IC Realtime HDVR-MX0402-1U5MP-AI2-WEB Product Manual - Page 46
Configuring Date and Time Settings
 |
View all IC Realtime HDVR-MX0402-1U5MP-AI2-WEB manuals
Add to My Manuals
Save this manual to your list of manuals |
Page 46 highlights
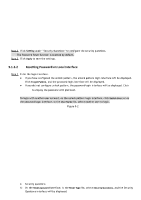
Logout Time Navigation Bar On the live view control bar, click the instant playback button to play back the recorded video within the configured time. In the Logout Time box, enter the standby time for the Device. The Device automatically logs out when it is not working for the configured time period. You need to log in to the Device again. The value ranges from 0 to 60. 0 indicates there is not standby time for the Device. Click Monitor Channel(s) when logout. Allows selecting the channels that you want to continue monitoring when an account is logged out. Enable the navigation bar. The navigation bar will be displayed when you click on the live view screen. Mouse Speed Pointer Adjust the speed of double-click by moving the slider. The greater the value, the faster the double-clicking speed. 5.1.4.3 Configuring Date and Time Settings This section allows for configuring the system time, choosing the time zone, setting the daylight saving time, and enabling the NTP (Network Time Protocol) server. You can also configure date and time settings by selecting Main Menu> Advanced Settings > System Operation > General > Date &Time. Step 1 After configuring the general settings, click Next on the General interface. The Date &Time interface will be displayed. Figure 5-5 Step 2 Configure the settings for date and time parameters. Parameter Description
-
 1
1 -
2
-
3
-
4
-
5
-
6
-
7
-
8
-
9
-
10
-
11
-
12
-
13
-
14
-
15
-
16
-
17
-
18
-
19
-
20
-
21
-
22
-
23
-
24
-
25
-
26
-
27
-
28
-
29
-
30
-
31
-
32
-
33
-
34
-
35
-
36
-
37
-
38
-
39
-
40
-
 41
41 -
 42
42 -
 43
43 -
 44
44 -
 45
45 -
 46
46 -
 47
47 -
 48
48 -
 49
49 -
 50
50 -
 51
51 -
52
-
53
-
54
-
55
-
56
-
57
-
58
-
59
-
60
-
61
-
62
-
63
-
64
-
65
-
66
-
67
-
68
-
69
-
70
-
71
-
72
-
73
-
74
-
75
-
76
-
77
-
78
-
79
-
80
-
81
-
82
-
83
-
84
-
85
-
86
-
87
-
88
-
89
-
90
-
91
-
92
-
93
-
94
-
95
-
96
-
97
-
98
-
99
-
100
-
101
-
102
-
103
-
104
-
105
-
106
-
107
-
108
-
109
-
110
-
111
-
112
-
113
-
114
-
115
-
116
-
117
-
118
-
119
-
120
-
121
-
122
-
123
-
124
-
125
-
126
-
127
-
128
-
129
-
130
-
131
-
132
-
133
-
134
-
135
-
136
-
137
-
138
-
139
-
140
-
141
-
142
-
143
-
144
-
145
-
146
-
147
-
148
-
149
-
150
-
151
-
152
-
153
-
154
-
155
-
156
-
157
-
158
-
159
-
160
-
161
-
162
-
163
-
164
-
165
-
166
-
167
-
168
-
169
-
170
-
171
-
172
-
173
-
174
-
175
-
176
-
177
-
178
-
179
-
180
-
181
-
182
-
183
-
184
-
185
-
186
-
187
-
188
-
189
-
190
-
191
-
192
-
193
-
194
-
195
-
196
-
197
-
198
-
199
-
200
-
201
-
202
-
203
-
204
-
205
-
206
-
207
-
208
-
209
-
210
-
211
-
212
-
213
-
214
-
215
-
216
-
217
-
218
-
219
-
220
-
221
-
222
-
223
-
224
-
225
-
226
-
227
-
228
-
229
-
230
-
231
-
232
-
233
-
234
-
235
-
236
-
237
-
238
-
239
-
240
-
241
-
242
-
243
-
244
-
245
-
246
-
247
-
248
-
249
-
250
-
251
-
252
-
253
 |
 |
