Konica Minolta AccurioLabel 190 bizhub PRESS C71cf/AccurioLabel 190 Quick Guid - Page 26
Step 4: Adjust (Image Position and Image Quality), Image Position Adjustment
 |
View all Konica Minolta AccurioLabel 190 manuals
Add to My Manuals
Save this manual to your list of manuals |
Page 26 highlights
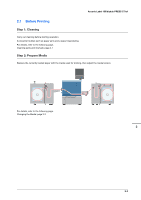
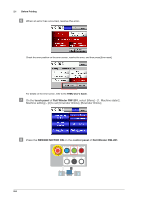
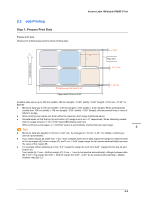
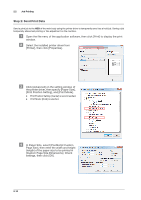
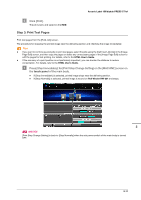
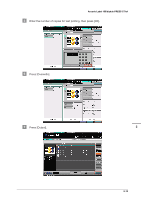
2.1 Before Printing Step 4: Adjust (Image Position and Image Quality) Adjust the image position and image quality before printing. )Image Position Adjustment You can change zoom ratio of images or shift images (forward or backward). At the time of printing, heat in the fusing section may cause the paper to slightly enlarge or shrink. How much the paper is affected depends on the type or thickness (weight) of the paper; therefore, after changing the media set, always perform the [Registration Adj.]. For details, refer to the HTML User's Guide. Tips - There are two ways for registration adjustment: One is using [Registration Adj.] on the [MACHINE] screen; the other is using [Paper Setting] - [Change Set] - [Change IndividualSet] on the [MACHINE] screen. - When the registration is adjusted in [Paper Setting] on the [MACHINE] screen. You can call the registered paper profile and easily make paper settings. )Image Quality Adjustment To reproduce stable colors with the machine, use pre-output image quality adjustment. In addition to regular calibration for the controller, use other image quality adjustments as necessary, such as when changing screens or papers or when hue is important. For details on the image quality adjustment flow (which timing, which image quality adjustment, in what order, etc.), refer to the HTML User's Guide. 2-8
-
 1
1 -
2
-
3
-
4
-
5
-
6
-
7
-
8
-
9
-
10
-
11
-
12
-
13
-
14
-
15
-
16
-
17
-
18
-
19
-
20
-
 21
21 -
 22
22 -
 23
23 -
 24
24 -
 25
25 -
 26
26 -
 27
27 -
 28
28 -
 29
29 -
 30
30 -
 31
31 -
32
-
33
-
34
-
35
-
36
-
37
-
38
-
39
-
40
-
41
-
42
-
43
-
44
-
45
-
46
-
47
-
48
-
49
-
50
-
51
-
52
-
53
-
54
-
55
-
56
-
57
-
58
-
59
-
60
-
61
-
62
-
63
-
64
-
65
-
66
-
67
-
68
-
69
-
70
-
71
-
72
-
73
-
74
-
75
-
76
-
77
-
78
-
79
-
80
-
81
-
82
-
83
-
84
-
85
-
86
-
87
-
88
-
89
-
90
-
91
-
92
-
93
-
94
-
95
-
96
-
97
-
98
-
99
-
100
-
101
-
102
-
103
-
104
-
105
-
106
-
107
-
108
-
109
-
110
-
111
-
112
-
113
-
114
-
115
-
116
-
117
-
118
-
119
-
120
-
121
-
122
-
123
-
124
-
125
-
126
-
127
-
128
-
129
-
130
-
131
-
132
-
133
-
134
-
135
-
136
-
137
-
138
-
139
-
140
-
141
-
142
-
143
 |
 |
