Lenovo ThinkStation P300 (English) User Guide - Small Form Factor - Page 135
Completing the parts replacement, yourcomputer., Pressthereleasetab
 |
View all Lenovo ThinkStation P300 manuals
Add to My Manuals
Save this manual to your list of manuals |
Page 135 highlights
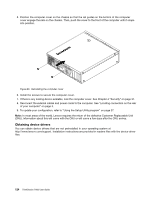
• To complete the installation or replacement, go to "Completing the parts replacement" on page 123. Completing the parts replacement After completing the installation or replacement for all parts, you need to reinstall the computer cover and reconnect cables. Depending on the parts you installed or replaced, you might need to confirm the updated information in the Setup Utility program. Refer to "Using the Setup Utility program" on page 37. To reinstall the computer cover and reconnect cables to your computer, do the following: 1. Ensure that all components have been reassembled correctly and that no tools or loose screws are left inside your computer. See "Locating components" on page 5 for the locations of various components in your computer. 2. If you have removed the front bezel, reinstall it. 3. Ensure that the cables are routed correctly before reinstalling the computer cover. Keep cables off the hinges and sides of the computer chassis to avoid interference with reinstalling the computer cover. 4. Press the release tab 1 as shown and pivot the drive bay assembly downward until it snaps into position. Figure 85. Pivoting the drive bay assembly downward Chapter 9. Installing or replacing hardware 123
-
 1
1 -
2
-
3
-
4
-
5
-
6
-
7
-
8
-
9
-
10
-
11
-
12
-
13
-
14
-
15
-
16
-
17
-
18
-
19
-
20
-
21
-
22
-
23
-
24
-
25
-
26
-
27
-
28
-
29
-
30
-
31
-
32
-
33
-
34
-
35
-
36
-
37
-
38
-
39
-
40
-
41
-
42
-
43
-
44
-
45
-
46
-
47
-
48
-
49
-
50
-
51
-
52
-
53
-
54
-
55
-
56
-
57
-
58
-
59
-
60
-
61
-
62
-
63
-
64
-
65
-
66
-
67
-
68
-
69
-
70
-
71
-
72
-
73
-
74
-
75
-
76
-
77
-
78
-
79
-
80
-
81
-
82
-
83
-
84
-
85
-
86
-
87
-
88
-
89
-
90
-
91
-
92
-
93
-
94
-
95
-
96
-
97
-
98
-
99
-
100
-
101
-
102
-
103
-
104
-
105
-
106
-
107
-
108
-
109
-
110
-
111
-
112
-
113
-
114
-
115
-
116
-
117
-
118
-
119
-
120
-
121
-
122
-
123
-
124
-
125
-
126
-
127
-
128
-
129
-
 130
130 -
 131
131 -
 132
132 -
 133
133 -
 134
134 -
 135
135 -
 136
136 -
 137
137 -
 138
138 -
 139
139 -
 140
140 -
141
-
142
-
143
-
144
-
145
-
146
-
147
-
148
-
149
-
150
-
151
-
152
-
153
-
154
-
155
-
156
-
157
-
158
-
159
-
160
-
161
-
162
 |
 |
