Netgear 771S User Guide - Page 12
Setting Up Your Device, Device Setup, Starting Your Device for the First Time
 |
View all Netgear 771S manuals
Add to My Manuals
Save this manual to your list of manuals |
Page 12 highlights
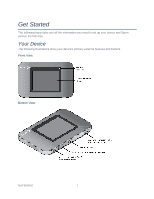
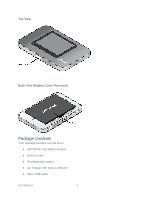
Setting Up Your Device The following topics describe how to set up and start using your device. Device Setup This section describes how to set up your device. 1. Install the battery (see Installing the Battery for details). 2. The battery is shipped partially charged. If you want to fully charge the battery at this time, connect your device to the AC charger (see Charging the Battery for details). 3. Plug the AC charger into an electrical outlet. Important: Charge your device until the battery icon is full ( ). Starting Your Device for the First Time The NETGEAR Zing Mobile Hotspot is designed to activate automatically the first time that it is turned on, using 'hands-free activation'. Typically, the activation process will be seamless, not requiring any action on your part; you might not even see any activation-related messages displayed on your device's LCD. If your account did not activate for some reason, an alert will appear on the home screen and on the Zing Manager home page with an option to try the activation again. You must activate your account before you can use Sprint data services. After going through the activation process, you will have the option of running a quick tutorial to learn the LCD's features. Power On and Activate Your Account 1. Turn on the hotspot (press and hold the Power button for 2 seconds). 2. When the Welcome message appears, tap Continue. 3. Read the End User License Agreement and, when you are ready, tap I Agree to accept the terms of the agreement. • If the account is still activating, a Hands Free Activation message will display the current status. Wait for the process to finish (recommended) or tap Cancel. If you cancel the activation, follow the instructions that appear to finish the activation process. • If the activation succeeds, the Activation Complete message will appear, showing your device's Wi-Fi name and Wi-Fi password. 4. If you want to change the Wi-Fi name and/or password immediately: Get Started 4
-
 1
1 -
2
-
3
-
4
-
5
-
6
-
 7
7 -
 8
8 -
 9
9 -
 10
10 -
 11
11 -
 12
12 -
 13
13 -
 14
14 -
 15
15 -
 16
16 -
 17
17 -
18
-
19
-
20
-
21
-
22
-
23
-
24
-
25
-
26
-
27
-
28
-
29
-
30
-
31
-
32
-
33
-
34
-
35
-
36
-
37
-
38
-
39
-
40
-
41
-
42
-
43
-
44
-
45
-
46
-
47
-
48
-
49
-
50
-
51
-
52
-
53
-
54
-
55
-
56
-
57
-
58
-
59
-
60
-
61
-
62
-
63
-
64
-
65
-
66
-
67
-
68
-
69
-
70
-
71
-
72
-
73
-
74
-
75
-
76
-
77
-
78
-
79
-
80
-
81
-
82
-
83
-
84
-
85
-
86
-
87
-
88
-
89
-
90
-
91
-
92
-
93
-
94
-
95
-
96
-
97
-
98
-
99
-
100
-
101
-
102
-
103
-
104
-
105
-
106
-
107
-
108
-
109
-
110
-
111
-
112
-
113
-
114
-
115
-
116
-
117
-
118
-
119
-
120
-
121
-
122
-
123
-
124
-
125
-
126
-
127
-
128
-
129
-
130
-
131
-
132
-
133
-
134
-
135
-
136
-
137
-
138
-
139
-
140
-
141
-
142
-
143
-
144
-
145
-
146
-
147
-
148
-
149
-
150
-
151
-
152
-
153
-
154
-
155
-
156
-
157
-
158
-
159
-
160
-
161
-
162
-
163
-
164
-
165
-
166
-
167
-
168
-
169
-
170
-
171
-
172
-
173
-
174
-
175
-
176
-
177
-
178
-
179
-
180
-
181
-
182
-
183
-
184
-
185
-
186
-
187
-
188
-
189
-
190
-
191
-
192
-
193
-
194
-
195
-
196
-
197
-
198
-
199
-
200
-
201
-
202
-
203
-
204
-
205
 |
 |
