Netgear STM300 STM 150-300-600 Reference Manual (PDF) - Page 34
Table 5., Setup Wizard Step 2: Network Settings
 |
UPC - 606449062458
View all Netgear STM300 manuals
Add to My Manuals
Save this manual to your list of manuals |
Page 34 highlights
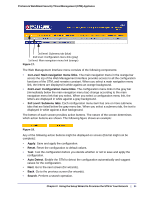
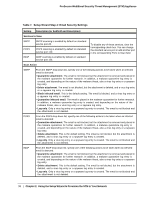
ProSecure Web/Email Security Threat Management (STM) Appliance Table 5. Setup Wizard Step 2: Network Settings Setting Description (or Subfield and Description) Management Interface Settings System Name The name for the STM for purposes of identification and management. The default name is the name of your model (STM150, STM300, or STM600). IP Address Enter the IP address of the STM through which you will access the Web Management Interface. The factory default IP address is 192.168.1.201. Subnet Mask Note: If you change the IP address of the STM while being connected through the browser, you will be disconnected. You then need to open a new connection to the new IP address and log in again. For example, if you change the default IP address from 192.168.1.201 to 10.0.0.1, you need to enter https://10.0.0.1 in your browser to reconnect to the Web Management Interface. Enter the IP subnet mask. The subnet mask specifies the network number portion of an IP address. Unless you are implementing subnetting, use 255.255.255.0 as the subnet mask. Gateway Address Primary DNS Enter the IP address of the gateway through which the STM is accessed. Specify the IP address for the primary DNS server. Secondary DNS MTU Settings As an option, specify the IP address for the secondary DNS server. Maximum Transmission Unit The maximum transmission unit (MTU) is the largest physical packet size that a network can transmit. Packets that are larger than the MTU value are divided into smaller packets before they are sent, an action that prolongs the transmission process. For most Ethernet networks the MTU value is 1500 bytes, which is the default setting. Note: NETGEAR recommends synchronizing the STM's MTU setting with that of your network to prevent delays in transmission. 34 | Chapter 2. Using the Setup Wizard to Provision the STM in Your Network
-
 1
1 -
2
-
3
-
4
-
5
-
6
-
7
-
8
-
9
-
10
-
11
-
12
-
13
-
14
-
15
-
16
-
17
-
18
-
19
-
20
-
21
-
22
-
23
-
24
-
25
-
26
-
27
-
28
-
 29
29 -
 30
30 -
 31
31 -
 32
32 -
 33
33 -
 34
34 -
 35
35 -
 36
36 -
 37
37 -
 38
38 -
 39
39 -
40
-
41
-
42
-
43
-
44
-
45
-
46
-
47
-
48
-
49
-
50
-
51
-
52
-
53
-
54
-
55
-
56
-
57
-
58
-
59
-
60
-
61
-
62
-
63
-
64
-
65
-
66
-
67
-
68
-
69
-
70
-
71
-
72
-
73
-
74
-
75
-
76
-
77
-
78
-
79
-
80
-
81
-
82
-
83
-
84
-
85
-
86
-
87
-
88
-
89
-
90
-
91
-
92
-
93
-
94
-
95
-
96
-
97
-
98
-
99
-
100
-
101
-
102
-
103
-
104
-
105
-
106
-
107
-
108
-
109
-
110
-
111
-
112
-
113
-
114
-
115
-
116
-
117
-
118
-
119
-
120
-
121
-
122
-
123
-
124
-
125
-
126
-
127
-
128
-
129
-
130
-
131
-
132
-
133
-
134
-
135
-
136
-
137
-
138
-
139
-
140
-
141
-
142
-
143
-
144
-
145
-
146
-
147
-
148
-
149
-
150
-
151
-
152
-
153
-
154
-
155
-
156
-
157
-
158
-
159
-
160
-
161
-
162
-
163
-
164
-
165
-
166
-
167
-
168
-
169
-
170
-
171
-
172
-
173
-
174
-
175
-
176
-
177
-
178
-
179
-
180
-
181
-
182
-
183
-
184
-
185
-
186
-
187
-
188
-
189
-
190
-
191
-
192
-
193
-
194
-
195
-
196
-
197
-
198
-
199
-
200
-
201
-
202
-
203
-
204
-
205
-
206
-
207
-
208
-
209
-
210
-
211
-
212
-
213
-
214
-
215
-
216
-
217
-
218
-
219
-
220
-
221
-
222
-
223
-
224
-
225
-
226
-
227
-
228
-
229
-
230
-
231
-
232
-
233
-
234
-
235
-
236
-
237
-
238
-
239
-
240
-
241
-
242
-
243
-
244
-
245
-
246
-
247
-
248
-
249
-
250
-
251
-
252
-
253
-
254
-
255
-
256
-
257
-
258
-
259
-
260
-
261
 |
 |
