Netgear WAC124 User Manual For Firmware version less than 1.0.4.2 - Page 41
Use Static IP Address, Use These DNS Servers
 |
View all Netgear WAC124 manuals
Add to My Manuals
Save this manual to your list of manuals |
Page 41 highlights
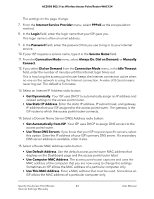
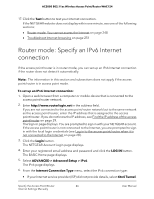
AC2000 802.11ac Wireless Access Point/Router WAC124 3. Click the Login button. The NETGEAR Account Login page displays. 4. Enter your registered email address and password and click the LOG IN button. The BASIC Home page displays. 5. Select BASIC > Internet. The Internet Setup page displays. 6. Select the No radio button. This is the default setting. 7. If your Internet connection requires an account name (sometimes referred to as a host name), enter it in the Account Name field. The account name is the same as the device name, which, by default, is WAC124. 8. If your Internet connection requires a domain name, enter it in the Domain Name field. For the other sections on this page, the default settings usually work, but you can change them. 9. Select an Internet IP Address radio button: • Get Dynamically. Your ISP uses DHCP to automatically assign an IP address and related settings to the access point/router. • Use Static IP Address. Enter the static IP address, IP subnet mask, and gateway IP address that your ISP assigned to the access point/router. The gateway is the ISP router to which the access point/router connects. 10. Select a Domain Name Server (DNS) Address radio button: • Get Automatically from ISP. Your ISP uses DHCP to assign DNS servers to the access point/router. • Use These DNS Servers. If you know that your ISP requires specific servers, select this option. Enter the IP address of your ISP's primary DNS server. If a secondary DNS server address is available, enter it also. 11. Select a Router MAC Address radio button: • Use Default Address. Use the default access point/router MAC address that displays on the Dashboard page and the access point/router label. • Use Computer MAC Address. The access point/router captures and uses the MAC address of the computer that you are now using to change the settings. Sometimes an ISP allows the MAC address of a particular computer only. Specify the Access Point/Router 41 Internet Settings Manually User Manual
-
 1
1 -
2
-
3
-
4
-
5
-
6
-
7
-
8
-
9
-
10
-
11
-
12
-
13
-
14
-
15
-
16
-
17
-
18
-
19
-
20
-
21
-
22
-
23
-
24
-
25
-
26
-
27
-
28
-
29
-
30
-
31
-
32
-
33
-
34
-
35
-
 36
36 -
 37
37 -
 38
38 -
 39
39 -
 40
40 -
 41
41 -
 42
42 -
 43
43 -
 44
44 -
 45
45 -
 46
46 -
47
-
48
-
49
-
50
-
51
-
52
-
53
-
54
-
55
-
56
-
57
-
58
-
59
-
60
-
61
-
62
-
63
-
64
-
65
-
66
-
67
-
68
-
69
-
70
-
71
-
72
-
73
-
74
-
75
-
76
-
77
-
78
-
79
-
80
-
81
-
82
-
83
-
84
-
85
-
86
-
87
-
88
-
89
-
90
-
91
-
92
-
93
-
94
-
95
-
96
-
97
-
98
-
99
-
100
-
101
-
102
-
103
-
104
-
105
-
106
-
107
-
108
-
109
-
110
-
111
-
112
-
113
-
114
-
115
-
116
-
117
-
118
-
119
-
120
-
121
-
122
-
123
-
124
-
125
-
126
-
127
-
128
-
129
-
130
-
131
-
132
-
133
-
134
-
135
-
136
-
137
-
138
-
139
-
140
-
141
-
142
-
143
-
144
-
145
-
146
-
147
-
148
-
149
-
150
-
151
-
152
-
153
-
154
-
155
-
156
-
157
-
158
-
159
-
160
-
161
-
162
-
163
-
164
-
165
-
166
-
167
-
168
-
169
-
170
-
171
-
172
-
173
-
174
-
175
-
176
-
177
-
178
-
179
-
180
-
181
-
182
-
183
-
184
-
185
-
186
-
187
-
188
-
189
-
190
-
191
-
192
-
193
-
194
-
195
-
196
-
197
-
198
-
199
-
200
-
201
-
202
-
203
-
204
-
205
-
206
-
207
-
208
-
209
-
210
-
211
-
212
-
213
-
214
-
215
-
216
-
217
-
218
-
219
-
220
-
221
-
222
-
223
-
224
-
225
-
226
-
227
-
228
-
229
-
230
-
231
-
232
-
233
-
234
-
235
-
236
-
237
-
238
-
239
-
240
-
241
-
242
-
243
-
244
-
245
-
246
-
247
-
248
-
249
-
250
-
251
-
252
-
253
-
254
-
255
-
256
-
257
-
258
-
259
-
260
-
261
-
262
-
263
 |
 |
