Netgear WAC124 User Manual For Firmware version less than 1.0.4.2 - Page 48
ADVANCED > Advanced Setup > IPv6, Router's IPv6 Address on LAN
 |
View all Netgear WAC124 manuals
Add to My Manuals
Save this manual to your list of manuals |
Page 48 highlights
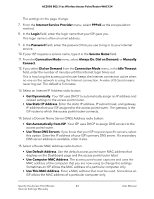
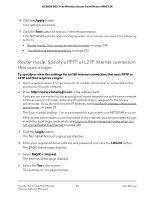
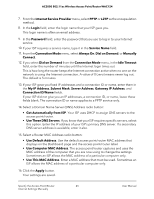
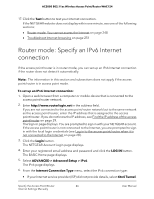
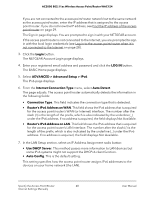
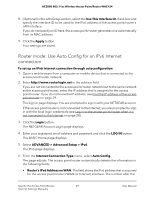
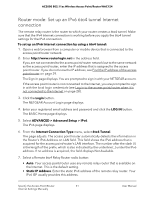
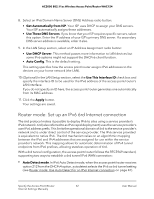
AC2000 802.11ac Wireless Access Point/Router WAC124 If you are not connected to the access point/router network but to the same network as the access point/router, enter the IP address that is assigned to the access point/router. If you do not know the IP address, see Find the IP address of the access point/router on page 29. The Sign-In page displays. You are prompted to sign in with your NETGEAR account. If the access point/router is not connected to the Internet, you are prompted to sign in with the local login credentials (see Log in to the access point/router when it is not connected to the Internet on page 28). 3. Click the Login button. The NETGEAR Account Login page displays. 4. Enter your registered email address and password and click the LOG IN button. The BASIC Home page displays. 5. Select ADVANCED > Advanced Setup > IPv6. The IPv6 page displays. 6. From the Internet Connection Type menu, select Auto Detect. The page adjusts. The access point/router automatically detects the information in the following fields: • Connection Type. This field indicates the connection type that is detected. • Router's IPv6 Address on WAN. This field shows the IPv6 address that is acquired for the access point/router's WAN (or Internet) interface. The number after the slash (/) is the length of the prefix, which is also indicated by the underline (_) under the IPv6 address. If no address is acquired, the field displays Not Available. • Router's IPv6 Address on LAN. This field shows the IPv6 address that is acquired for the access point/router's LAN interface. The number after the slash (/) is the length of the prefix, which is also indicated by the underline (_) under the IPv6 address. If no address is acquired, the field displays Not Available. 7. In the LAN Setup section, select an IP Address Assignment radio button: • Use DHCP Server. This method passes more information to LAN devices but some IPv6 systems might not support the DHCPv6 client function. • Auto Config. This is the default setting. This setting specifies how the access point/router assigns IPv6 addresses to the devices on your home network (the LAN). Specify the Access Point/Router 48 Internet Settings Manually User Manual
-
 1
1 -
2
-
3
-
4
-
5
-
6
-
7
-
8
-
9
-
10
-
11
-
12
-
13
-
14
-
15
-
16
-
17
-
18
-
19
-
20
-
21
-
22
-
23
-
24
-
25
-
26
-
27
-
28
-
29
-
30
-
31
-
32
-
33
-
34
-
35
-
36
-
37
-
38
-
39
-
40
-
41
-
42
-
 43
43 -
 44
44 -
 45
45 -
 46
46 -
 47
47 -
 48
48 -
 49
49 -
 50
50 -
 51
51 -
 52
52 -
 53
53 -
54
-
55
-
56
-
57
-
58
-
59
-
60
-
61
-
62
-
63
-
64
-
65
-
66
-
67
-
68
-
69
-
70
-
71
-
72
-
73
-
74
-
75
-
76
-
77
-
78
-
79
-
80
-
81
-
82
-
83
-
84
-
85
-
86
-
87
-
88
-
89
-
90
-
91
-
92
-
93
-
94
-
95
-
96
-
97
-
98
-
99
-
100
-
101
-
102
-
103
-
104
-
105
-
106
-
107
-
108
-
109
-
110
-
111
-
112
-
113
-
114
-
115
-
116
-
117
-
118
-
119
-
120
-
121
-
122
-
123
-
124
-
125
-
126
-
127
-
128
-
129
-
130
-
131
-
132
-
133
-
134
-
135
-
136
-
137
-
138
-
139
-
140
-
141
-
142
-
143
-
144
-
145
-
146
-
147
-
148
-
149
-
150
-
151
-
152
-
153
-
154
-
155
-
156
-
157
-
158
-
159
-
160
-
161
-
162
-
163
-
164
-
165
-
166
-
167
-
168
-
169
-
170
-
171
-
172
-
173
-
174
-
175
-
176
-
177
-
178
-
179
-
180
-
181
-
182
-
183
-
184
-
185
-
186
-
187
-
188
-
189
-
190
-
191
-
192
-
193
-
194
-
195
-
196
-
197
-
198
-
199
-
200
-
201
-
202
-
203
-
204
-
205
-
206
-
207
-
208
-
209
-
210
-
211
-
212
-
213
-
214
-
215
-
216
-
217
-
218
-
219
-
220
-
221
-
222
-
223
-
224
-
225
-
226
-
227
-
228
-
229
-
230
-
231
-
232
-
233
-
234
-
235
-
236
-
237
-
238
-
239
-
240
-
241
-
242
-
243
-
244
-
245
-
246
-
247
-
248
-
249
-
250
-
251
-
252
-
253
-
254
-
255
-
256
-
257
-
258
-
259
-
260
-
261
-
262
-
263
 |
 |