Nikon COOLPIX P510 User Manual - Page 189
Source, Start Transfer, panel and click - windows 8 1
 |
View all Nikon COOLPIX P510 manuals
Add to My Manuals
Save this manual to your list of manuals |
Page 189 highlights
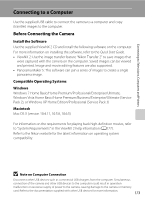
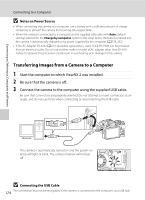
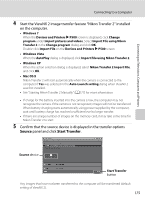
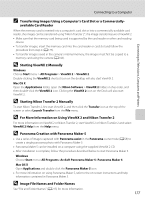
Connecting to Televisions, Computers and Printers Connecting to a Computer 4 Start the ViewNX 2 image transfer feature "Nikon Transfer 2" installed on the computer. • Windows 7 When the Devices and Printers K P500 screen is displayed, click Change program under Import pictures and videos. Select Import File using Nikon Transfer 2 in the Change program dialog and click OK. Double-click Import File on the Devices and Printers K P500 screen. • Windows Vista When the AutoPlay dialog is displayed, click Import File using Nikon Transfer 2. • Windows XP When the action selection dialog is displayed, select Nikon Transfer 2 Import File, and click OK. • Mac OS X Nikon Transfer 2 will start automatically when the camera is connected to the computer if Yes was selected in the Auto-Launch setting dialog when ViewNX 2 was first installed. • See "Starting Nikon Transfer 2 Manually" (A177) for more information. • If charge for the battery inserted into the camera is low, the computer may not recognize the camera. If the camera is not recognized, images will not be transferred. When battery charging starts automatically using power supplied by the computer, wait until battery charge has reached a sufficient level to begin transfer. • If there are a large number of images on the memory card, it may take some time for Nikon Transfer 2 to start. 5 Confirm that the source device is displayed in the transfer options Source panel and click Start Transfer. Source device Start Transfer button Any images that have not been transferred to the computer will be transferred (default setting of ViewNX 2). 175
-
 1
1 -
2
-
3
-
4
-
5
-
6
-
7
-
8
-
9
-
10
-
11
-
12
-
13
-
14
-
15
-
16
-
17
-
18
-
19
-
20
-
21
-
22
-
23
-
24
-
25
-
26
-
27
-
28
-
29
-
30
-
31
-
32
-
33
-
34
-
35
-
36
-
37
-
38
-
39
-
40
-
41
-
42
-
43
-
44
-
45
-
46
-
47
-
48
-
49
-
50
-
51
-
52
-
53
-
54
-
55
-
56
-
57
-
58
-
59
-
60
-
61
-
62
-
63
-
64
-
65
-
66
-
67
-
68
-
69
-
70
-
71
-
72
-
73
-
74
-
75
-
76
-
77
-
78
-
79
-
80
-
81
-
82
-
83
-
84
-
85
-
86
-
87
-
88
-
89
-
90
-
91
-
92
-
93
-
94
-
95
-
96
-
97
-
98
-
99
-
100
-
101
-
102
-
103
-
104
-
105
-
106
-
107
-
108
-
109
-
110
-
111
-
112
-
113
-
114
-
115
-
116
-
117
-
118
-
119
-
120
-
121
-
122
-
123
-
124
-
125
-
126
-
127
-
128
-
129
-
130
-
131
-
132
-
133
-
134
-
135
-
136
-
137
-
138
-
139
-
140
-
141
-
142
-
143
-
144
-
145
-
146
-
147
-
148
-
149
-
150
-
151
-
152
-
153
-
154
-
155
-
156
-
157
-
158
-
159
-
160
-
161
-
162
-
163
-
164
-
165
-
166
-
167
-
168
-
169
-
170
-
171
-
172
-
173
-
174
-
175
-
176
-
177
-
178
-
179
-
180
-
181
-
182
-
183
-
 184
184 -
 185
185 -
 186
186 -
 187
187 -
 188
188 -
 189
189 -
 190
190 -
 191
191 -
 192
192 -
 193
193 -
 194
194 -
195
-
196
-
197
-
198
-
199
-
200
-
201
-
202
-
203
-
204
-
205
-
206
-
207
-
208
-
209
-
210
-
211
-
212
-
213
-
214
-
215
-
216
-
217
-
218
-
219
-
220
-
221
-
222
-
223
-
224
-
225
-
226
-
227
-
228
-
229
-
230
-
231
-
232
-
233
-
234
-
235
-
236
-
237
-
238
-
239
-
240
-
241
-
242
-
243
-
244
-
245
-
246
-
247
-
248
-
249
-
250
-
251
-
252
 |
 |