Oki X400 X400 Programming Command Manual - Page 6
Printing with the RS232 Port, THE PRINT AREA
 |
View all Oki X400 manuals
Add to My Manuals
Save this manual to your list of manuals |
Page 6 highlights
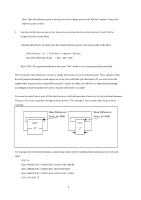
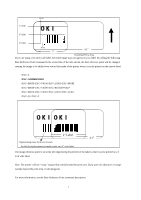
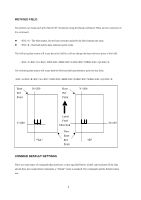
Printing with the RS232 Port 5 REM RS232 Example 10 E$=CHR$(27) 20 OPEN "COM1:9600,N,8,1,CS,DS" AS #1 30 PRINT #1,E$;"A"; 40 PRINT #1,E$;"H400";E$;"V100";E$;"WL1OKI"; 50 PRINT #1,E$;"Q1"; 60 PRINT #1,E$;"Z"; Identifies the program as a RS232 port print label. The "REM" prevents this data from being sent to the printer and displays it only on the screen. Sets the "E$" string as an character Opens the COM1 port for output and sets the parameters as 9600 baud, No parity, 8 Data bits, 1 Stop bit and instructs the port to ignore the CTS and DSR control signals. Sends an "A" command code to print port #1 opened by statement 20 above. Sends the data "OKI" to be placed 400 dots horizontally and 100 dots vertically on the label and printed in the "WL" font. Instructs the printer to print one label. Tells the printer that the last command has been sent. The printer can now create and print the job. THE PRINT AREA The maximum print area is 50 inches long. Most of your label application will fit into this area, therefore, it is important to understand how to work with label that do not use the entire print area. The goal is to help you avoid printing where no label exists, which may lead to print head damage, not to mention the frustration when you cannot see the printed output. The diagram below illustrates the print area for a sample 2 inch wide by 3 inch long label places within this area. As can be seen, your label will be oriented against the inside left edge of the printer as viewed from the front (label exit) of the printer. The normal reference point is located at the H1,V1 position of the print area in the normal print orientation (no rotation). 4
-
 1
1 -
 2
2 -
 3
3 -
 4
4 -
 5
5 -
 6
6 -
 7
7 -
 8
8 -
 9
9 -
 10
10 -
 11
11 -
 12
12 -
13
-
14
-
15
-
16
-
17
-
18
-
19
-
20
-
21
-
22
-
23
-
24
-
25
-
26
-
27
-
28
-
29
-
30
-
31
-
32
-
33
-
34
-
35
-
36
-
37
-
38
-
39
-
40
-
41
-
42
-
43
-
44
-
45
-
46
-
47
-
48
-
49
-
50
-
51
-
52
-
53
-
54
-
55
-
56
-
57
-
58
-
59
-
60
-
61
-
62
-
63
-
64
-
65
-
66
-
67
-
68
-
69
-
70
-
71
-
72
-
73
-
74
-
75
-
76
-
77
-
78
-
79
-
80
-
81
-
82
-
83
-
84
-
85
-
86
-
87
-
88
-
89
-
90
-
91
-
92
-
93
-
94
-
95
-
96
-
97
-
98
-
99
-
100
-
101
-
102
-
103
-
104
-
105
-
106
-
107
-
108
-
109
-
110
-
111
-
112
-
113
-
114
-
115
-
116
-
117
-
118
-
119
-
120
-
121
-
122
-
123
-
124
-
125
-
126
-
127
-
128
-
129
-
130
-
131
-
132
-
133
-
134
-
135
-
136
-
137
 |
 |
