Oki X400 X400 Programming Command Manual - Page 8
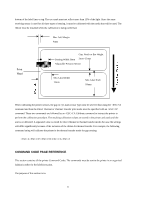
Base Reference, Point, H=0001
 |
View all Oki X400 manuals
Add to My Manuals
Save this manual to your list of manuals |
Page 8 highlights
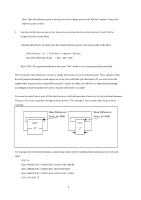
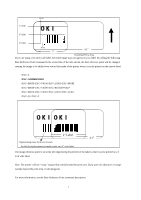
Note: After the reference point is moved, you can no longer print on the 426 dot "margin" unless the reference point is reset. 2. Use the normal reference point from the print area and use the horizontal position for each field to properly locate it on the label. Calculate the distance (in dots) from the normal reference point to the closest edge of the label. Shift Distance = 2.1" x 25.4 mm/in x 8 dpmm = 426 dots New Base Reference Point = 832 - 426 = 406 Each H command would have the value "406" added to it to correctly position each field. The Command Code Subsection contains a sample label output for each command code. These samples reflect how the printed information would appear on a five inch wide label (see illustration). If you want to test the sample label outputs and are using labels less than 5 inches in width, you will have to adjust the positioning accordingly so that the printer does not try to print where there is no label. You must be careful not to print off the label surface as the label provides a heat sink for the print head elements. Doing so will cause irreparable damage to the print head. This damage is not covered under the print head warranty. Base Reference Point, H=0001 Base Reference Point, H=0001 Label 4" Label 2" For example, the following illustrates a sample data stream and the resulting label assuming a four inch wide label: A H0050V0100L0303MOKI H0050V0200B103100*OKI* H0070V0310L0101UOKI Q1Z 6
-
 1
1 -
2
-
 3
3 -
 4
4 -
 5
5 -
 6
6 -
 7
7 -
 8
8 -
 9
9 -
 10
10 -
 11
11 -
 12
12 -
 13
13 -
14
-
15
-
16
-
17
-
18
-
19
-
20
-
21
-
22
-
23
-
24
-
25
-
26
-
27
-
28
-
29
-
30
-
31
-
32
-
33
-
34
-
35
-
36
-
37
-
38
-
39
-
40
-
41
-
42
-
43
-
44
-
45
-
46
-
47
-
48
-
49
-
50
-
51
-
52
-
53
-
54
-
55
-
56
-
57
-
58
-
59
-
60
-
61
-
62
-
63
-
64
-
65
-
66
-
67
-
68
-
69
-
70
-
71
-
72
-
73
-
74
-
75
-
76
-
77
-
78
-
79
-
80
-
81
-
82
-
83
-
84
-
85
-
86
-
87
-
88
-
89
-
90
-
91
-
92
-
93
-
94
-
95
-
96
-
97
-
98
-
99
-
100
-
101
-
102
-
103
-
104
-
105
-
106
-
107
-
108
-
109
-
110
-
111
-
112
-
113
-
114
-
115
-
116
-
117
-
118
-
119
-
120
-
121
-
122
-
123
-
124
-
125
-
126
-
127
-
128
-
129
-
130
-
131
-
132
-
133
-
134
-
135
-
136
-
137
 |
 |
