Panasonic KX-MB1500 Operating Instructions - Page 19
Date and time KX-MB1520, 6 Your logo KX-MB1520 only
 |
View all Panasonic KX-MB1500 manuals
Add to My Manuals
Save this manual to your list of manuals |
Page 19 highlights
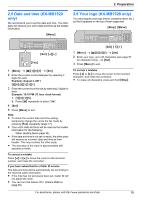
2. Preparation 2.5 Date and time (KX-MB1520 only) We recommend you to set the date and time. The other party will receive your unit's date and time as the header information. MMenuN 2.6 Your logo (KX-MB1520 only) You can program your logo (name, company name, etc.) so that it appears on the top of each page sent. MStopN MMenuN MSetN MFNMEN MFaxN 1 MMenuN A MBNM1NM0NM1N A MSetN 2 Enter the current month/date/year by selecting 2 digits for each. Example: August 3, 2011 M0NM8N M0NM3N M1NM1N 3 Enter the current hour/minute by selecting 2 digits for each. Example: 10:15 PM (12 hour clock format) 1. M1NM0N M1NM5N 2. Press MGN repeatedly to select "PM". 4 MSetN 5 Press MMenuN to exit. Note: R To check the current date and time setting, temporarily change the unit to the fax mode by pressing MFaxN repeatedly (page 17). R Your unit's date and time will be used as the header information for the following: - When sending faxes (page 34). R If the date and time is not set correctly, the other party will receive an incorrect date and time as their header. This may confuse the other party. R The accuracy of the clock is approximately ±60 seconds a month. To correct a mistake Press MFN or MEN to move the cursor to the incorrect number, and make the correction. If you have subscribed to a Caller ID service The date and time will be automatically set according to the received caller information. R If the time has not previously been set, Caller ID will not adjust the clock. R You can turn this feature OFF (feature #226 on page 48). MSetN MFNMEN 1 MMenuN A MBNM1NM0NM2N A MSetN 2 Enter your logo, up to 30 characters (see page 57 for character entry). A MSetN 3 Press MMenuN to exit. To correct a mistake Press MFN or MEN to move the cursor to the incorrect character, and make the correction. R To erase all characters, press and hold MStopN. For assistance, please visit http://www.panasonic.com/help 19
-
 1
1 -
2
-
3
-
4
-
5
-
6
-
7
-
8
-
9
-
10
-
11
-
12
-
13
-
 14
14 -
 15
15 -
 16
16 -
 17
17 -
 18
18 -
 19
19 -
 20
20 -
 21
21 -
 22
22 -
 23
23 -
 24
24 -
25
-
26
-
27
-
28
-
29
-
30
-
31
-
32
-
33
-
34
-
35
-
36
-
37
-
38
-
39
-
40
-
41
-
42
-
43
-
44
-
45
-
46
-
47
-
48
-
49
-
50
-
51
-
52
-
53
-
54
-
55
-
56
-
57
-
58
-
59
-
60
-
61
-
62
-
63
-
64
-
65
-
66
-
67
-
68
-
69
-
70
-
71
-
72
-
73
-
74
-
75
-
76
-
77
-
78
-
79
-
80
 |
 |
