Panasonic KX-MB1500 Operating Instructions - Page 27
Scanning from a computer, Pull Scan - driver for windows 8
 |
View all Panasonic KX-MB1500 manuals
Add to My Manuals
Save this manual to your list of manuals |
Page 27 highlights
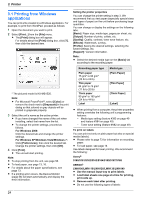
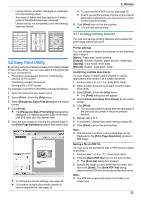
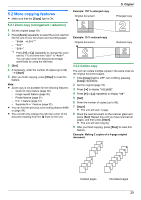
4. Scanner 4.2 Scanning from a computer (Pull Scan) 4.2.1 Using Multi-Function scan application By clicking an application icon, the selected application starts automatically after scanning. 1 Set the original (page 18). 2 Start Multi-Function Station. A [Scan] 3 Click the desired application icon. R When you click [Custom], the pre-programmed application starts. R To cancel scanning while the documents are being scanned, click [Cancel]. Note: R You can change the scanning settings beforehand for each application (page 23). R When you point to an application icon, the scanning settings for that application are displayed as a tooltip. R The scanned image will be automatically saved in the folder selected in the [Settings] window (page 23). 4.2.2 Using Multi-Function Viewer 1 Set the original (page 18). 2 Start Multi-Function Station. 3 [Utilities] A [Viewer] R [Multi-Function Viewer] will appear. 4 Click the [Scan] icon in the [Multi-Function Viewer] window. R The unit's name dialog box will appear. 5 If necessary, change the scanning settings on your computer. R To preview the scanned image, click [Preview]. You can drag the frame to specify the scanning area. If you change the scan settings, click [Preview] to refresh the scanned image. 6 [Scan] R The scanned image will be displayed in the [Multi-Function Viewer] window after scanning. R To save the scanned image, select [Save As ...] from the [File] menu. R To cancel scanning while the documents are being scanned, click [Cancel]. Note: R You can display images in applications that support TIFF, JPEG, PCX, DCX and BMP formats. R You can save images in TIFF, JPEG, PCX, DCX, BMP or PDF formats. R If the [Select...] button is displayed in [Target Device], click [Select...] to select the unit from the list, and then click [OK]. The [Select...] button will not be displayed when there is only one printer driver installed. R You can move, copy and delete a file or page. 4.2.3 Using other applications Multi-Function Station includes a TWAIN and WIA compliant scanner driver. You can also scan using other applications that support TWAIN or WIA scanning. For scanning example, proceed as follows: 1 Set the original (page 18). 2 Start an application that supports TWAIN or WIA scanning. 3 For TWAIN scanning: Select [Acquire Image...] from the [File] menu. For WIA scanning: Select [From Scanner or Camera...] from the [File] menu. R The unit's name dialog box will appear. 4 If necessary, change the scanning settings on your computer. A [Scan] R The scanned image will be displayed in the application window after scanning. R To cancel scanning while the documents are being scanned, click [Cancel]. Note: R Scanning from WIA compliant applications is only available for Windows XP, Windows Vista and Windows 7. R Depending on the application used, the appearance may differ slightly. R If the [Select...] button is displayed in [Target Device] when performing TWAIN scanning, click [Select...] to select the unit from the list, and then click [OK]. The [Select...] button will not be displayed when there is only one printer driver installed. 27
-
 1
1 -
2
-
3
-
4
-
5
-
6
-
7
-
8
-
9
-
10
-
11
-
12
-
13
-
14
-
15
-
16
-
17
-
18
-
19
-
20
-
21
-
 22
22 -
 23
23 -
 24
24 -
 25
25 -
 26
26 -
 27
27 -
 28
28 -
 29
29 -
 30
30 -
 31
31 -
 32
32 -
33
-
34
-
35
-
36
-
37
-
38
-
39
-
40
-
41
-
42
-
43
-
44
-
45
-
46
-
47
-
48
-
49
-
50
-
51
-
52
-
53
-
54
-
55
-
56
-
57
-
58
-
59
-
60
-
61
-
62
-
63
-
64
-
65
-
66
-
67
-
68
-
69
-
70
-
71
-
72
-
73
-
74
-
75
-
76
-
77
-
78
-
79
-
80
 |
 |