Panasonic KX-MB1500 Operating Instructions - Page 51
Setting the Error Correction
 |
View all Panasonic KX-MB1500 manuals
Add to My Manuals
Save this manual to your list of manuals |
Page 51 highlights
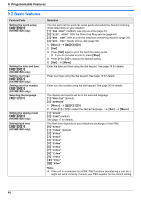
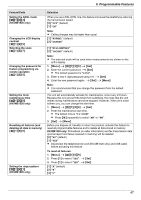
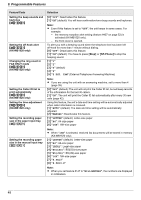
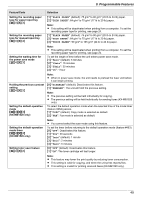
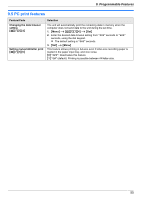
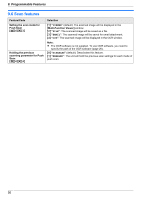
9. Programmable Features Feature/Code Sending a fax at a specific time MBNM4NM1NM2N Setting the Error Correction Mode (ECM) MBNM4NM1NM3N Setting the connecting tone MBNM4NM1NM6N Setting the maximum fax speed MBNM4NM1NM8N Confirming the destination before sending a fax MBNM4NM2NM0N Selection This feature allows you to take advantage of low-cost calling hours offered by your telephone company. This feature can be set up to 24 hours in advance of the desired time. M0N "OFF" (default) M1N "ON" To send a document: 1. If the MFaxN light is OFF, turn it ON by pressing MFaxN repeatedly. 2. Set the original (page 18). 3. If necessary, change the contrast (page 34) and the resolution (page 34). 4. MMenuN A MBNM4NM1NM2N 5. Press M1N to select "ON". A MSetN 6. Enter the fax number. R To enter an item using phonebook, see step 3 on "6.3 Sending a fax using phonebook", page 36. (When using phonebook, you do not have to press MEN before pressing MCN or MDN.) 7. MSetN 8. Enter the transmission start time. R Press MGN repeatedly to select "AM" or "PM". 9. MSetN A MStartN R The document will be scanned into memory. The unit will then send the data at the specified time. You cannot use this feature for another fax transmission until the former sending is completed. Note: R To cancel this setting after programming, press MStopN while the unit is idle, and then press MSetN. This feature is available when the sending / receiving fax machines are ECM compatible. M0N "OFF": Deactivates this feature. M1N "ON" (default): Fax transmission / reception will be carried out so that the errors do not occur. If you often have trouble when sending faxes, this feature allows you to hear connecting tones: fax tone, ring back tone and busy tone. You can use these tones to confirm the status of the other party's machine. M0N "OFF": Deactivates this feature. M1N "ON" (default): You will hear connecting tones. Note: R If the ring back tone continues, the other party's machine may not be a fax machine or may have run out of paper. Check with the other party. R The connecting tone volume cannot be adjusted. M1N "14.4kbps" M2N "33.6kbps" (default) Note: R The fax speed maybe lower than the selected speed depending on your line. M0N "OFF" (default): Deactivates this feature. M1N "ON": You can send a fax after confirming the destination. When the displayed destination is correct, press MStartN to send the fax. 51
-
 1
1 -
2
-
3
-
4
-
5
-
6
-
7
-
8
-
9
-
10
-
11
-
12
-
13
-
14
-
15
-
16
-
17
-
18
-
19
-
20
-
21
-
22
-
23
-
24
-
25
-
26
-
27
-
28
-
29
-
30
-
31
-
32
-
33
-
34
-
35
-
36
-
37
-
38
-
39
-
40
-
41
-
42
-
43
-
44
-
45
-
 46
46 -
 47
47 -
 48
48 -
 49
49 -
 50
50 -
 51
51 -
 52
52 -
 53
53 -
 54
54 -
 55
55 -
 56
56 -
57
-
58
-
59
-
60
-
61
-
62
-
63
-
64
-
65
-
66
-
67
-
68
-
69
-
70
-
71
-
72
-
73
-
74
-
75
-
76
-
77
-
78
-
79
-
80
 |
 |
