Panasonic KX-MB1500 Operating Instructions - Page 36
Sending a fax using, phonebook, 4 Sending an electronic, document as a fax message from, your
 |
View all Panasonic KX-MB1500 manuals
Add to My Manuals
Save this manual to your list of manuals |
Page 36 highlights
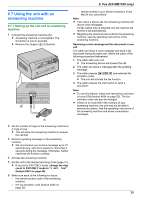
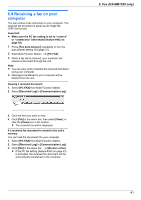
6. Fax (KX-MB1520 only) 6.3 Sending a fax using phonebook Before using this feature, store the desired names and telephone numbers into the phonebook (page 35). R Make sure that the MFaxN light is ON. 1 Set the original (page 18). 2 If necessary, change the contrast (page 34) and the resolution (page 34). 3 Press MEN, then press MCN or MDN repeatedly to display the desired item. 4 Press MStartN to scan the document into memory. Wait until "SCAN:PRESS SET" "SEND:PRESS START" is displayed. R To send a single page, go to step 6. R To send multiple pages, go to the next step. 5 Place the next page. A MSetN R To send more pages, repeat this step. 6 MStartN To search for a name by initial Example: "LISA" 1. Press MEN. 2. Press MCN or MDN to initiate the phonebook. 3. Press M5N repeatedly to display any name with the initial "L" (see page 57 for character entry). R To search for symbols, press MGN. 4. Press MCN or MDN repeatedly to display "LISA". R To stop the search, press MStopN. Fax auto redial If the line is busy or if there is no answer, the unit will automatically redial the number 1 time. Note: R To stop sending, see page 58. 6.4 Sending an electronic document as a fax message from your computer You can access the fax function from a Windows application using Multi-Function Station. For example, to send a document created from WordPad, proceed as follows. 1 Open the document you want to send. 2 Select [Print...] from the [File] menu. R The [Print] dialog box will appear. 3 Select the PCFAX unit's name as the active printer. 4 Click [Print]. R The [Send a Fax] dialog box will appear. 5 Enter the fax number using the keypad display or the phonebook. R To stop the operation, click [Cancel]. 6 [Send] R The document will be sent through the unit from your computer. Note: R To stop sending, see page 58. R If the document exceeds the memory capacity of the unit, sending will be canceled. R For details, see the help file by selecting [ ] from Multi-Function Station. R Click [Select...] to change the active unit. To prevent fax sending to the wrong destination 1. Start Multi-Function Station. A [PC FAX] 2. [Tools] A [Function Setup...] 3. Select the desired setting from the [Send] list. - [Display the Fax Send confirmation for every transmission]: The confirmation dialog box of the fax number is displayed before sending a fax. 36
-
 1
1 -
2
-
3
-
4
-
5
-
6
-
7
-
8
-
9
-
10
-
11
-
12
-
13
-
14
-
15
-
16
-
17
-
18
-
19
-
20
-
21
-
22
-
23
-
24
-
25
-
26
-
27
-
28
-
29
-
30
-
 31
31 -
 32
32 -
 33
33 -
 34
34 -
 35
35 -
 36
36 -
 37
37 -
 38
38 -
 39
39 -
 40
40 -
 41
41 -
42
-
43
-
44
-
45
-
46
-
47
-
48
-
49
-
50
-
51
-
52
-
53
-
54
-
55
-
56
-
57
-
58
-
59
-
60
-
61
-
62
-
63
-
64
-
65
-
66
-
67
-
68
-
69
-
70
-
71
-
72
-
73
-
74
-
75
-
76
-
77
-
78
-
79
-
80
 |
 |
