Panasonic KX-MB1500 Operating Instructions - Page 26
Scanning from the unit Push - reset
 |
View all Panasonic KX-MB1500 manuals
Add to My Manuals
Save this manual to your list of manuals |
Page 26 highlights
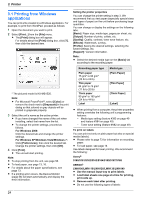
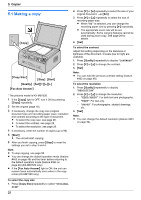
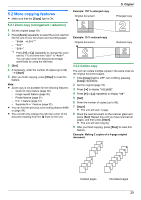
4. Scanner 4.1 Scanning from the unit (Push the software that is associated to open PDF files will start. Scan) R When scanning to email, the email software will 4. . Scanner automatically start and the scanned image will be You can easily scan the document by using the operation attached to a new email message. panel on the unit. You can select one of the following scanning modes depending on how you intend to use the scanned image. R When scanning to OCR, the scanned image will be displayed in the OCR window after scanning. 6 After you finish scanning, press MStopN to reset the Scanning mode setting you set in step 4. "VIEWER" "FILE" "EMAIL" "OCR" Viewing using Multi-Function Viewer (Scan to Multi-Function Viewer) Saving as a file to your computer (Scan to save as a file) Sending as an attached file to an email destination from your computer (Scan to email) Using OCR software (Scan to OCR) Note: R To stop scanning, see page 58. R The following data formats can be selected to save the scanned images. Scanning mode "VIEWER" "FILE" "EMAIL" "OCR" TIFF JPEG BMP PDF U U U U U U U U U U k U U U U k MScanN MStopN MStartN MSetNMCNMDNMEN If you want to scan several pages and save as a single file, select TIFF or PDF as the file format. R The scanned image will be automatically saved in the folder selected in the [Settings] window. To change the folder, see page 23. R You can set the desired scan mode for push scan beforehand (feature #493 on page 56). Helpful hints: The OCR software is not supplied. Install the desired third-party OCR software, then specify the path of the OCR software. To specify the path, see following. Start Multi-Function Station A [Settings] A Specify the path to the OCR program file (.exe) in the [OCR Path] field. A [OK] R We cannot guarantee the performance of third-party OCR software. 1 Set the original (page 18). 2 If the MScanN light is OFF, turn it ON by pressing MScanN repeatedly. 3 Press MCN or MDN repeatedly to select a scanning mode. A MSetN 4 If necessary, change the scanning settings. Press MEN, press MCN or MDN repeatedly to select the desired setting. A MSetN 5 MStartN A The unit will scan 1 page. Place the next document on the scanner glass and press MSetN. Repeat this until all the documents are scanned, then press MStartN. R When scanning to Multi-Function Viewer, the scanned image will be displayed in the [Multi-Function Viewer] window after scanning. However, when you select PDF as a file format, 26
-
 1
1 -
2
-
3
-
4
-
5
-
6
-
7
-
8
-
9
-
10
-
11
-
12
-
13
-
14
-
15
-
16
-
17
-
18
-
19
-
20
-
 21
21 -
 22
22 -
 23
23 -
 24
24 -
 25
25 -
 26
26 -
 27
27 -
 28
28 -
 29
29 -
 30
30 -
 31
31 -
32
-
33
-
34
-
35
-
36
-
37
-
38
-
39
-
40
-
41
-
42
-
43
-
44
-
45
-
46
-
47
-
48
-
49
-
50
-
51
-
52
-
53
-
54
-
55
-
56
-
57
-
58
-
59
-
60
-
61
-
62
-
63
-
64
-
65
-
66
-
67
-
68
-
69
-
70
-
71
-
72
-
73
-
74
-
75
-
76
-
77
-
78
-
79
-
80
 |
 |
