Panasonic NV-GS400 Operating Instructions - Page 11
Panasonic NV-GS400 Manual
 |
View all Panasonic NV-GS400 manuals
Add to My Manuals
Save this manual to your list of manuals |
Page 11 highlights
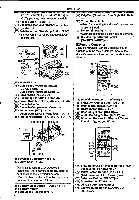
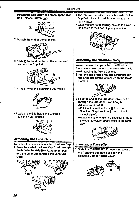
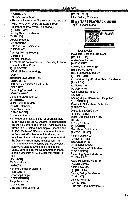
2 Insert a Cassette. Before Use 2 While holding the Memory Card with Its cut corner on top 0, insert It Into the Card Slot. 3 Close the Cassette Holder by pressing the [PUSH] mark 0. 0 'A, 4 Close the Cassette Compartment Cover. 3 Close the Card Slot Cover a) securely. Removing the Card Open the Card Slot Cover and then pull the Card straight out. *After removing the Card, close the Card Slot Cover. [ACCESS] Lamp OD 4.41 Accidental Erasure Prevention Opening the accidental erasure prevention slider 0 on the cassette (by sliding it to the [SAVE] arrow direction) prevents recording. To enable recording, close the accidental erasure prevention slider (by sliding it to the [REC] arrow direction). • For other notes concerning this item, see -54-. Using a Card • A Card can be used to record pictures. is Caution before inserting/removing a Card Be sure to turn off the Movie Camera. •Otherwise, the Movie Camera may not function properly or it may cause the loss of recorded data in a Card. Inserting a Card 1 Slide the [OPEN] Lever ® to open the Card Slot Cover ®. III (it) 0 ACCESS While the Movie Camera is accessing the Card (reading, recording, playback or erasing), the [ACCESS] Lamp lights up. •While the [ACCESS] Lamp is on, never attempt to open the Card Slot Cover, to pull out the Card, to turn off the Movie Camera. Such actions will damage the Card, and recorded data, and cause the Movie Camera to malfunction. Turning on the Movie Camera When the Movie Camera is turned on with the Lens Cap on, the Automatic White Balance Adjustment may not function properly. Please turn on the Movie Camera after removing the Lens Cap. In How to Turn on the Power 1 Set the [OFF/ON] Switch a6 to [ON] while pressing the button 0. •The Power Lamp ( ) lights up. 46 O 9 48 0 111111101111 11
-
 1
1 -
2
-
3
-
4
-
5
-
 6
6 -
 7
7 -
 8
8 -
 9
9 -
 10
10 -
 11
11 -
 12
12 -
 13
13 -
 14
14 -
 15
15 -
 16
16 -
17
-
18
-
19
-
20
-
21
-
22
-
23
-
24
-
25
-
26
-
27
-
28
-
29
-
30
-
31
-
32
-
33
-
34
-
35
-
36
-
37
-
38
-
39
-
40
-
41
-
42
-
43
-
44
-
45
-
46
-
47
-
48
-
49
-
50
-
51
-
52
-
53
-
54
-
55
-
56
-
57
-
58
-
59
-
60
-
61
-
62
-
63
-
64
-
65
-
66
-
67
-
68
-
69
-
70
 |
 |
