Panasonic NV-GS400 Operating Instructions - Page 8
Using, Remote, Controller, Power, Supply, Adaptor, Battery
 |
View all Panasonic NV-GS400 manuals
Add to My Manuals
Save this manual to your list of manuals |
Page 8 highlights
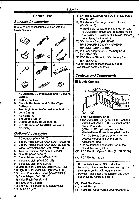
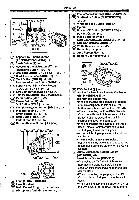
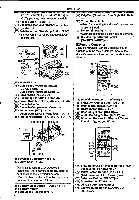
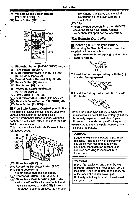
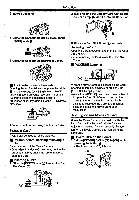
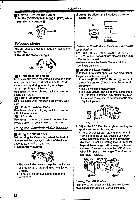
Before Use Using the Remote Controller 1 Direct the Remote Controller at the Remote Control Sensor ( ) of the Movie Camera and press an appropriate button. Power Supply Using the AC Adaptor 10* 36 1:, 15' • 15° • Distance from the Movie Camera: Within approximately 5 metres • Angle: Within approximately 10° in the upward, and 15° In the downward and horizontal directions from the central axis • The above operating ranges are for indoor use. Outdoors or under strong light, the Movie Camera may not operate properly even within the above ranges. •Within a 1-metre range, you can also use the Remote Controller on the LCD Monitor side of the Movie Camera. 1 Connect the DC Input Lead to the Movie Camera. 2 Connect the DC Input Lead to the AC Adaptor. 3 Connect the AC Mains Lead to the AC Adaptor and the AC mains socket. •The AC Mains Lead's outlet plug does not fit entirely Into the AC Adaptor socket. A gap will remain as shown 0. • Before connecting or disconnecting the Selecting Remote Controller Modes power supply, set the [OFF/ON] Switch on When 2 Movie Cameras are used the Movie Camera to [OFF] and make sure H simultaneously, they can be operated individually that Power Lamp Is not lit. by selecting different Remote Controller Modes. • If the Remote Controller Mode of the Movie Camera and that of the Remote Controller do not match, [REMOTE] Indication is displayed. III Using the Battery Before use, fully charge the Battery. *We recommend using Panasonic's Battery. *We cannot guarantee the quality of this Movie Setup on the Movie Camera: Camera when batteries of other companies are Set [REMOTE] on the [INITIAL] Sub-Menu to the used. desired Remote Controller Mode. (-t5.) 1 Attach the Battery to the AC Adaptor and Setup on the Remote Controller: charge it. I II I I 712A1 XI At 01200,1 1 I I [VCR1]: Press the [O.] Button and [M] Button simultaneously. 0 [VCR2]: Press the [.1] Button and [M] Button simultaneously. • When the battery in the Remote Controller is replaced, the mode is automatically reset to [VCR1] Mode. •Since the Battery will not be charged when the DC Input Lead is connected to the AC Adaptor, disconnect it from the AC Adaptor. •The [CHARGE] Lamp lights up, and charging starts. •When the [CHARGE] Lamp goes off, charging is completed. •When charging the overdischarged battery, the [CHARGE] Lamp blinks at first, but the battery is charged normally. When the 8
-
 1
1 -
2
-
 3
3 -
 4
4 -
 5
5 -
 6
6 -
 7
7 -
 8
8 -
 9
9 -
 10
10 -
 11
11 -
 12
12 -
 13
13 -
14
-
15
-
16
-
17
-
18
-
19
-
20
-
21
-
22
-
23
-
24
-
25
-
26
-
27
-
28
-
29
-
30
-
31
-
32
-
33
-
34
-
35
-
36
-
37
-
38
-
39
-
40
-
41
-
42
-
43
-
44
-
45
-
46
-
47
-
48
-
49
-
50
-
51
-
52
-
53
-
54
-
55
-
56
-
57
-
58
-
59
-
60
-
61
-
62
-
63
-
64
-
65
-
66
-
67
-
68
-
69
-
70
 |
 |
