Panasonic NV-GS400 Operating Instructions - Page 46
Recording, Contents, Other, Equipment
 |
View all Panasonic NV-GS400 manuals
Add to My Manuals
Save this manual to your list of manuals |
Page 46 highlights
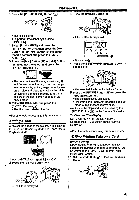
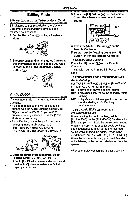
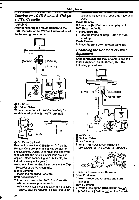
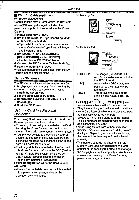
J Editing Mode I Copying on a DVD-R or an S-VHS (or operating instructions of your DVD Recorer or a VHS) Cassette (Dubbing) After connecting the Movie Camera to the DVD Recorder or the VCR as illustrated, start the following procedures. VCR. Movie Camera: 3 Press the [►] Button to start playback. DVD RecorderNCR: 4 Start recording. 5 Press the Pause or Stop Button to stop recording. Movie Camera: 6 Press the [ii) Button to stop playback. Recording the Contents of Other Equipment [S-VIDEO [VIDEO IN] [AUDIO IN] 0 After connecting the Movie Camera and the other equipment as illustrated, start the following procedures. AV AWT DV &VIDES, ci I W0U AV Cable S-Video Cable When connecting with DV Cable (Only for models equipped with the DV terminal) 0 DV ° DV Cable (optional) Be sure to press the [OSD] Button (-6-) on the Remote Controller prior to copying so that no indications are visible. Otherwise, the displayed tape counter and function indications are also copied. (When connecting with DV Cable, the Indications may not appear.) •Also read the operating Instructions of the DVD Recorder or the VCR carefully. Movie Camera: 1 Insert the recorded Cassette. DVD RecorderNCR: 2 Insert an unrecorded DVD-R or Cassette with an erasure prevention tab. • If various setups (such as external input, tape speed, etc.) are required, please refer to the 46 [S-VIDEO OUT] [VIDEO OUT] [AUDIO OUT] IQ AV MAUI AIMS py SAPJECI I WOUT EMJ AV Cable S-Video Cable Movie Camera: 1 Set [TAPE PLAYBACK MENU] » [AV IN/OUT] » [AV JACK] » [IN/OUT]. 2 Insert an unrecorded Cassette. Other Equipment: 3 Insert a recorded Cassette and start playback. Movie Camera: 4 While pressing the [OREC] Button (Es), press the Button (an) on the Remote
-
 1
1 -
2
-
3
-
4
-
5
-
6
-
7
-
8
-
9
-
10
-
11
-
12
-
13
-
14
-
15
-
16
-
17
-
18
-
19
-
20
-
21
-
22
-
23
-
24
-
25
-
26
-
27
-
28
-
29
-
30
-
31
-
32
-
33
-
34
-
35
-
36
-
37
-
38
-
39
-
40
-
 41
41 -
 42
42 -
 43
43 -
 44
44 -
 45
45 -
 46
46 -
 47
47 -
 48
48 -
 49
49 -
 50
50 -
 51
51 -
52
-
53
-
54
-
55
-
56
-
57
-
58
-
59
-
60
-
61
-
62
-
63
-
64
-
65
-
66
-
67
-
68
-
69
-
70
 |
 |
