Panasonic PT-DZ21KU Operating Instructions - Page 176
Ceiling mount bracket safeguards
 |
View all Panasonic PT-DZ21KU manuals
Add to My Manuals
Save this manual to your list of manuals |
Page 176 highlights
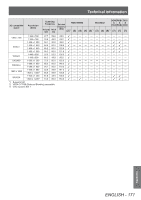
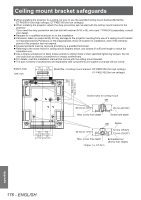
CCeeiliinlginmgoumntobruacnktetbsrafaecgukaerdtssafeguards zzWhen installing the projector to a ceiling, be sure to use the specified ceiling mount bracket (Model No.: ET-PKD510H (for high ceilings), ET-PKD510S (for low ceilings)). zzWhen installing the projector, attach the drop-prevention set included with the ceiling mount bracket to the projector. If you need the drop-prevention set (hex bolt with washer (M10 x 40), wire rope: TTRA0143) separately, consult your dealer. zzRequest for a qualified technician to do the installation. zzPanasonic takes no responsibility for any damage to the projector resulting from use of a ceiling mount bracket not manufactured by Panasonic or the inappropriate choice of location for installation, even if the warranty period of the projector has not expired. zzUnused products must be removed promptly by a qualified technician. zzReferring to the screw holes for ceiling mount diagram below, use screws of sufficient length to reach the imbedded nuts. zzUse a torque screwdriver or Allen torque wrench to tighten bolts to their specified tightening torques. Do not use tools such as electric screwdrivers or impact screwdrivers. zzFor details, read the installation manual that comes with the ceiling mount bracket. zzThe part numbers of accessories and separately sold components are subject to change without notice. Bottom view Unit: mm 110 145 (4-11/32") (5-23/32") Model No. of ceiling mount bracket: ET-PKD510H (for high ceilings) ET-PKD510S (for low ceilings) 48 (1-7/8") 298 (11-23/32") 548 (21-9/16") 110 110 (4-11/32") (4-11/32") 135.5 145 (5-11/32") (5-23/32") Screw holes for ceiling mount M6 30 mm (1-3/16") Max. screw hole depth 25 mm (31/32") Screw hole depth M6 Space 30 mm (1-3/16") 12 mm (15/32") 12 mm (15/32") Max. screw hole depth Torque: 4 ± 0.5 N·m Embedded nut (Screw hole depth) Appendix 176 - ENGLISH
-
 1
1 -
2
-
3
-
4
-
5
-
6
-
7
-
8
-
9
-
10
-
11
-
12
-
13
-
14
-
15
-
16
-
17
-
18
-
19
-
20
-
21
-
22
-
23
-
24
-
25
-
26
-
27
-
28
-
29
-
30
-
31
-
32
-
33
-
34
-
35
-
36
-
37
-
38
-
39
-
40
-
41
-
42
-
43
-
44
-
45
-
46
-
47
-
48
-
49
-
50
-
51
-
52
-
53
-
54
-
55
-
56
-
57
-
58
-
59
-
60
-
61
-
62
-
63
-
64
-
65
-
66
-
67
-
68
-
69
-
70
-
71
-
72
-
73
-
74
-
75
-
76
-
77
-
78
-
79
-
80
-
81
-
82
-
83
-
84
-
85
-
86
-
87
-
88
-
89
-
90
-
91
-
92
-
93
-
94
-
95
-
96
-
97
-
98
-
99
-
100
-
101
-
102
-
103
-
104
-
105
-
106
-
107
-
108
-
109
-
110
-
111
-
112
-
113
-
114
-
115
-
116
-
117
-
118
-
119
-
120
-
121
-
122
-
123
-
124
-
125
-
126
-
127
-
128
-
129
-
130
-
131
-
132
-
133
-
134
-
135
-
136
-
137
-
138
-
139
-
140
-
141
-
142
-
143
-
144
-
145
-
146
-
147
-
148
-
149
-
150
-
151
-
152
-
153
-
154
-
155
-
156
-
157
-
158
-
159
-
160
-
161
-
162
-
163
-
164
-
165
-
166
-
167
-
168
-
169
-
170
-
 171
171 -
 172
172 -
 173
173 -
 174
174 -
 175
175 -
 176
176 -
 177
177 -
 178
178 -
 179
179
 |
 |
