Pioneer VSX-1018AH-K Owner's Manual - Page 15
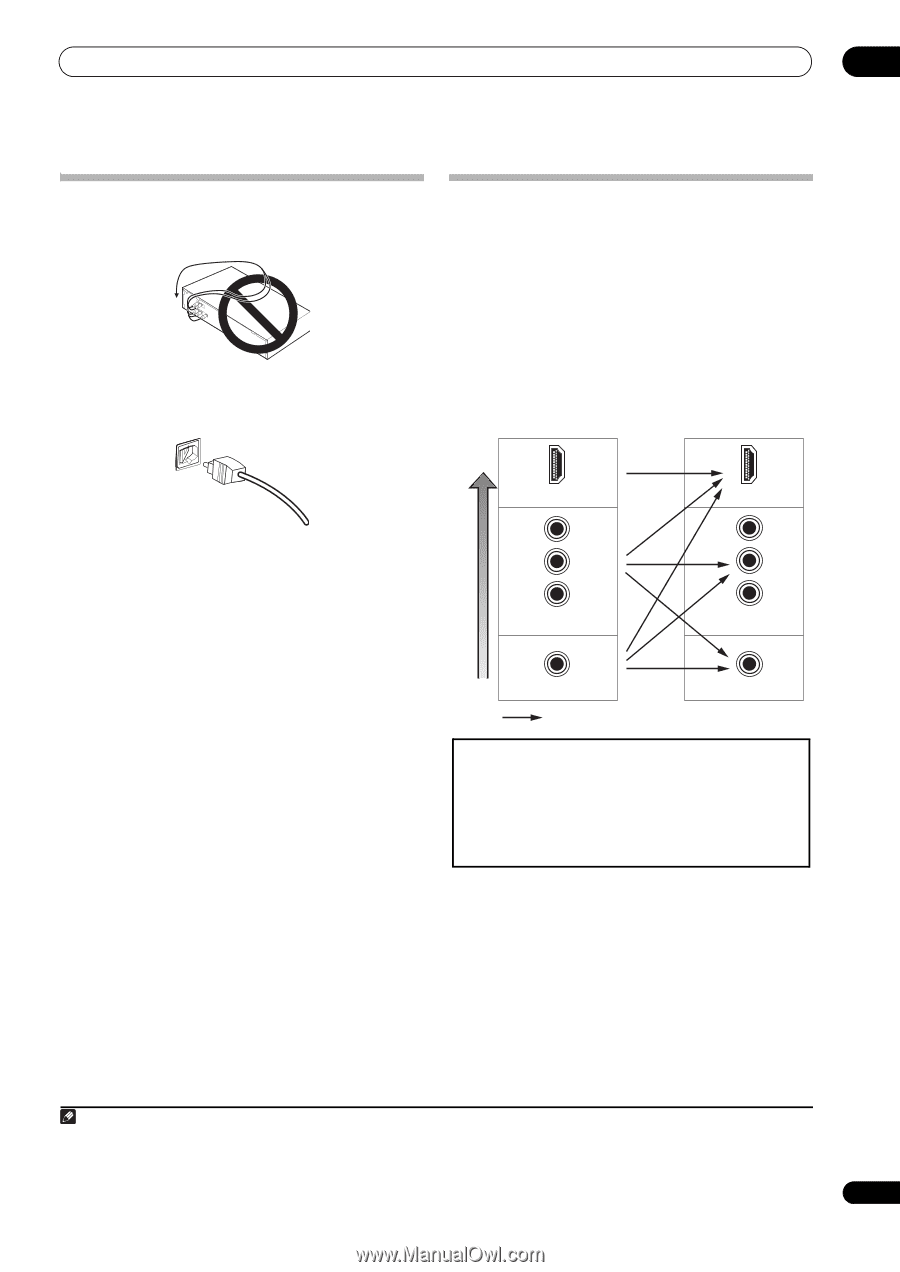
Connecting your equipment, When making cable connections, About the video converter - receiver
 |
View all Pioneer VSX-1018AH-K manuals
Add to My Manuals
Save this manual to your list of manuals |
Page 15 highlights
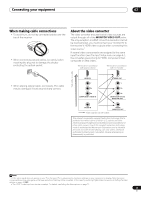
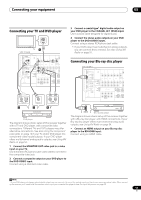
Connecting your equipment 03 When making cable connections • To avoid hum, do not lay connected cables over the top of the receiver. • When connecting optical cables, be careful when inserting the plug not to damage the shutter protecting the optical socket. About the video converter The video converter ensures that all video sources are output through all of the MONITOR VIDEO OUT jacks. The only exception is HDMI: since this resolution cannot be downsampled, you must connect your monitor/TV to the receiver's HDMI video outputs when connecting this video source.1 If several video components are assigned to the same input function (see The Input Setup menu on page 67), the converter gives priority to HDMI, component, then composite (in that order). Terminal for connection with source device Terminal for connection with TV monitor High picture quality • When storing optical cable, coil loosely. The cable may be damaged if bent around sharp corners. HDMI IN Y PB PR COMPONENT VIDEO IN HDMI OUT Y PB PR COMPONENT VIDEO MONITOR OUT VIDEO IN Video signals can be output VIDEO MONITOR OUT This product incorporates copyright protection technology that is protected by method claims of certain U.S. patents and other intellectual property rights owned by Macrovision Corporation and other rights owners. Use of this copyright protection technology must be authorized by Macrovision Corporation, and is intended for home and other limited viewing uses only unless otherwise authorized by Macrovision Corporation. Reverse engineering or disassembly is prohibited. Note 1 • If the video signal does not appear on your TV or flat panel TV, try adjusting the resolution settings on your component or display. Note that some components (such as video game units) have resolutions that may not be converted. In this case, try switching Digital Video Conversion (in Setting the Video options on page 72) OFF. • The ZONE 2 video input can also be converted. For details, see Setting the Video options on page 72. 15 En
-
 1
1 -
2
-
3
-
4
-
5
-
6
-
7
-
8
-
9
-
 10
10 -
 11
11 -
 12
12 -
 13
13 -
 14
14 -
 15
15 -
 16
16 -
 17
17 -
 18
18 -
 19
19 -
 20
20 -
21
-
22
-
23
-
24
-
25
-
26
-
27
-
28
-
29
-
30
-
31
-
32
-
33
-
34
-
35
-
36
-
37
-
38
-
39
-
40
-
41
-
42
-
43
-
44
-
45
-
46
-
47
-
48
-
49
-
50
-
51
-
52
-
53
-
54
-
55
-
56
-
57
-
58
-
59
-
60
-
61
-
62
-
63
-
64
-
65
-
66
-
67
-
68
-
69
-
70
-
71
-
72
-
73
-
74
-
75
-
76
-
77
-
78
-
79
-
80
-
81
-
82
-
83
-
84
-
85
-
86
-
87
-
88
-
89
-
90
-
91
-
92
-
93
-
94
-
95
-
96
-
97
-
98
-
99
-
100
 |
 |