Pioneer VSX-1018AH-K Owner's Manual - Page 44
Custom Menu
 |
View all Pioneer VSX-1018AH-K manuals
Add to My Manuals
Save this manual to your list of manuals |
Page 44 highlights
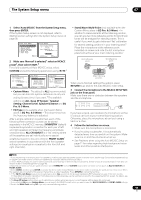
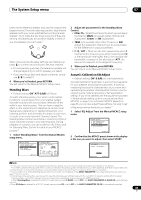
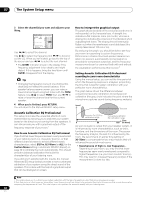
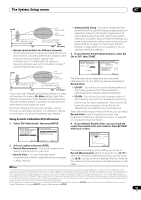
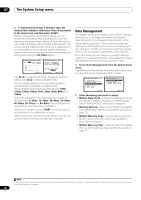
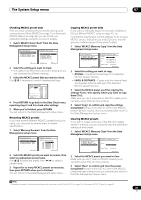
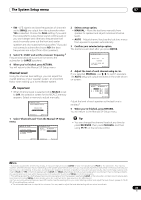
07 The System Setup menu 3 Select the channel(s) you want and adjust to your liking. 63 125 250 500 1k 2k 4k 8k 16k TRM 3d.EQ Adjust MCACC : M1 Ch [SBL] dB :Finish 63Hz [ 0.0] 125Hz [ 0.0] 250Hz [ 0.0] 500Hz [ 0.0] 1kHz 0.0 2kHz [ 0.0] 4kHz [ 0.0] 8kHz [ 0.0] 16kHz [ 0.0] TRIM [ 0.0] Use / to select the channel. Use / to select the frequency and / to boost or cut the EQ. When you're finished, go back to the top of the screen and use / to select the next channel. • The OVER! indicator shows in the display if the frequency adjustment is too drastic and might distort. If this happens, bring the level down until OVER! disappears from the display. Tip • Changing the frequency curve of one channel too drastically will affect the overall balance. If the speaker balance seems uneven, you can raise or lower channel levels using test tones with the TRIM feature. Use / to select TRIM, then use / to raise or lower the channel level for the current speaker. 4 When you're finished, press RETURN. You will return to the Manual MCACC setup menu. Acoustic Calibration EQ Professional This setup minimizes the unwanted effects of room reverberation by allowing you to calibrate your system based on the direct sound coming from the speakers. It can also provide you with a graphical output of the frequency response of your room.1 How to use Acoustic Calibration EQ Professional If you find that lower frequencies seem overly reverberant in your listening room (i.e. it sounds 'boomy'), or that different channels seem to exhibit different reverb characteristics, select EQ Pro. & S-Wave (or ALL) for the Custom Menu setting in Automatic MCACC (Expert) on page 38 to calibrate the room automatically. This should provide a balanced calibration that suits the characteristics of your listening room. If you still aren't satisfied with the results, the manual Advanced EQ setup (below) provides a more customized calibration of your system using the direct sound of the speakers. This is done with the help of a graphical output that can be displayed on-screen. How to interpret the graphical output The graph shows decibels on the vertical axis and time (in milliseconds) on the horizontal axis. A straight line indicates a flat-response room (no reverb), whereas a sloping line indicates the presence of reverberation when outputting test tones. The sloping line will eventually flatten out when the reverberant sound stabilizes (this usually takes about 100 ms or so). By analyzing the graph, you should be able to see how your room is responding to certain frequencies. Differences in channel level and speaker distance are taken into account automatically (compensation is provided for comparison purposes), and the frequency measurements can be examined both with and without the equalization performed by this receiver.2 Setting Acoustic Calibration EQ Professional according to your room characteristics Using the manual setup, you can set the time period at which the frequency response is analyzed, pinpointing the time that is best for system calibration with your particular room characteristics. The graph below shows the difference between conventional acoustic calibration and professional calibration (the gray circle indicates the point where the microphone captures sound during frequency analysis). Level Test tone Acoustic Cal. EQ Pro. calibration range Conventional MCACC EQ calibration range Time 0 80 160 (in msec) As soon as audio is output from your speaker system, it is influenced by room characteristics, such as walls, furniture, and the dimensions of the room. The sooner the frequency analysis, the less it is influenced by the room. We recommend an earlier time setting of 30~50ms to compensate for two major factors that will influence the sound of most rooms: • Reverberance of high vs. low frequencies - Depending on your room, you may find that lower frequencies seem overly reverberant compared to higher frequencies (i.e. your room sounds 'boomy'). This may result in a skewed frequency analysis if the measurement is done too late. Note 1 This system allows you to customize your system calibration with the help of a graphical output that can be displayed on-screen. 2 Note that due to an effect known as 'group delay', lower frequencies will take longer to be generated than higher frequencies (this is most obvious when comparing the frequencies at 0 ms). This initial slope is not a problem (i.e. excessive reverb) with your listening room. 44 En
-
 1
1 -
2
-
3
-
4
-
5
-
6
-
7
-
8
-
9
-
10
-
11
-
12
-
13
-
14
-
15
-
16
-
17
-
18
-
19
-
20
-
21
-
22
-
23
-
24
-
25
-
26
-
27
-
28
-
29
-
30
-
31
-
32
-
33
-
34
-
35
-
36
-
37
-
38
-
 39
39 -
 40
40 -
 41
41 -
 42
42 -
 43
43 -
 44
44 -
 45
45 -
 46
46 -
 47
47 -
 48
48 -
 49
49 -
50
-
51
-
52
-
53
-
54
-
55
-
56
-
57
-
58
-
59
-
60
-
61
-
62
-
63
-
64
-
65
-
66
-
67
-
68
-
69
-
70
-
71
-
72
-
73
-
74
-
75
-
76
-
77
-
78
-
79
-
80
-
81
-
82
-
83
-
84
-
85
-
86
-
87
-
88
-
89
-
90
-
91
-
92
-
93
-
94
-
95
-
96
-
97
-
98
-
99
-
100
 |
 |