Pioneer VSX-1018AH-K Owner's Manual - Page 76
Controlling the rest of your system
 |
View all Pioneer VSX-1018AH-K manuals
Add to My Manuals
Save this manual to your list of manuals |
Page 76 highlights
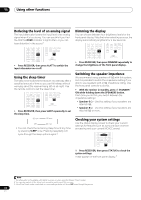
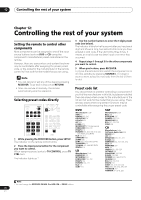
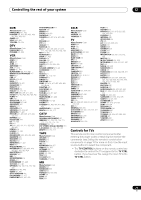
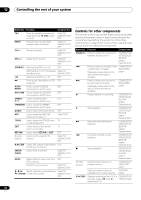
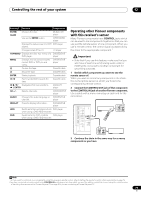
12 Controlling the rest of your system Chapter 12: Controlling the rest of your system Setting the remote to control other components Most components can be assigned to one of the input source buttons (such as DVD or CD) using the component's manufacturer preset code stored in the remote. However, there are cases where only certain functions may be controllable after assigning the proper preset code, or the codes for the manufacturer in the remote control will not work for the model that you are using. Note • You can cancel or exit any of the steps by pressing RECEIVER. To go back a step, press RETURN. • After one minute of inactivity, the remote automatically exits the operation. Selecting preset codes directly RECEIVER SOURCE DVD BD TV HDMI ST ENTER CATEGORY SETUP TUNE iPod CTRL ST RETURN DVR 1 DVR 2 CD CD-R FM/AM XM SIRIUS iPod USB INPUT SELECT 1 2 GENRE 4 MCACC 5 DIMMER 3 SLEEP 6 AUTO/ STEREO/ BD MENU DIRECT A.L.C. STANDARD ADV SURR HDD DVD THX STATUS PHASE ANT AUDIO DISPLAY MPX SIGNAL SEL MEM CH SR+ SBch A.ATT 7 8 9 TV CTRL RECEIVER D.ACCESS CH LEVEL 0 CLASS ENTER INPUT MASTER VOLUME MAIN ZONE 2 1 While pressing the RECEIVER button, press SETUP. The indicator on the remote control blinks. 2 Press the input source button for the component you want to control. When assigning preset codes to TV CONTROL, press TV CTRL here. The indicator lights up.1 3 Use the number buttons to enter the 3 digit preset code (see below). The indicator blinks for half a second after you input each digit and shows a long, two second blink once you have entered a valid code. If the LED blinks three times, it means an invalid code has been input or an error has occurred. 4 Repeat steps 1 through 3 for the other components you want to control. 5 When you're done, press RECEIVER. To try out the remote control, switch the component on or off (into standby) by pressing SOURCE. If it doesn't seem to work, select the next code from the list (if there is one). Preset code list You should have no problem controlling a component if you find the manufacturer in this list, but please note that there are cases where codes for the manufacturer in the list will not work for the model that you are using. There are also cases where only certain functions may be controllable after assigning the proper preset code. DVD Manufacturer Code AKAI 007 DENON 003, 010 GOLDSTAR 014 HITACHI 012 JVC 004 LOEWE 013 MICROSOFT 017 (video game) PANASONIC 003, 019 PHILIPS 013 PIONEER 000, 003, 009, 018, 020, 021 (BDP), 023 (BDP) RCA 008, 011 SAMSUNG 005 SHARP 006 SONY 002, 016 (video game) THOMSON 015 TOSHIBA 001, 022 (HD DVD) ZENITH 014 LD Manufacturer Code KENWOOD 103 MITSUBISHI 100 PANASONIC 105, 106 PHILIPS 104 PIONEER 100, 111 RCA 107 SONY 101 SAT Manufacturer Code BELL 208 ECHOSTAR 205 PIONEER 200, 210 PRIMESTAR 206 RCA 201, 203, 209 SONY 202 CD Manufacturer Code California Audio labs 304 DENON 309 JVC 303 KENWOOD 310, 311, 321 KODAK 322 MARANTZ 304, 312, 323, 324 MCS 304 MEMOREX 300 NAD 316 ONKYO 307, 308, 320 OPTIMUS 300 PANASONIC 304, 326 PHILIPS 312, 322 PIONEER 300, 348 (SACD) QUASAR 304 RCA 302, 313, 319 SANYO 313 SONY 301, 316, 317, 318 TEAC 305, 306, 324, 325, 327 THOMSON 319 YAMAHA 314, 315, 328 Note 1 You can't assign the RECEIVER, FM/AM, iPod USB, XM or SIRIUS buttons. 76 En
-
 1
1 -
2
-
3
-
4
-
5
-
6
-
7
-
8
-
9
-
10
-
11
-
12
-
13
-
14
-
15
-
16
-
17
-
18
-
19
-
20
-
21
-
22
-
23
-
24
-
25
-
26
-
27
-
28
-
29
-
30
-
31
-
32
-
33
-
34
-
35
-
36
-
37
-
38
-
39
-
40
-
41
-
42
-
43
-
44
-
45
-
46
-
47
-
48
-
49
-
50
-
51
-
52
-
53
-
54
-
55
-
56
-
57
-
58
-
59
-
60
-
61
-
62
-
63
-
64
-
65
-
66
-
67
-
68
-
69
-
70
-
 71
71 -
 72
72 -
 73
73 -
 74
74 -
 75
75 -
 76
76 -
 77
77 -
 78
78 -
 79
79 -
 80
80 -
 81
81 -
82
-
83
-
84
-
85
-
86
-
87
-
88
-
89
-
90
-
91
-
92
-
93
-
94
-
95
-
96
-
97
-
98
-
99
-
100
 |
 |