Pioneer VSX-1018AH-K Owner's Manual - Page 57
Other connections, Connecting the multichannel analog, inputs - phono
 |
View all Pioneer VSX-1018AH-K manuals
Add to My Manuals
Save this manual to your list of manuals |
Page 57 highlights
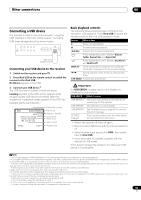
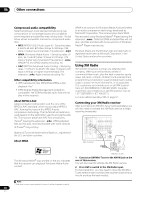
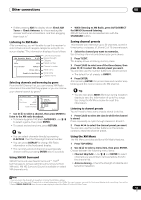
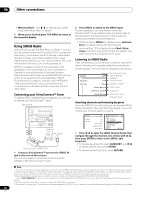
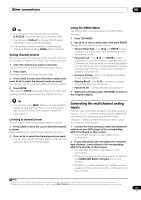
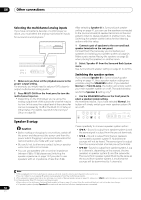
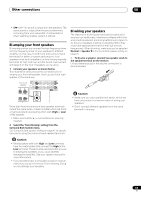
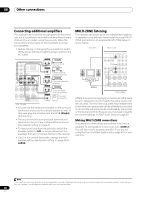
Other connections 08 Tip • You can select channels directly by pressing D.ACCESS, then the three-digit channel number. • You can press DISPLAY to change SIRIUS Radio information in the front panel display. • The currently selected channel is automatically chosen (without pressing ENTER) after 5 seconds. Saving channel presets This receiver can memorize up to 30 channels, stored in three banks, or classes, (A, B and C) of 10 channels each. 1 Select the channel you want to memorize. See Selecting channels and browsing by genre above. 2 Press T.EDIT. The display shows a blinking memory class. 3 Press CLASS to select one of the three classes, then press / to select the channel preset you want. You can also use the number buttons to select a preset. 4 Press ENTER. After pressing ENTER, the preset class and number stop blinking and the receiver stores the SIRIUS channel.1 Using the SIRIUS Menu The SIRIUS Menu provides additional SIRIUS Radio features.2 1 Press TOP MENU. 2 Use / to select a menu item, then press ENTER. Choose from the following menu items: • Channel Skip/Add - Use / and ENTER to select channels you would like to remove/restore from/to the channel guide. • Parental Lock - Use / and ENTER to select channels you would like to place under parental lock. Channels put under parental lock are not displayed in the Channel Guide, but may be accessed by directly inputting their channel number and providing the parental lock password. • Antenna Aiming - Check the strength of satellite and terrestrial reception. • Memory Recall - Use / to browse your saved song information (see Tip above). • Password Set - Set the parental lock password. 3 When you're finished, press TOP MENU to return to the reception display. Tip • You can also press MEM (Memory) during reception display to save the information of up to five songs. See Using the SIRIUS Menu below to recall this information.2 Listening to channel presets You will need to have some presets stored to do this. 1 Press CLASS to select the class in which the channel is stored. Press repeatedly to cycle through classes A, B and C. 2 Press / to select the channel preset you want. • You can also use the number buttons on the remote control to recall the channel preset. Connecting the multichannel analog inputs For DVD Audio and SACD playback, your DVD player may have 5.1, 6.1 or 7.1 channel analog outputs (depending on whether your player supports surround back channels).2 Make sure that the player is set to output multichannel analog audio. 1 Connect the front, surround, center and subwoofer outputs on your DVD player to the corresponding MULTI CH IN jack on this receiver. • Use standard RCA/phono jack cables for the connections. 2 If your DVD player also has outputs for surround back channels, connect these to the corresponding MULTI CH IN jacks on this receiver. • Use standard RCA/phono jack cables for the connections. • If there is a single surround back output, connect it to the SURROUND BACK L (Single) jack on this receiver. • To use a 5.1-channel speaker set, use the surround speakers for the surround channel, not the surround back channel. Note 1 You can reset the Channel presets, Memory, Channel Skip/Add, Parental Lock and Password settings in Resetting the system on page 75. 2 To listen to multichannel analog audio you'll need to select MULTI CH IN (see Selecting the multichannel analog inputs below for more on this). 57 En
-
 1
1 -
2
-
3
-
4
-
5
-
6
-
7
-
8
-
9
-
10
-
11
-
12
-
13
-
14
-
15
-
16
-
17
-
18
-
19
-
20
-
21
-
22
-
23
-
24
-
25
-
26
-
27
-
28
-
29
-
30
-
31
-
32
-
33
-
34
-
35
-
36
-
37
-
38
-
39
-
40
-
41
-
42
-
43
-
44
-
45
-
46
-
47
-
48
-
49
-
50
-
51
-
 52
52 -
 53
53 -
 54
54 -
 55
55 -
 56
56 -
 57
57 -
 58
58 -
 59
59 -
 60
60 -
 61
61 -
 62
62 -
63
-
64
-
65
-
66
-
67
-
68
-
69
-
70
-
71
-
72
-
73
-
74
-
75
-
76
-
77
-
78
-
79
-
80
-
81
-
82
-
83
-
84
-
85
-
86
-
87
-
88
-
89
-
90
-
91
-
92
-
93
-
94
-
95
-
96
-
97
-
98
-
99
-
100
 |
 |