Ricoh Aficio SP C232DN Operating Instructions - Page 135
When Remove Misfeed Tray 2 Appears
 |
View all Ricoh Aficio SP C232DN manuals
Add to My Manuals
Save this manual to your list of manuals |
Page 135 highlights
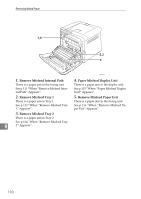
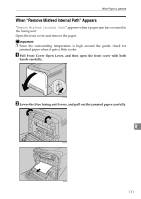
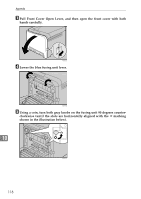
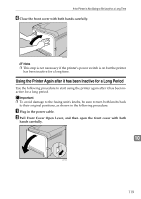
Removing Misfed Paper C Close the front cover with both hands carefully. ASH067S Note ❒ Do not pull out the paper tray (Tray 1). ❒ If paper is jammed in Tray 2, but it is difficult to locate, pull out Tray 2 to remove it. After removing the paper, carefully push Tray 2 all the way back inside the printer. ❒ When closing the front cover, push the upper side of the cover firmly. After closing the cover, check that the error is cleared. When "Remove Misfeed Tray 2" Appears "Remove Misfeed Tray 2" appears when a paper jam has occurred in Tray 2. Open the front cover and remove the paper following the same procedure as for Tray 1. Reference For details about the procedure, see p.113 "When "Remove Misfeed Tray 1" 9 Appears" 114
-
 1
1 -
2
-
3
-
4
-
5
-
6
-
7
-
8
-
9
-
10
-
11
-
12
-
13
-
14
-
15
-
16
-
17
-
18
-
19
-
20
-
21
-
22
-
23
-
24
-
25
-
26
-
27
-
28
-
29
-
30
-
31
-
32
-
33
-
34
-
35
-
36
-
37
-
38
-
39
-
40
-
41
-
42
-
43
-
44
-
45
-
46
-
47
-
48
-
49
-
50
-
51
-
52
-
53
-
54
-
55
-
56
-
57
-
58
-
59
-
60
-
61
-
62
-
63
-
64
-
65
-
66
-
67
-
68
-
69
-
70
-
71
-
72
-
73
-
74
-
75
-
76
-
77
-
78
-
79
-
80
-
81
-
82
-
83
-
84
-
85
-
86
-
87
-
88
-
89
-
90
-
91
-
92
-
93
-
94
-
95
-
96
-
97
-
98
-
99
-
100
-
101
-
102
-
103
-
104
-
105
-
106
-
107
-
108
-
109
-
110
-
111
-
112
-
113
-
114
-
115
-
116
-
117
-
118
-
119
-
120
-
121
-
122
-
123
-
124
-
125
-
126
-
127
-
128
-
129
-
 130
130 -
 131
131 -
 132
132 -
 133
133 -
 134
134 -
 135
135 -
 136
136 -
 137
137 -
 138
138 -
 139
139 -
 140
140 -
141
-
142
-
143
-
144
-
145
-
146
-
147
-
148
-
149
-
150
-
151
-
152
-
153
-
154
-
155
-
156
-
157
-
158
-
159
-
160
-
161
-
162
-
163
-
164
-
165
-
166
-
167
-
168
-
169
-
170
-
171
-
172
-
173
-
174
-
175
-
176
-
177
-
178
-
179
-
180
-
181
-
182
-
183
-
184
-
185
-
186
-
187
-
188
-
189
-
190
-
191
-
192
-
193
-
194
-
195
-
196
-
197
-
198
-
199
-
200
-
201
-
202
-
203
-
204
-
205
-
206
-
207
-
208
-
209
-
210
-
211
-
212
-
213
-
214
-
215
-
216
-
217
-
218
-
219
-
220
-
221
-
222
-
223
-
224
-
225
-
226
-
227
-
228
-
229
-
230
-
231
-
232
-
233
-
234
-
235
-
236
-
237
-
238
-
239
-
240
-
241
-
242
-
243
-
244
-
245
-
246
-
247
-
248
-
249
-
250
-
251
-
252
-
253
-
254
-
255
-
256
-
257
-
258
-
259
-
260
-
261
-
262
-
263
-
264
-
265
-
266
-
267
-
268
-
269
-
270
-
271
-
272
-
273
-
274
-
275
-
276
-
277
-
278
-
279
-
280
-
281
-
282
-
283
-
284
-
285
-
286
-
287
-
288
 |
 |

Removing Misfed Paper
114
9
C
Close the front cover with both hands carefully.
Note
❒
Do not pull out the paper tray (Tray 1).
❒
If paper is jammed in Tray 2, but it is difficult to locate, pull out Tray 2 to
remove it. After removing the paper, carefully push Tray 2 all the way back
inside the printer.
❒
When closing the front cover, push the upper side of the cover firmly. After
closing the cover, check that the error is cleared.
When “Remove Misfeed Tray 2” Appears
“
Remove Misfeed Tray 2
” appears when a paper jam has occurred in Tray 2.
Open the front cover and remove the paper following the same procedure as for
Tray 1.
Reference
For details about the procedure, see p.113 “When “Remove Misfeed Tray 1”
Appears”
ASH067S