Ricoh Aficio SP C232DN Operating Instructions - Page 260
Specifying the Printer, Using USB, Mac OS X 10.4.x or earlier, Mac OS X 10.5
 |
View all Ricoh Aficio SP C232DN manuals
Add to My Manuals
Save this manual to your list of manuals |
Page 260 highlights
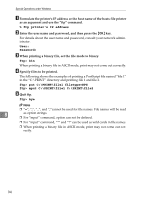
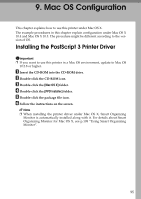
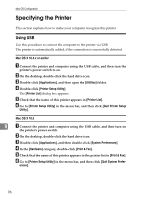
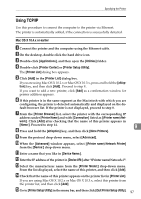
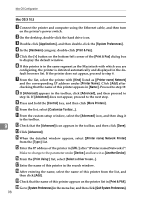
Mac OS Configuration Specifying the Printer This section explains how to make your computer recognize this printer. Using USB Use this procedure to connect the computer to the printer via USB. The printer is automatically added, if the connection is successfully detected. Mac OS X 10.4.x or earlier A Connect the printer and computer using the USB cable, and then turn the printer's power switch to on. B On the desktop, double-click the hard drive icon. C Double-click [Applications], and then open the [Utilities] folder. D Double-click [Printer Setup Utility]. The [Printer List] dialog box appears. E Check that the name of this printer appears in [Printer List]. F Go to [Printer Setup Utility] in the menu bar, and then click [Quit Printer Setup Utility]. Mac OS X 10.5 9 A Connect the printer and computer using the USB cable, and then turn on the printer's power switch. B On the desktop, double-click the hard drive icon. C Double-click [Applications], and then double-click [System Preferences]. D In the [Hardware] category, double-click [Print & Fax]. E Check that the name of this printer appears in the printer list in [Print & Fax]. F Go to [Printer Setup Utility] in the menu bar, and then click [Quit System Prefer- ences]. 96
-
 1
1 -
2
-
3
-
4
-
5
-
6
-
7
-
8
-
9
-
10
-
11
-
12
-
13
-
14
-
15
-
16
-
17
-
18
-
19
-
20
-
21
-
22
-
23
-
24
-
25
-
26
-
27
-
28
-
29
-
30
-
31
-
32
-
33
-
34
-
35
-
36
-
37
-
38
-
39
-
40
-
41
-
42
-
43
-
44
-
45
-
46
-
47
-
48
-
49
-
50
-
51
-
52
-
53
-
54
-
55
-
56
-
57
-
58
-
59
-
60
-
61
-
62
-
63
-
64
-
65
-
66
-
67
-
68
-
69
-
70
-
71
-
72
-
73
-
74
-
75
-
76
-
77
-
78
-
79
-
80
-
81
-
82
-
83
-
84
-
85
-
86
-
87
-
88
-
89
-
90
-
91
-
92
-
93
-
94
-
95
-
96
-
97
-
98
-
99
-
100
-
101
-
102
-
103
-
104
-
105
-
106
-
107
-
108
-
109
-
110
-
111
-
112
-
113
-
114
-
115
-
116
-
117
-
118
-
119
-
120
-
121
-
122
-
123
-
124
-
125
-
126
-
127
-
128
-
129
-
130
-
131
-
132
-
133
-
134
-
135
-
136
-
137
-
138
-
139
-
140
-
141
-
142
-
143
-
144
-
145
-
146
-
147
-
148
-
149
-
150
-
151
-
152
-
153
-
154
-
155
-
156
-
157
-
158
-
159
-
160
-
161
-
162
-
163
-
164
-
165
-
166
-
167
-
168
-
169
-
170
-
171
-
172
-
173
-
174
-
175
-
176
-
177
-
178
-
179
-
180
-
181
-
182
-
183
-
184
-
185
-
186
-
187
-
188
-
189
-
190
-
191
-
192
-
193
-
194
-
195
-
196
-
197
-
198
-
199
-
200
-
201
-
202
-
203
-
204
-
205
-
206
-
207
-
208
-
209
-
210
-
211
-
212
-
213
-
214
-
215
-
216
-
217
-
218
-
219
-
220
-
221
-
222
-
223
-
224
-
225
-
226
-
227
-
228
-
229
-
230
-
231
-
232
-
233
-
234
-
235
-
236
-
237
-
238
-
239
-
240
-
241
-
242
-
243
-
244
-
245
-
246
-
247
-
248
-
249
-
250
-
251
-
252
-
253
-
254
-
 255
255 -
 256
256 -
 257
257 -
 258
258 -
 259
259 -
 260
260 -
 261
261 -
 262
262 -
 263
263 -
 264
264 -
 265
265 -
266
-
267
-
268
-
269
-
270
-
271
-
272
-
273
-
274
-
275
-
276
-
277
-
278
-
279
-
280
-
281
-
282
-
283
-
284
-
285
-
286
-
287
-
288
 |
 |