Ricoh Aficio SP C232DN Operating Instructions - Page 261
Using TCP/IP, Mac OS X 10.4.x or earlier
 |
View all Ricoh Aficio SP C232DN manuals
Add to My Manuals
Save this manual to your list of manuals |
Page 261 highlights
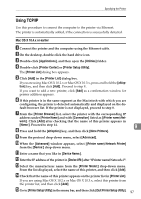
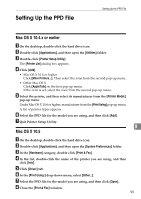
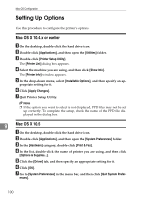
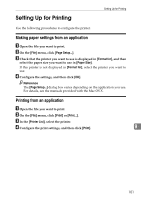
Specifying the Printer Using TCP/IP Use this procedure to connect the computer to the printer via Ethernet. The printer is automatically added, if the connection is successfully detected. Mac OS X 10.4.x or earlier A Connect the printer and the computer using the Ethernet cable. B On the desktop, double-click the hard drive icon. C Double-click [Applications], and then open the [Utilities] folder. D Double-click [Printer Center] or [Printer Setup Utility]. The [Printer List] dialog box appears. E Click [Add] in the [Printer List] dialog box. If you are using Mac OS X 10.2.x or Mac OS X 10.3.x, press and hold the [alt/option] key, and then click [Add]. Proceed to step 9.. If you want to add a new printer, click [Add] as a confirmation window for printer addition appears. F If this printer is in the same segment as the Macintosh with which you are configuring, the printer is detected automatically and displayed on the default browser list. If the printer is not displayed, proceed to step 8. G From the [Printer Browser] list, select the printer with the corresponding IP address under [Printer Name] and with [Connection] listed as [(Printer name) Network]. Click [Add] after checking that the name of this printer appears in [Name:]. Proceed to step 14. H Press and hold the [alt/option] key, and then click [More Printers]. I From the protocol drop-down menu, select [Advanced]. J When the [Advanced] window appears, select [(Printer name) Network Printer] from the [Device:] drop-down menu. K Enter a name that you like in [Device Name:]. L Enter the IP address of the printer in [Device URI:] after "(Printer name)Network://". M Select the manufacturer name from the [Printer Model:] drop-down menu. From the list displayed, select the name of this printer, and then click [Add]. N Check that the name of this printer appears on the printer list in [Printer List]. If you are using Mac OS X 10.2.x or Mac OS X 10.3.x, select this printer from the printer list, and then click [Add]. O Go to [Printer Setup Utility] in the menu bar, and then click [Quit Printer Setup Utility]. 9 97
-
 1
1 -
2
-
3
-
4
-
5
-
6
-
7
-
8
-
9
-
10
-
11
-
12
-
13
-
14
-
15
-
16
-
17
-
18
-
19
-
20
-
21
-
22
-
23
-
24
-
25
-
26
-
27
-
28
-
29
-
30
-
31
-
32
-
33
-
34
-
35
-
36
-
37
-
38
-
39
-
40
-
41
-
42
-
43
-
44
-
45
-
46
-
47
-
48
-
49
-
50
-
51
-
52
-
53
-
54
-
55
-
56
-
57
-
58
-
59
-
60
-
61
-
62
-
63
-
64
-
65
-
66
-
67
-
68
-
69
-
70
-
71
-
72
-
73
-
74
-
75
-
76
-
77
-
78
-
79
-
80
-
81
-
82
-
83
-
84
-
85
-
86
-
87
-
88
-
89
-
90
-
91
-
92
-
93
-
94
-
95
-
96
-
97
-
98
-
99
-
100
-
101
-
102
-
103
-
104
-
105
-
106
-
107
-
108
-
109
-
110
-
111
-
112
-
113
-
114
-
115
-
116
-
117
-
118
-
119
-
120
-
121
-
122
-
123
-
124
-
125
-
126
-
127
-
128
-
129
-
130
-
131
-
132
-
133
-
134
-
135
-
136
-
137
-
138
-
139
-
140
-
141
-
142
-
143
-
144
-
145
-
146
-
147
-
148
-
149
-
150
-
151
-
152
-
153
-
154
-
155
-
156
-
157
-
158
-
159
-
160
-
161
-
162
-
163
-
164
-
165
-
166
-
167
-
168
-
169
-
170
-
171
-
172
-
173
-
174
-
175
-
176
-
177
-
178
-
179
-
180
-
181
-
182
-
183
-
184
-
185
-
186
-
187
-
188
-
189
-
190
-
191
-
192
-
193
-
194
-
195
-
196
-
197
-
198
-
199
-
200
-
201
-
202
-
203
-
204
-
205
-
206
-
207
-
208
-
209
-
210
-
211
-
212
-
213
-
214
-
215
-
216
-
217
-
218
-
219
-
220
-
221
-
222
-
223
-
224
-
225
-
226
-
227
-
228
-
229
-
230
-
231
-
232
-
233
-
234
-
235
-
236
-
237
-
238
-
239
-
240
-
241
-
242
-
243
-
244
-
245
-
246
-
247
-
248
-
249
-
250
-
251
-
252
-
253
-
254
-
255
-
 256
256 -
 257
257 -
 258
258 -
 259
259 -
 260
260 -
 261
261 -
 262
262 -
 263
263 -
 264
264 -
 265
265 -
 266
266 -
267
-
268
-
269
-
270
-
271
-
272
-
273
-
274
-
275
-
276
-
277
-
278
-
279
-
280
-
281
-
282
-
283
-
284
-
285
-
286
-
287
-
288
 |
 |
