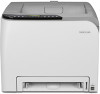
Ricoh Aficio SP C232DN Operating Instructions - Page 202
PictBridge Printing
 |
View all Ricoh Aficio SP C232DN manuals
Add to My Manuals
Save this manual to your list of manuals |
Page 202 highlights
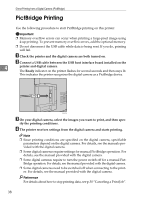
Direct Printing from a Digital Camera (PictBridge) PictBridge Printing Use the following procedure to start PictBridge printing on this printer. Important ❒ Memory overflow errors can occur when printing a large-pixel image using 4-up printing. To prevent memory overflow errors, add the optional memory. ❒ Do not disconnect the USB cable while data is being sent. If you do, printing will fail. A Check the printer and the digital camera are both turned on. B Connect a USB cable between the USB host interface board installed on the 4 printer and digital camera. The Ready indicator on the printer flashes for several seconds and then stays lit. This indicates the printer recognizes the digital camera as a PictBridge device. ASH108S C On your digital camera, select the images you want to print, and then spec- ify the printing conditions. D The printer receives settings from the digital camera and starts printing. Note ❒ Since printing conditions are specified on the digital camera, specifiable parameters depend on the digital camera. For details, see the manuals provided with the digital camera. ❒ Some digital cameras require settings for manual PictBridge operation. For details, see the manual provided with the digital camera. ❒ Some digital cameras require to turn the power switch off for a manual PictBridge operation. For details, see the manual provided with the digital camera. ❒ Some digital cameras need to be switched off when connecting to the printer. For details, see the manual provided with the digital camera. Reference For details about how to stop printing data, see p.30 "Canceling a Print Job". 38
-
 1
1 -
2
-
3
-
4
-
5
-
6
-
7
-
8
-
9
-
10
-
11
-
12
-
13
-
14
-
15
-
16
-
17
-
18
-
19
-
20
-
21
-
22
-
23
-
24
-
25
-
26
-
27
-
28
-
29
-
30
-
31
-
32
-
33
-
34
-
35
-
36
-
37
-
38
-
39
-
40
-
41
-
42
-
43
-
44
-
45
-
46
-
47
-
48
-
49
-
50
-
51
-
52
-
53
-
54
-
55
-
56
-
57
-
58
-
59
-
60
-
61
-
62
-
63
-
64
-
65
-
66
-
67
-
68
-
69
-
70
-
71
-
72
-
73
-
74
-
75
-
76
-
77
-
78
-
79
-
80
-
81
-
82
-
83
-
84
-
85
-
86
-
87
-
88
-
89
-
90
-
91
-
92
-
93
-
94
-
95
-
96
-
97
-
98
-
99
-
100
-
101
-
102
-
103
-
104
-
105
-
106
-
107
-
108
-
109
-
110
-
111
-
112
-
113
-
114
-
115
-
116
-
117
-
118
-
119
-
120
-
121
-
122
-
123
-
124
-
125
-
126
-
127
-
128
-
129
-
130
-
131
-
132
-
133
-
134
-
135
-
136
-
137
-
138
-
139
-
140
-
141
-
142
-
143
-
144
-
145
-
146
-
147
-
148
-
149
-
150
-
151
-
152
-
153
-
154
-
155
-
156
-
157
-
158
-
159
-
160
-
161
-
162
-
163
-
164
-
165
-
166
-
167
-
168
-
169
-
170
-
171
-
172
-
173
-
174
-
175
-
176
-
177
-
178
-
179
-
180
-
181
-
182
-
183
-
184
-
185
-
186
-
187
-
188
-
189
-
190
-
191
-
192
-
193
-
194
-
195
-
196
-
 197
197 -
 198
198 -
 199
199 -
 200
200 -
 201
201 -
 202
202 -
 203
203 -
 204
204 -
 205
205 -
 206
206 -
 207
207 -
208
-
209
-
210
-
211
-
212
-
213
-
214
-
215
-
216
-
217
-
218
-
219
-
220
-
221
-
222
-
223
-
224
-
225
-
226
-
227
-
228
-
229
-
230
-
231
-
232
-
233
-
234
-
235
-
236
-
237
-
238
-
239
-
240
-
241
-
242
-
243
-
244
-
245
-
246
-
247
-
248
-
249
-
250
-
251
-
252
-
253
-
254
-
255
-
256
-
257
-
258
-
259
-
260
-
261
-
262
-
263
-
264
-
265
-
266
-
267
-
268
-
269
-
270
-
271
-
272
-
273
-
274
-
275
-
276
-
277
-
278
-
279
-
280
-
281
-
282
-
283
-
284
-
285
-
286
-
287
-
288
 |
 |
