Ricoh DD 6650P Operating Instructions - Page 116
is recognized., Make a gap of at least 2mm 0.08 inches
 |
View all Ricoh DD 6650P manuals
Add to My Manuals
Save this manual to your list of manuals |
Page 116 highlights
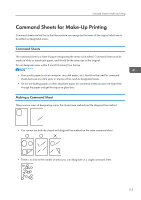
4. Advanced Printing • If you use Outline mode for letter images with a thickness of less than 3mm (0.12 inches) the print image might come out as expected. • The image might differ depending on how the designated area is drawn, so remember the following when making the command sheet. Designated area Area recognized Preferred designated area Part of the designated area is surrounded by 3 sides of the entire area. Make a space of at least 2mm (0.08 inches), in front of the area surrounded by 3 sides (relative to the feed direction). 1 2 Double line pattern. 1, 2 = 2mm (0.08 inches) Only the outer line Make a gap of at least 2mm (0.08 inches) in is recognized. width. The designated area is surrounded by 3 sides of another designated area. Non-closed line Make a space of at least 2mm (0.08 inches) in front of the area surrounded by 3 sides (relative to the feeding direction). 2 1 1, 2 = 2mm (0.08 inches) Designate the area with a closed line. 114
-
 1
1 -
2
-
3
-
4
-
5
-
6
-
7
-
8
-
9
-
10
-
11
-
12
-
13
-
14
-
15
-
16
-
17
-
18
-
19
-
20
-
21
-
22
-
23
-
24
-
25
-
26
-
27
-
28
-
29
-
30
-
31
-
32
-
33
-
34
-
35
-
36
-
37
-
38
-
39
-
40
-
41
-
42
-
43
-
44
-
45
-
46
-
47
-
48
-
49
-
50
-
51
-
52
-
53
-
54
-
55
-
56
-
57
-
58
-
59
-
60
-
61
-
62
-
63
-
64
-
65
-
66
-
67
-
68
-
69
-
70
-
71
-
72
-
73
-
74
-
75
-
76
-
77
-
78
-
79
-
80
-
81
-
82
-
83
-
84
-
85
-
86
-
87
-
88
-
89
-
90
-
91
-
92
-
93
-
94
-
95
-
96
-
97
-
98
-
99
-
100
-
101
-
102
-
103
-
104
-
105
-
106
-
107
-
108
-
109
-
110
-
 111
111 -
 112
112 -
 113
113 -
 114
114 -
 115
115 -
 116
116 -
 117
117 -
 118
118 -
 119
119 -
 120
120 -
 121
121 -
122
-
123
-
124
-
125
-
126
-
127
-
128
-
129
-
130
-
131
-
132
-
133
-
134
-
135
-
136
-
137
-
138
-
139
-
140
-
141
-
142
-
143
-
144
-
145
-
146
-
147
-
148
-
149
-
150
-
151
-
152
-
153
-
154
-
155
-
156
-
157
-
158
-
159
-
160
-
161
-
162
-
163
-
164
-
165
-
166
-
167
-
168
-
169
-
170
-
171
-
172
-
173
-
174
-
175
-
176
-
177
-
178
-
179
-
180
-
181
-
182
-
183
-
184
-
185
-
186
-
187
-
188
-
189
-
190
-
191
-
192
-
193
-
194
-
195
-
196
-
197
-
198
-
199
-
200
-
201
-
202
-
203
-
204
-
205
-
206
-
207
-
208
-
209
-
210
-
211
-
212
-
213
-
214
-
215
-
216
-
217
-
218
-
219
-
220
-
221
-
222
-
223
-
224
-
225
-
226
-
227
-
228
-
229
-
230
-
231
-
232
 |
 |
