Ricoh DD 6650P Operating Instructions - Page 192
When \, This indicates the paper is wrapped around the drum.
 |
View all Ricoh DD 6650P manuals
Add to My Manuals
Save this manual to your list of manuals |
Page 192 highlights
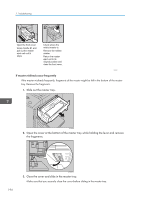
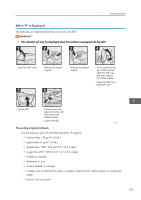
7. Troubleshooting TPEY080J • When printing onto postcards or thick paper, lower the printing speed to setting 1 or 2. For details, see page 73 "Changing the Printing Speed". When a multiple feed occurs or the paper comes out skewed, make sure that the paper feed side plates are properly adjusted. When you load paper in the paper feed tray, make sure that the paper edge touches the back fence and paper is placed on the proper paper size scale. Only use paper where the leading edge has two right angle corners. When "B" Is Displayed This indicates the paper is wrapped around the drum. When the master is wrapped around the drum ·Open the front cover. ·Lower drum unit lock lever B1. ·Pull out the drum unit handle B2 slowly. ·Lift the upper drum stay B3 a little to unlock the drum unit, and then pull out the drum unit while holding the drum unit handle B2 and the upper drum stay B3. ·While pressing the drum lock, grasp the edge of the master (the white area) and peel it off. ·Return the drum lock to its original position. ·Set the drum unit and close the front cover. CVU014 190
-
 1
1 -
2
-
3
-
4
-
5
-
6
-
7
-
8
-
9
-
10
-
11
-
12
-
13
-
14
-
15
-
16
-
17
-
18
-
19
-
20
-
21
-
22
-
23
-
24
-
25
-
26
-
27
-
28
-
29
-
30
-
31
-
32
-
33
-
34
-
35
-
36
-
37
-
38
-
39
-
40
-
41
-
42
-
43
-
44
-
45
-
46
-
47
-
48
-
49
-
50
-
51
-
52
-
53
-
54
-
55
-
56
-
57
-
58
-
59
-
60
-
61
-
62
-
63
-
64
-
65
-
66
-
67
-
68
-
69
-
70
-
71
-
72
-
73
-
74
-
75
-
76
-
77
-
78
-
79
-
80
-
81
-
82
-
83
-
84
-
85
-
86
-
87
-
88
-
89
-
90
-
91
-
92
-
93
-
94
-
95
-
96
-
97
-
98
-
99
-
100
-
101
-
102
-
103
-
104
-
105
-
106
-
107
-
108
-
109
-
110
-
111
-
112
-
113
-
114
-
115
-
116
-
117
-
118
-
119
-
120
-
121
-
122
-
123
-
124
-
125
-
126
-
127
-
128
-
129
-
130
-
131
-
132
-
133
-
134
-
135
-
136
-
137
-
138
-
139
-
140
-
141
-
142
-
143
-
144
-
145
-
146
-
147
-
148
-
149
-
150
-
151
-
152
-
153
-
154
-
155
-
156
-
157
-
158
-
159
-
160
-
161
-
162
-
163
-
164
-
165
-
166
-
167
-
168
-
169
-
170
-
171
-
172
-
173
-
174
-
175
-
176
-
177
-
178
-
179
-
180
-
181
-
182
-
183
-
184
-
185
-
186
-
 187
187 -
 188
188 -
 189
189 -
 190
190 -
 191
191 -
 192
192 -
 193
193 -
 194
194 -
 195
195 -
 196
196 -
 197
197 -
198
-
199
-
200
-
201
-
202
-
203
-
204
-
205
-
206
-
207
-
208
-
209
-
210
-
211
-
212
-
213
-
214
-
215
-
216
-
217
-
218
-
219
-
220
-
221
-
222
-
223
-
224
-
225
-
226
-
227
-
228
-
229
-
230
-
231
-
232
 |
 |
