Samsung CLP-650N User Manual (user Manual) (ver.1.03) (English) - Page 13
Installing the Toner Cartridges, open the toner cartridge packages. You could damage
 |
UPC - 635753721393
View all Samsung CLP-650N manuals
Add to My Manuals
Save this manual to your list of manuals |
Page 13 highlights
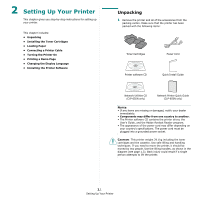
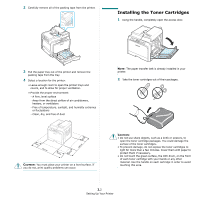
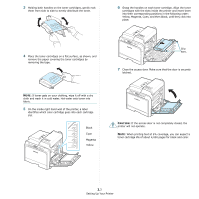
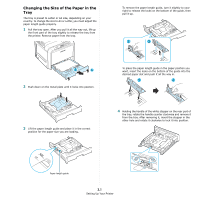
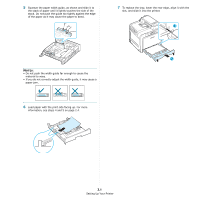
2 Carefully remove all of the packing tape from the printer. Installing the Toner Cartridges 1 Using the handle, completely open the access door. 3 Pull the paper tray out of the printer and remove the packing tape from the tray. 4 Select a location for the printer: • Leave enough room to open the printer trays and covers, and to allow for proper ventilation. • Provide the proper environment: - A firm, level surface - Away from the direct airflow of air conditioners, heaters, or ventilators - Free of temperature, sunlight, and humidity extremes or fluctuations - Clean, dry, and free of dust CAUTION: You must place your printer on a level surface. If you do not, print quality problems can occur. NOTE: The paper transfer belt is already installed in your printer. 2 Take the toner cartridges out of their packages. CAUTION: • Do not use sharp objects, such as a knife or scissors, to open the toner cartridge packages. You could damage the surface of the toner cartridges. • To prevent damage, do not expose the toner cartridges to light for more than a few minutes. Cover them with paper to protect them if necessary. • Do not touch the green surface, the OPC drum, on the front of each toner cartridge with your hands or any other material. Use the handle on each cartridge in order to avoid touching this area. 2.2 Setting Up Your Printer
-
 1
1 -
2
-
3
-
4
-
5
-
6
-
7
-
 8
8 -
 9
9 -
 10
10 -
 11
11 -
 12
12 -
 13
13 -
 14
14 -
 15
15 -
 16
16 -
 17
17 -
 18
18 -
19
-
20
-
21
-
22
-
23
-
24
-
25
-
26
-
27
-
28
-
29
-
30
-
31
-
32
-
33
-
34
-
35
-
36
-
37
-
38
-
39
-
40
-
41
-
42
-
43
-
44
-
45
-
46
-
47
-
48
-
49
-
50
-
51
-
52
-
53
-
54
-
55
-
56
-
57
-
58
-
59
-
60
-
61
-
62
-
63
-
64
-
65
-
66
-
67
-
68
-
69
-
70
-
71
-
72
-
73
-
74
-
75
-
76
-
77
-
78
-
79
-
80
-
81
-
82
-
83
-
84
-
85
-
86
-
87
-
88
-
89
-
90
-
91
-
92
-
93
-
94
-
95
-
96
-
97
-
98
-
99
-
100
-
101
-
102
-
103
-
104
-
105
-
106
-
107
-
108
-
109
-
110
-
111
-
112
-
113
-
114
-
115
-
116
-
117
 |
 |
