Samsung CLP-650N User Manual (user Manual) (ver.1.03) (English) - Page 18
Connecting a Printer Cable, For Local Printing - user guide
 |
UPC - 635753721393
View all Samsung CLP-650N manuals
Add to My Manuals
Save this manual to your list of manuals |
Page 18 highlights
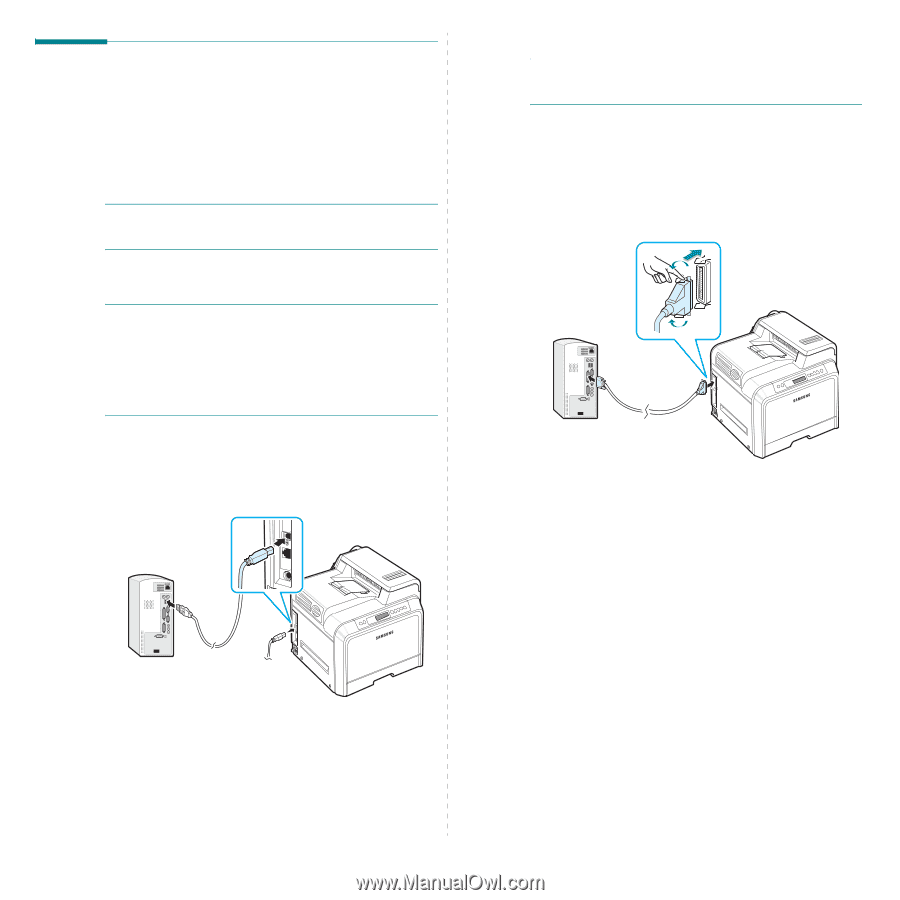
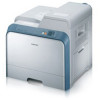
Connecting a Printer Cable For Local Printing To print from your computer in a local environment, you need to connect your printer to the computer with either a parallel interface cable or a Universal Serial Bus (USB) cable. If you are a Macintosh user, you can use only a USB cable. NOTES: You only need to connect one of cables mentioned above. Do not use the parallel and the USB cables at the same time. Using a USB Cable NOTES: • Connecting the printer to the USB port of the computer requires a certified USB cable. You will need to buy a USB 2.0 compliant cable that is 3m or less in length. • To print using the USB interface, you must run Windows 98SE/Me/2000/2003/XP or Macintosh with OS 8.6 ~ 9.2/ 10.1 ~ 10.4. 1 Make sure that both the printer and the computer are turned off. 2 Plug the USB cable into the connector on the left rear of the printer. Using a Parallel Cable NOTES: Connecting the printer to the parallel port of the computer requires a certified parallel cable. You will need to buy a IEEE1284 compliant cable that is 3m or less in length. 1 Make sure that both the printer and the computer are turned off. 2 Connect a parallel printer cable into the parallel port on the back of the printer. Push the metal clips down to fit inside the notches on the cable plug. 3 Connect the other end of the cable to the parallel interface port on your computer, and tighten the screws. See your computer's User's Guide, if you need help. 3 Connect the other end of the cable to the USB port on your computer. 2.7 Setting Up Your Printer
-
 1
1 -
2
-
3
-
4
-
5
-
6
-
7
-
8
-
9
-
10
-
11
-
12
-
 13
13 -
 14
14 -
 15
15 -
 16
16 -
 17
17 -
 18
18 -
 19
19 -
 20
20 -
 21
21 -
 22
22 -
 23
23 -
24
-
25
-
26
-
27
-
28
-
29
-
30
-
31
-
32
-
33
-
34
-
35
-
36
-
37
-
38
-
39
-
40
-
41
-
42
-
43
-
44
-
45
-
46
-
47
-
48
-
49
-
50
-
51
-
52
-
53
-
54
-
55
-
56
-
57
-
58
-
59
-
60
-
61
-
62
-
63
-
64
-
65
-
66
-
67
-
68
-
69
-
70
-
71
-
72
-
73
-
74
-
75
-
76
-
77
-
78
-
79
-
80
-
81
-
82
-
83
-
84
-
85
-
86
-
87
-
88
-
89
-
90
-
91
-
92
-
93
-
94
-
95
-
96
-
97
-
98
-
99
-
100
-
101
-
102
-
103
-
104
-
105
-
106
-
107
-
108
-
109
-
110
-
111
-
112
-
113
-
114
-
115
-
116
-
117
 |
 |