Samsung CLP-650N User Manual (user Manual) (ver.1.03) (English) - Page 72
Installing Printer Options, control board cover, power cord
 |
UPC - 635753721393
View all Samsung CLP-650N manuals
Add to My Manuals
Save this manual to your list of manuals |
Page 72 highlights
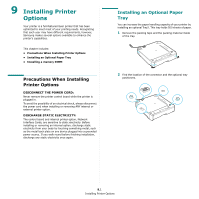
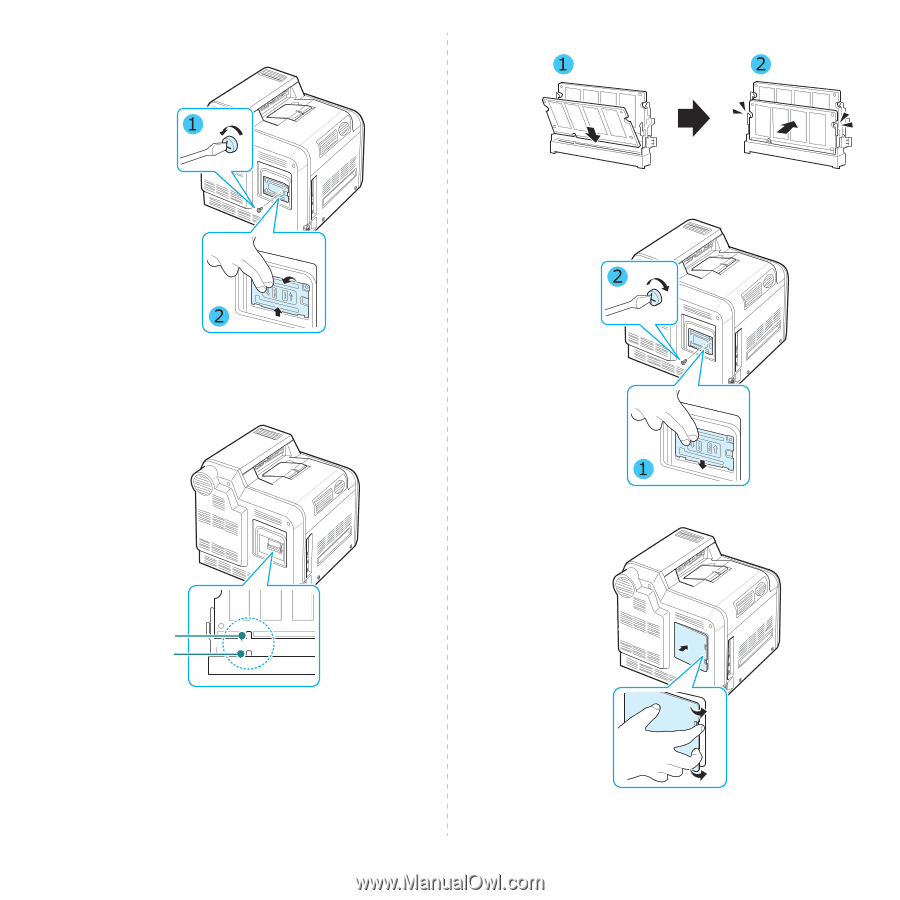
3 Remove the screw on the metal plate and then the metal plate by pusing it up. 6 Push the DIMM into the lower slot until it snaps into place. 7 Replace the metal plate and insert the screw into the hole, as shown below. Carefully tighten it. 4 Take out a new memory DIMM from its antistatic package. 5 Locate the memory DIMM slot, the lower slot, and align the notch on the memory DIMM with the groove at the memory DIMM slot by holding the memory DIMM edges. 8 Replace the control board cover. Notch Groove 9 Reconnect the power cord and printer cable, and turn the printer on. 9.3 Installing Printer Options
-
 1
1 -
2
-
3
-
4
-
5
-
6
-
7
-
8
-
9
-
10
-
11
-
12
-
13
-
14
-
15
-
16
-
17
-
18
-
19
-
20
-
21
-
22
-
23
-
24
-
25
-
26
-
27
-
28
-
29
-
30
-
31
-
32
-
33
-
34
-
35
-
36
-
37
-
38
-
39
-
40
-
41
-
42
-
43
-
44
-
45
-
46
-
47
-
48
-
49
-
50
-
51
-
52
-
53
-
54
-
55
-
56
-
57
-
58
-
59
-
60
-
61
-
62
-
63
-
64
-
65
-
66
-
 67
67 -
 68
68 -
 69
69 -
 70
70 -
 71
71 -
 72
72 -
 73
73 -
 74
74 -
 75
75 -
 76
76 -
 77
77 -
78
-
79
-
80
-
81
-
82
-
83
-
84
-
85
-
86
-
87
-
88
-
89
-
90
-
91
-
92
-
93
-
94
-
95
-
96
-
97
-
98
-
99
-
100
-
101
-
102
-
103
-
104
-
105
-
106
-
107
-
108
-
109
-
110
-
111
-
112
-
113
-
114
-
115
-
116
-
117
 |
 |
Installing Printer Options
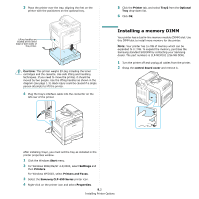
9.
3
3
Remove the screw on the metal plate and then the metal
plate by pusing it up.
4
Take out a new memory DIMM from its antistatic package.
5
Locate the memory DIMM slot, the lower slot, and align
the notch on the memory DIMM with the groove at the
memory DIMM slot by holding the memory DIMM edges.
Notch
Groove
6
Push the DIMM into the lower slot until it snaps into place.
7
Replace the metal plate and insert the screw into the hole,
as shown below. Carefully tighten it.
8
Replace the
control board cover
.
9
Reconnect the
power cord
and printer cable, and turn the
printer on.