Samsung CLP-650N User Manual (user Manual) (ver.1.03) (English) - Page 26
Layout Menu, Graphics Menu, Color Menu, Layout, Top Margin, Left Margin, Graphics, Explanation - toner cartridge
 |
UPC - 635753721393
View all Samsung CLP-650N manuals
Add to My Manuals
Save this manual to your list of manuals |
Page 26 highlights
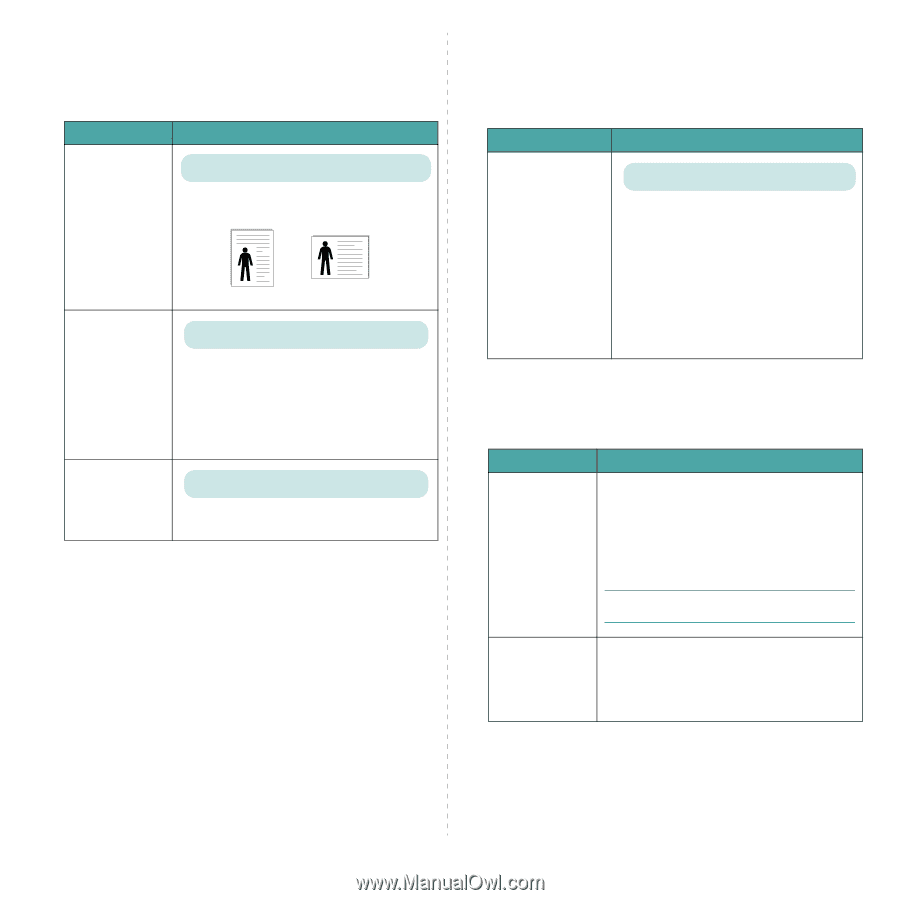
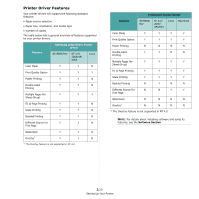
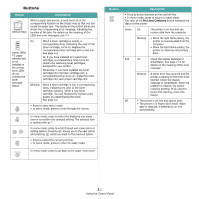
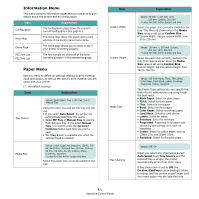
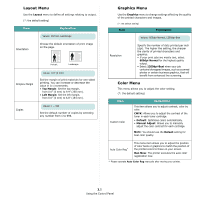
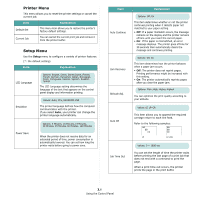
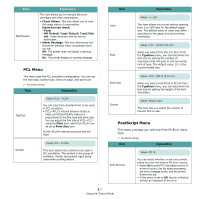
Layout Menu Use the Layout menu to define all settings relating to output. (*: the default setting) Item Explanation Values: Portrait, Landscape Orientation Choose the default orientation of print image on the page. Portrait Landscape Simplex Margin Values: 0.0" (0 mm) Set the margin of print materials for one-sided printing. You can increase or decrease the value in 0.1 increments. • Top Margin: Set the top margin, from 0.0" (0 mm) to 9.9" (250 mm). • Left Margin: Set the left margin, from 0.0" (0 mm) to 6.8" (164 mm). Copies Values: 1 ~ 999 Set the default number of copies by selecting any number from 1 to 999. Graphics Menu Use the Graphics menu to change settings affecting the quality of the printed characters and images. (*: the default setting) Item Explanation Values: 600dpi-Normal, 1200dpi-Best Resolution Specify the number of dots printed per inch (dpi). The higher the setting, the sharper the clarity of printed characters and graphics. • If your print jobs are mostly text, select 600dpi-Normal for the highest quality output. • Select 1200dpi-Best when your job contains bitmapped images, such as scanned photos or certain business graphics, that will benefit from enhanced line screening. Color Menu This menu allows you to adjust the color setting. (*: the default setting) Item Custom Color Explanation This item allows you to adjust contrast, color by color. CMYK: Allows you to adjust the contrast of the toner in each toner cartridge. • Default: Optimizes colors automatically. • Manual Adjust: Allows you to manually adjust the color contrast for each cartridge. NOTE: You should use the Default setting for best color quality. Auto Color Reg* This menu item allows you to adjust the position of color texts or graphics to match the position of the printed colors to those on your screen. Run Now: The printer executes the auto color registration now. * Please operate Auto Color Reg manually after moving your printer. 3.5 Using the Control Panel
-
 1
1 -
2
-
3
-
4
-
5
-
6
-
7
-
8
-
9
-
10
-
11
-
12
-
13
-
14
-
15
-
16
-
17
-
18
-
19
-
20
-
 21
21 -
 22
22 -
 23
23 -
 24
24 -
 25
25 -
 26
26 -
 27
27 -
 28
28 -
 29
29 -
 30
30 -
 31
31 -
32
-
33
-
34
-
35
-
36
-
37
-
38
-
39
-
40
-
41
-
42
-
43
-
44
-
45
-
46
-
47
-
48
-
49
-
50
-
51
-
52
-
53
-
54
-
55
-
56
-
57
-
58
-
59
-
60
-
61
-
62
-
63
-
64
-
65
-
66
-
67
-
68
-
69
-
70
-
71
-
72
-
73
-
74
-
75
-
76
-
77
-
78
-
79
-
80
-
81
-
82
-
83
-
84
-
85
-
86
-
87
-
88
-
89
-
90
-
91
-
92
-
93
-
94
-
95
-
96
-
97
-
98
-
99
-
100
-
101
-
102
-
103
-
104
-
105
-
106
-
107
-
108
-
109
-
110
-
111
-
112
-
113
-
114
-
115
-
116
-
117
 |
 |