Samsung CLP-650N User Manual (user Manual) (ver.1.03) (English) - Page 43
Push down until it clicks into place. Then lower the paper
 |
UPC - 635753721393
View all Samsung CLP-650N manuals
Add to My Manuals
Save this manual to your list of manuals |
Page 43 highlights
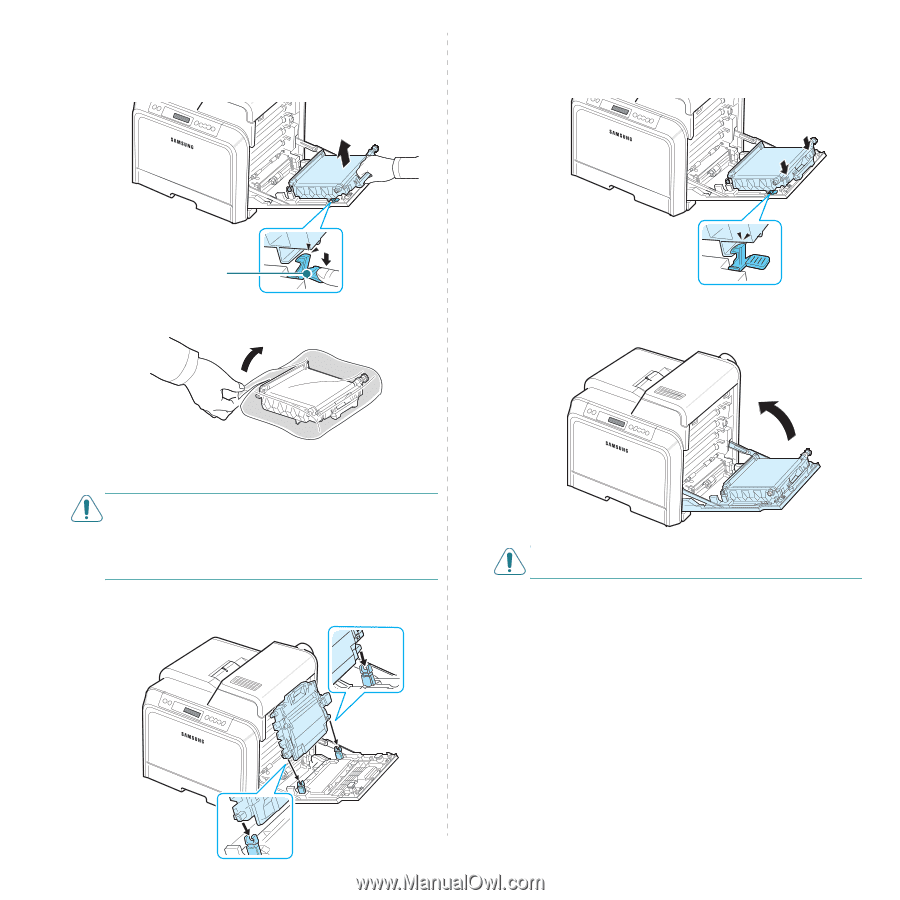
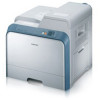
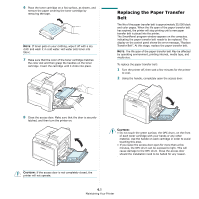
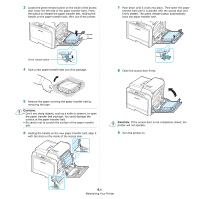
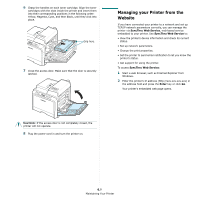
3 Locate the green release button on the inside of the access door (near the left side of the paper transfer belt). Press the button to release the paper transfer belt. Holding the handle on the paper transfer belt, lift it out of the printer. 7 Push down until it clicks into place. Then lower the paper transfer belt until it is parallel with the access door and firmly seated. The green release button automatically locks the paper transfer belt. Green release button 4 Take a new paper transfer belt out of its package. 8 Close the access door firmly. 5 Remove the paper covering the paper transfer belt by removing the tape. CAUTION: • Don't use sharp objects, such as a knife or scissors, to open the paper transfer belt package. You could damage the surface of the paper transfer belt. • Be careful not to scratch the surface of the paper transfer belt. 6 Holding the handle on the new paper transfer belt, align it with the slots on the inside of the access door. CAUTION: If the access door is not completely closed, the printer will not operate. 9 Turn the printer on. 6.6 Maintaining Your Printer
-
 1
1 -
2
-
3
-
4
-
5
-
6
-
7
-
8
-
9
-
10
-
11
-
12
-
13
-
14
-
15
-
16
-
17
-
18
-
19
-
20
-
21
-
22
-
23
-
24
-
25
-
26
-
27
-
28
-
29
-
30
-
31
-
32
-
33
-
34
-
35
-
36
-
37
-
 38
38 -
 39
39 -
 40
40 -
 41
41 -
 42
42 -
 43
43 -
 44
44 -
 45
45 -
 46
46 -
 47
47 -
 48
48 -
49
-
50
-
51
-
52
-
53
-
54
-
55
-
56
-
57
-
58
-
59
-
60
-
61
-
62
-
63
-
64
-
65
-
66
-
67
-
68
-
69
-
70
-
71
-
72
-
73
-
74
-
75
-
76
-
77
-
78
-
79
-
80
-
81
-
82
-
83
-
84
-
85
-
86
-
87
-
88
-
89
-
90
-
91
-
92
-
93
-
94
-
95
-
96
-
97
-
98
-
99
-
100
-
101
-
102
-
103
-
104
-
105
-
106
-
107
-
108
-
109
-
110
-
111
-
112
-
113
-
114
-
115
-
116
-
117
 |
 |