Samsung CLP-650N User Manual (user Manual) (ver.1.03) (English) - Page 44
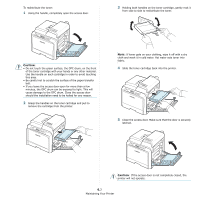
Replacing the Fuser Unit, Using a copper coin or a screwdriver, remove the two
 |
UPC - 635753721393
View all Samsung CLP-650N manuals
Add to My Manuals
Save this manual to your list of manuals |
Page 44 highlights
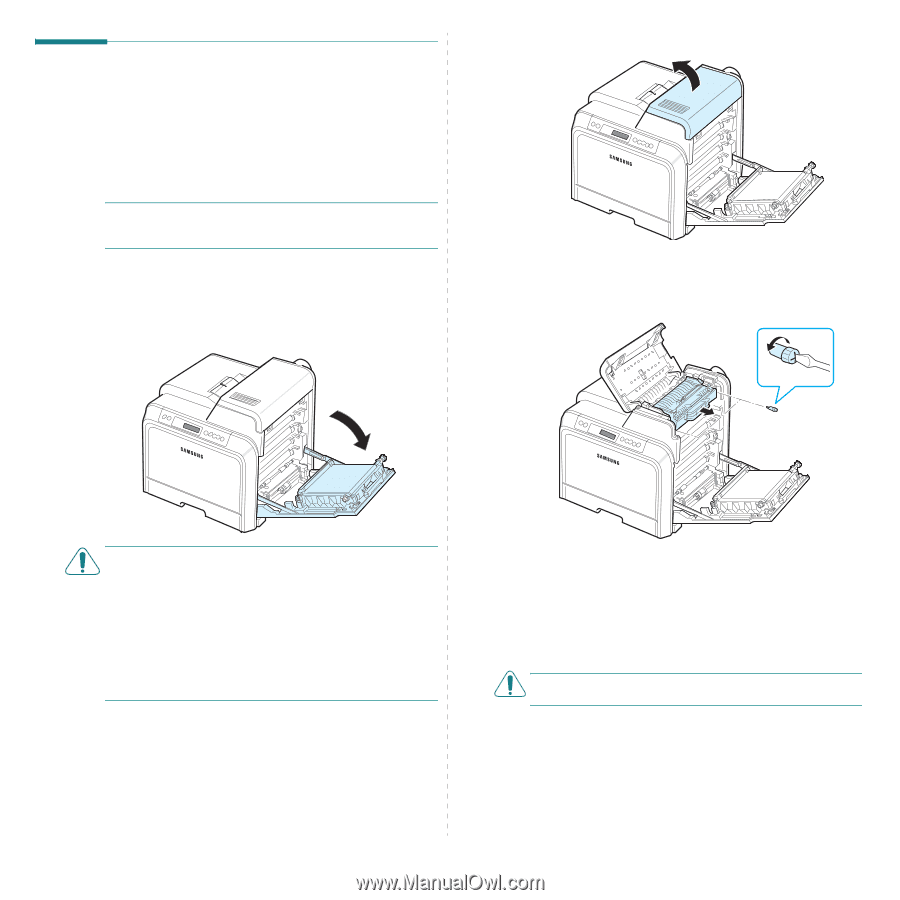
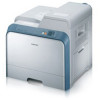
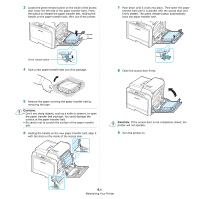
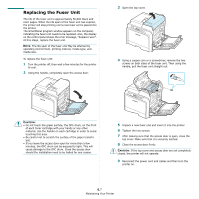
Replacing the Fuser Unit The life of the fuser unit is approximately 50,000 black and color pages. When the life span of the fuser unit has expired, the printer will stop printing until a new fuser unit is placed into the printer. The SmartPanel program window appears on the computer, indicating the fuser unit needs to be replaced. Also, the display on the control panel shows the error message, "Replace Fuser". At this stage, replace the fuser unit. NOTE: The life span of the fuser unit May be affected by operating environment, printing interval, media type, and media size. To replace the fuser unit: 1 Turn the printer off, then wait a few minutes for the printer to cool. 2 Using the handle, completely open the access door. 3 Open the top cover. 4 Using a copper coin or a screwdriver, remove the two screws on both sides of the fuser unit. Then using the handle, pull the fuser unit straight out. CAUTION: • Do not touch the green surface, the OPC drum, on the front of each toner cartridge with your hands or any other material. Use the handle on each cartridge in order to avoid touching this area. • Be careful not to scratch the surface of the paper transfer belt. • If you leave the access door open for more than a few minutes, the OPC drum can be exposed to light. This will cause damage to the OPC drum. Close the access door should the installation need to be halted for any reason. 5 Unpack a new fuser unit and insert it into the printer. 6 Tighten the two screws. 7 After making sure that the access door is open, close the top cover. Make sure that it is securely latched. 8 Close the access door firmly. CAUTION: If the top cover and access door are not completely closed, the printer will not operate. 9 Reconnect the power cord and cables and then turn the printer on. 6.7 Maintaining Your Printer
-
 1
1 -
2
-
3
-
4
-
5
-
6
-
7
-
8
-
9
-
10
-
11
-
12
-
13
-
14
-
15
-
16
-
17
-
18
-
19
-
20
-
21
-
22
-
23
-
24
-
25
-
26
-
27
-
28
-
29
-
30
-
31
-
32
-
33
-
34
-
35
-
36
-
37
-
38
-
 39
39 -
 40
40 -
 41
41 -
 42
42 -
 43
43 -
 44
44 -
 45
45 -
 46
46 -
 47
47 -
 48
48 -
 49
49 -
50
-
51
-
52
-
53
-
54
-
55
-
56
-
57
-
58
-
59
-
60
-
61
-
62
-
63
-
64
-
65
-
66
-
67
-
68
-
69
-
70
-
71
-
72
-
73
-
74
-
75
-
76
-
77
-
78
-
79
-
80
-
81
-
82
-
83
-
84
-
85
-
86
-
87
-
88
-
89
-
90
-
91
-
92
-
93
-
94
-
95
-
96
-
97
-
98
-
99
-
100
-
101
-
102
-
103
-
104
-
105
-
106
-
107
-
108
-
109
-
110
-
111
-
112
-
113
-
114
-
115
-
116
-
117
 |
 |