Samsung Galaxy S8 Active User Manual - Page 77
Contacts
 |
View all Samsung Galaxy S8 Active manuals
Add to My Manuals
Save this manual to your list of manuals |
Page 77 highlights
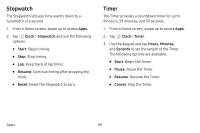
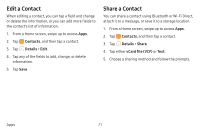
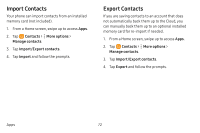
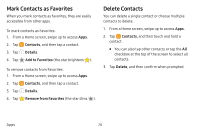
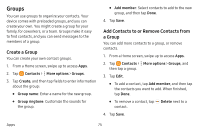
Contacts Store and manage your contacts with the Contacts app, which can be synchronized with a variety of your existing personal accounts. For more information on connecting with and managing your accounts through your device, see "Add an Account" on page 189. Note: The Contacts app is different from the Contacts tab in the Phone app. Although both list the contacts in your phone and accounts, the available options and functions are different. Add a Contact Use the following procedure to add a new contact. 1. From a Home screen, swipe up to access Apps. 2. Tap Contacts > Create contact, and then tap contact fields to enter information. • Choose a storage account for the contact. You can store the contact on the device or sync it with an account. • Tap Contact photo to assign a picture to the new contact. • Enter a name and other contact information. - Tap Add field to enter additional entries. - Tap Remove field to remove an entry. - Tap View more for additional fields. - Tap the label to the right of an entry to choose a label for the field (for example, Home or Work). • Tap Scan business card to import contact information from a business card through the device's camera. 3. Tap Save. Apps 70
-
 1
1 -
2
-
3
-
4
-
5
-
6
-
7
-
8
-
9
-
10
-
11
-
12
-
13
-
14
-
15
-
16
-
17
-
18
-
19
-
20
-
21
-
22
-
23
-
24
-
25
-
26
-
27
-
28
-
29
-
30
-
31
-
32
-
33
-
34
-
35
-
36
-
37
-
38
-
39
-
40
-
41
-
42
-
43
-
44
-
45
-
46
-
47
-
48
-
49
-
50
-
51
-
52
-
53
-
54
-
55
-
56
-
57
-
58
-
59
-
60
-
61
-
62
-
63
-
64
-
65
-
66
-
67
-
68
-
69
-
70
-
71
-
 72
72 -
 73
73 -
 74
74 -
 75
75 -
 76
76 -
 77
77 -
 78
78 -
 79
79 -
 80
80 -
 81
81 -
 82
82 -
83
-
84
-
85
-
86
-
87
-
88
-
89
-
90
-
91
-
92
-
93
-
94
-
95
-
96
-
97
-
98
-
99
-
100
-
101
-
102
-
103
-
104
-
105
-
106
-
107
-
108
-
109
-
110
-
111
-
112
-
113
-
114
-
115
-
116
-
117
-
118
-
119
-
120
-
121
-
122
-
123
-
124
-
125
-
126
-
127
-
128
-
129
-
130
-
131
-
132
-
133
-
134
-
135
-
136
-
137
-
138
-
139
-
140
-
141
-
142
-
143
-
144
-
145
-
146
-
147
-
148
-
149
-
150
-
151
-
152
-
153
-
154
-
155
-
156
-
157
-
158
-
159
-
160
-
161
-
162
-
163
-
164
-
165
-
166
-
167
-
168
-
169
-
170
-
171
-
172
-
173
-
174
-
175
-
176
-
177
-
178
-
179
-
180
-
181
-
182
-
183
-
184
-
185
-
186
-
187
-
188
-
189
-
190
-
191
-
192
-
193
-
194
-
195
-
196
-
197
-
198
-
199
-
200
-
201
-
202
-
203
-
204
-
205
-
206
-
207
-
208
-
209
-
210
-
211
-
212
-
213
-
214
-
215
-
216
-
217
-
218
 |
 |