Samsung NP-Q310I User Manual Vista Ver.1.5 (English) - Page 178
The Registration Complete window appears., Start
 |
View all Samsung NP-Q310I manuals
Add to My Manuals
Save this manual to your list of manuals |
Page 178 highlights
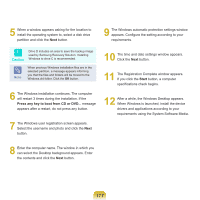
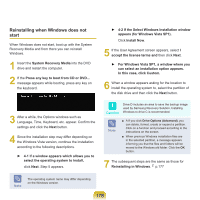
5 When a window appears asking for the location to install the operating system to, select a disk drive partition and click the Next button. 9 The Windows automatic protection settings window appears. Configure the setting according to your requirements. Caution Drive D includes an area to save the backup image used by Samsung Recovery Solution. Installing Windows to drive C is recommended. Note When previous Windows installation files are in the selected partition, a message appears informing you that the files and folders will be moved to the Windows.old folder. Click the OK button. 6 The Windows installation continues. The computer will restart 3 times during the installation. If the Press any key to boot from CD or DVD... message appears after a restart, do not press any button. 7 The Windows user registration screen appears. Select the username and photo and click the Next button. 10 The time and date settings window appears. Click the Next button. 11 The Registration Complete window appears. If you click the Start button, a computer specifications check begins. 12 After a while, the Windows Desktop appears. When Windows is launched, install the device drivers and applications according to your requirements using the System Software Media. 8 Enter the computer name. The window in which you can select the Desktop background appears. Enter the contents and click the Next button. 177
-
 1
1 -
2
-
3
-
4
-
5
-
6
-
7
-
8
-
9
-
10
-
11
-
12
-
13
-
14
-
15
-
16
-
17
-
18
-
19
-
20
-
21
-
22
-
23
-
24
-
25
-
26
-
27
-
28
-
29
-
30
-
31
-
32
-
33
-
34
-
35
-
36
-
37
-
38
-
39
-
40
-
41
-
42
-
43
-
44
-
45
-
46
-
47
-
48
-
49
-
50
-
51
-
52
-
53
-
54
-
55
-
56
-
57
-
58
-
59
-
60
-
61
-
62
-
63
-
64
-
65
-
66
-
67
-
68
-
69
-
70
-
71
-
72
-
73
-
74
-
75
-
76
-
77
-
78
-
79
-
80
-
81
-
82
-
83
-
84
-
85
-
86
-
87
-
88
-
89
-
90
-
91
-
92
-
93
-
94
-
95
-
96
-
97
-
98
-
99
-
100
-
101
-
102
-
103
-
104
-
105
-
106
-
107
-
108
-
109
-
110
-
111
-
112
-
113
-
114
-
115
-
116
-
117
-
118
-
119
-
120
-
121
-
122
-
123
-
124
-
125
-
126
-
127
-
128
-
129
-
130
-
131
-
132
-
133
-
134
-
135
-
136
-
137
-
138
-
139
-
140
-
141
-
142
-
143
-
144
-
145
-
146
-
147
-
148
-
149
-
150
-
151
-
152
-
153
-
154
-
155
-
156
-
157
-
158
-
159
-
160
-
161
-
162
-
163
-
164
-
165
-
166
-
167
-
168
-
169
-
170
-
171
-
172
-
 173
173 -
 174
174 -
 175
175 -
 176
176 -
 177
177 -
 178
178 -
 179
179 -
 180
180 -
 181
181 -
 182
182 -
 183
183 -
184
-
185
-
186
-
187
-
188
-
189
-
190
-
191
-
192
-
193
-
194
-
195
-
196
-
197
-
198
-
199
-
200
-
201
-
202
-
203
-
204
-
205
 |
 |