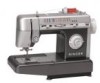
Singer CG-590 Commercial Grade Instruction Manual 2 - Page 20
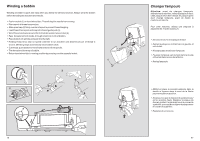
Winding a bobbin
 |
View all Singer CG-590 Commercial Grade manuals
Add to My Manuals
Save this manual to your list of manuals |
Page 20 highlights
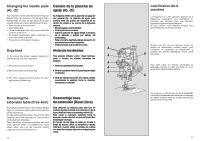
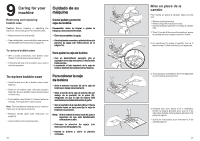
Winding a bobbin Winding a bobbin is quick and easy when you follow the directions below. Always wind the bobbin before threading the machine and needle. • Push in indent (1) on hand wheel disc. This will stop the needle from moving. • Place spool of thread on spool pin. • Slide spool cap (2) firmly over rim of spool to prevent thread tangling. • Lead thread from spool and snap into thread guide post (3). • Wind thread clockwise around front of bobbin winder tension disc (4). • Pass thread end, from inside, through small hole in rim of bobbin. • Place bobbin on spindle and push it to the right. • Holding thread end, step on speed controller to run machine until desired amount of thread is wound. (Winding stops automatically once bobbin is full). • Cut thread; push bobbin to the left and remove it from spindle. • Trim thread end from top of bobbin. • Return hand wheel disc to sewing position by pressing on side opposite indent. 1 3 1 2 4 18 Changer l'ampoule Attention: avant de changer l'ampoule, débranchez la machine, retirez la plaque de face; cette plaque devra être remise en plaque après avoir changé l'ampoule, avant de mettre la machine en marche. Pour cette machine, utilisez une ampoule à bayonette de 15 watts maximum. • Dévissez la vis (1) de la plaque de face. • Retirez la plaque en la tirant vers la gauche et vers le bas. • N'essayez pas de dévisser l'ampoule. • Poussez l'ampoule vers le haut dans la douille et tournez dans le sens de la flèche. • Retirez l'ampoule. • Mettez en place la nouvelle ampoule dans la douille et tournez dans le sens de la flèche pour verrouiller en position. • Assurez-vous que le releveur du peid presseur est en position haute. Replacez la plaque de face en guidant l'angle avant sous le couvercle supérieur: poussez pour aligner la plaque avec le couvercle supérieur. • Replacez et serrez la vis. 67
-
 1
1 -
2
-
3
-
4
-
5
-
6
-
7
-
8
-
9
-
10
-
11
-
12
-
13
-
14
-
 15
15 -
 16
16 -
 17
17 -
 18
18 -
 19
19 -
 20
20 -
 21
21 -
 22
22 -
 23
23 -
 24
24 -
 25
25 -
26
-
27
-
28
-
29
-
30
-
31
-
32
-
33
-
34
-
35
-
36
-
37
-
38
-
39
-
40
-
41
-
42
-
43
-
44
 |
 |
