Singer CG-590 Commercial Grade Instruction Manual 2 - Page 30
Boutonnière, étapes
 |
View all Singer CG-590 Commercial Grade manuals
Add to My Manuals
Save this manual to your list of manuals |
Page 30 highlights
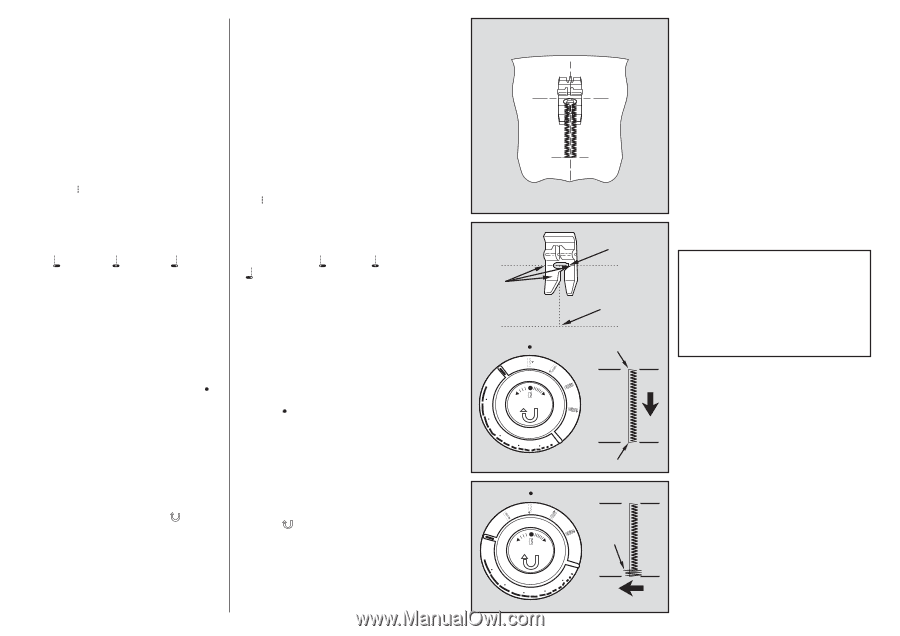
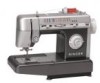
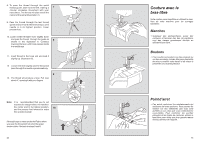
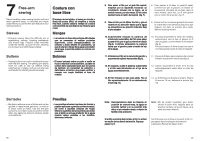
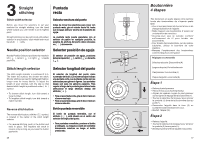
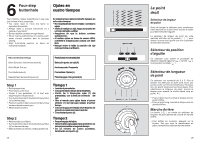
3 Straight stitching Puntada recta Stitch width selector Selector anchura del punto Before you move the selectors to set your machine for straight stiching, turn the hand wheel toward you until needle is at its highest point. Straight stitching can be performed with pattern selector in any position; stitch width lever must be set at ( ) only. Antes de mover los selectores para coser con puntada recta, gire el volante hacia Vd. hasta que la aguja esté por encima de la plancha de aguja. La puntada recta puede ejecutarse con el selector de patrón en cualquier posición, la palanca de anchura del punto debe colocarse en ( ) únicamente. Needle position selector Selector posición de aguja Needle Position Selector positions the needle in left ( ), center ( ) or right ( ) needle positions. El selector de posición de aguja, posiciona ésta a la izquierda ( ), centro ( ), o derecha ( ). Stitch length selector Selector longitud del punto The stitch length indicator is numbered 0 to 5. The lower the number, the shorter the stitch. Shorter stitches are best for lightweight fabrics; longer ones for heavy fabrics. To adjust the length of your stitches, turn the dial so that desired stitch length is positioned under ( ) symbol. • To shorten stitch length, turn dial toward a lower number. • To lengthen stitch length, turn dial toward a higher number. El selector de longitud del punto viene numerado del 0 al 5. Los números bajos indican una puntada corta. Las puntadas cortas son las adecuadas para géneros ligeros. Las puntadas largas son para los géneros pesados. Para regular el largo de la puntada gire el disco hasta seleccionar el largo deseado debajo del símbolo ( ). • Para una puntada corta, gire el disco hacia un número mas bajo. • Para una puntada larga, gire el disco hacia un número más alto. Reverse stitch button The reverse stitch button, with the ( ) symbol, is located in the center of the stitch length selector. • For reverse stitching, push in the button and hold in place. The machine will stitch in reverse only as long as you keep the button pushed in. Botón puntada reversible El botón de puntada reversible, con el símbolo ( ), está situado en el centro del selector de longitud del punto. • Para puntadas reversibles, presione el botón y reténgalo. La máquina coserá en reversible únicamente mientras se tenga el botón presionado. 28 5 4 5 3 3 4 2 1 2 1 3 2 1 2 3 4 0 2 1 3 2 1 3 4 4 0 Boutonnière 4 étapes Très facilement en quatre étapes votre machine brode des boutonnières de n'importe quelle taille. • Vous n'avez pas besoin de tourner le tissu ni de changer la position de l'aiguille. • Faites toujours une boutonnière d´essais sur un échantillon de votre tissu. • Assurez-vous que la canette contient suffisamment de fil pour broder vos boutonnières. • Pour broder des boutonnières sur des pièces tubulaires, utilisez le bras-libre de votre machine. • Marquez l'emplacement des boutonnières comme indiqué sur votre patron. Réglages recommandés Sélecteur de point: Boutonnière (A) Largeur de point: Pré-sélectionnée Pied presseur: boutonnière (L) Plaque à aiguille: universelle (A) Étape 1 • Relevez le pied presseur. • Placez le tissu sous le pied presseur. • Alignez les repères rouges du pied presseur sur les lignes de traçage de la boutonnière (1). • Tournez le sélecteur de longueur pour amener le symbole (1) lèvre de la boutonnière face au point (•). • Descendez l'aiguille dans le tissu (2) en tournant le volant à la main vers vous. • Brodez l´étape 1(3). Étape 2 • Relevez l'aiguille. • Tournez le sélecteur de longueur pour amener le symbole (2) face au point (•). • Brodez le point d'arrêt (4) (quatre à six points). 57
-
 1
1 -
2
-
3
-
4
-
5
-
6
-
7
-
8
-
9
-
10
-
11
-
12
-
13
-
14
-
15
-
16
-
17
-
18
-
19
-
20
-
21
-
22
-
23
-
24
-
 25
25 -
 26
26 -
 27
27 -
 28
28 -
 29
29 -
 30
30 -
 31
31 -
 32
32 -
 33
33 -
 34
34 -
 35
35 -
36
-
37
-
38
-
39
-
40
-
41
-
42
-
43
-
44
 |
 |