Singer CG-590 Commercial Grade Instruction Manual 2 - Page 29
Step 3, Step 4, Balancing the buttonhole, Tiempo 3, Tiempo 4, Nivelación de ojales
 |
View all Singer CG-590 Commercial Grade manuals
Add to My Manuals
Save this manual to your list of manuals |
Page 29 highlights
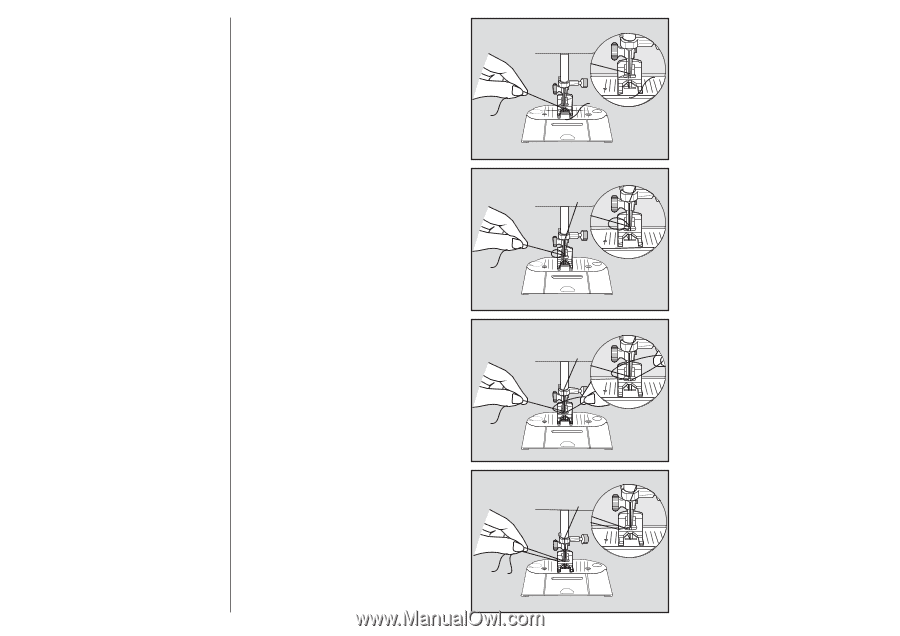
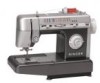
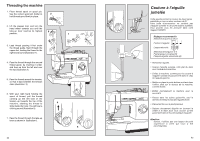
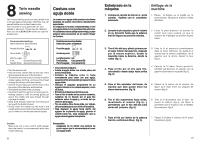
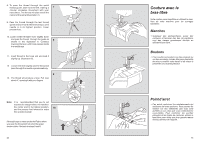
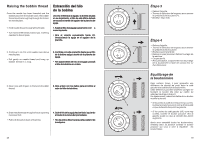
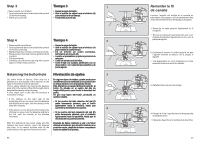
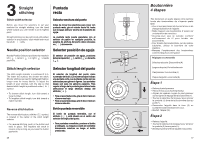
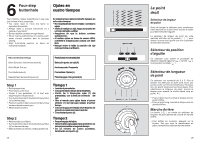
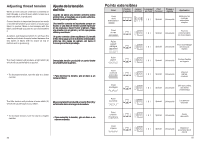
Step 3 Tiempo 3 1 • Raise needle out of fabric. • Turn buttonhole dial to the buttonhole symbol (3) for the third step. • Stitch up to point (5). • Saque la aguja del tejido. • Gire el mando de ojales hacia el símbolo (3) para realizar el tercer tiempo. • Cosa hasta el punto (5). Step 4 Tiempo 4 2 • Raise needle out of fabric. • Turn buttonhole dial to the buttonhole symbol (4) for the fourth step. • Make at least four stitches, ending at point (6). • Raise presser foot and remove garment from machine. • Clip thread ends. • Carefully cut buttonhole opening with a seam ripper or small, sharp scissors. • Saque la aguja del tejido. • Gire el mando de ojales hacia el símbolo (4) para realizar el cuarto tiempo. • De un mínimo de cuatro puntadas, terminando en el punto (6). • Levante el prensatelas y quite la prenda de la máquina. • Corte los extremos de los hilos. • Corte el ojal con cuidado, abriéndolo con un descosedor o con unas tijeras pequeñas y de punta aguda. Balancing the buttonhole Nivelación de ojales 3 On some kinds of fabrics, there may be a En algunos tipos de tejidos, puede producirse difference in the density of the stitches on the una diferencia en la densidad de los puntos bien right or the left side of the buttonhole. en el lado derecho o en el izquierdo del ojal. This is easily adjusted by turning the balance Esta diferencia se ajusta fácilmente girando el knob (1), in the center of the stitch length dial to botón (1) situado en el centro del dial de balance the density of the stitching. longitud del punto, para nivelar la densidad del A very slight turn of the dial will produce a punto. noticeable change. Un giro muy ligero del botón, producirá un cambio notable. • If the stitches on the right side of the buttonhole ( I ) are too open, turn the balance • Si los puntos del lado derecho del ojal (I) dial slightly to the right, until the density of the están demasiado abiertos, gire el botón stitches increases. ligeramente hacia la derecha, hasta que aumente la densidad de los puntos. 4 • If the stitches on the left side of the buttonhole ( II ) are too open, turn the balance slightly to • Si los puntos del lado izquierdo del ojal (II) the left, until the density of the stitches están demasiado abiertos, gire el nivelador increases. ligeramente hacia la izquierda, hasta que la densidad de los puntos aumente. After the buttonhole has been made and the balance has been altered, return the balance dial back to its neutral position after all the buttonholes on the garment have been sewn. Después de haber realizado el ojal y de haber alterado el nivelador, gire el botón nivelador a su posición neutra, después de haber completado todos los ojales de la prenda. 58 Remonter le fil de canette Lorsque l'aiguille est enfilée et la canette en place dans son support, le fil de canette doit être remonté à traveers le trou de la plaque à aiguille. 1. Tenez de la main gauche légèrement le fil d'aiguille. • Tournez le volant à la main lentement vers vous et faites descendre l'aiguille dans le trou de la plaque à aiguille. 2. Continuez à tourner le volant jusqu'à ce que l'aiguille remonte au-dessus de la plaque à aiguille. • Tire légèrement sur le fil d'aiguille pour faire remonter la bouche du fil de canette. 3. Défaites la boucle avec les doigts. 4. Passez le fil de l'aiguille dans la fente gauche du pied presseur. • Placez les deux fils vers l'arrière de la machine. 27
-
 1
1 -
2
-
3
-
4
-
5
-
6
-
7
-
8
-
9
-
10
-
11
-
12
-
13
-
14
-
15
-
16
-
17
-
18
-
19
-
20
-
21
-
22
-
23
-
 24
24 -
 25
25 -
 26
26 -
 27
27 -
 28
28 -
 29
29 -
 30
30 -
 31
31 -
 32
32 -
 33
33 -
 34
34 -
35
-
36
-
37
-
38
-
39
-
40
-
41
-
42
-
43
-
44
 |
 |