Singer CG-590 Commercial Grade Instruction Manual 2 - Page 36

Flexi-stitch patterns

Page 36 highlights

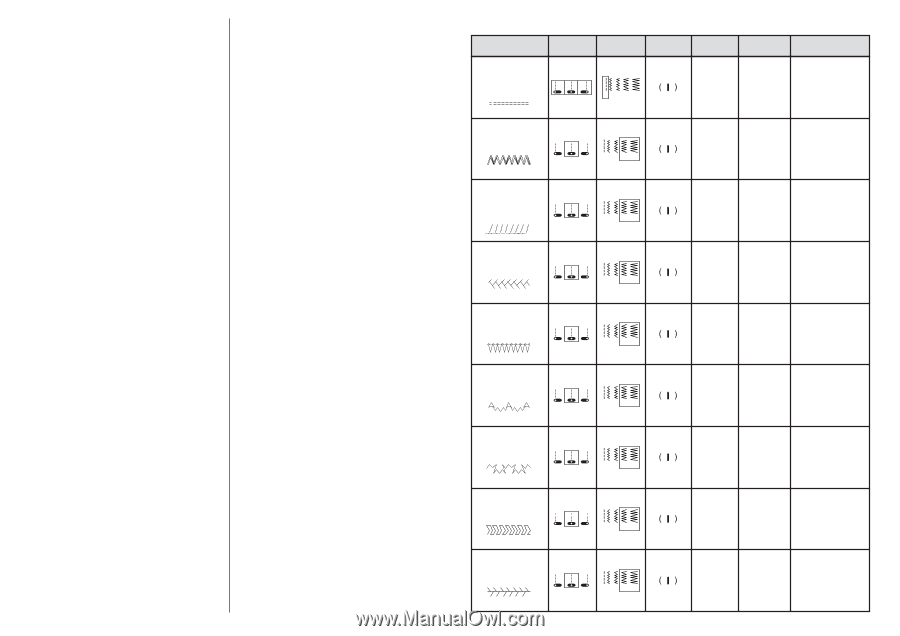
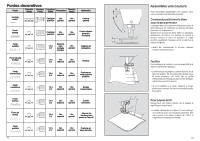
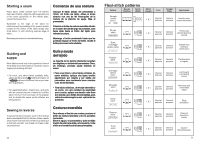
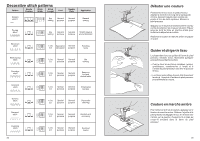
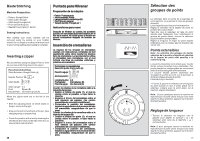
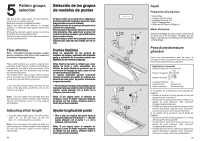
Starting a seam Place fabric under presser foot 1/2"(12mm) from rear of fabric. Align the right edge with one of the seam guidelines on the needle plate. Lower the presser foot. Backstitch to the edge of the fabric for reinforcement by pushing in the reverse button located in the center of the stitch length dial. Hold button in until stitching reaches edge of fabric. Release push button for forward stitching. Comienzo de una costura Coloque el tejido debajo del prensatelas a 12mm. del fondo del tejido. Alínee el borde derecho con una de las líneas-guías de la costura de la plancha de aguja. Baje el prensatelas. Pulsando el botón de costura reversible situado en el centro del dial de largo de puntadas, cosa hacia atrás hasta el fondo del tejido para reforzar la costura. Mantenga el botón presionado hasta que las puntadas lleguen al fondo del tejido. Suelte el botón para coser hacia adelante. Guiding and suppo Most fabrics need only to be guided in front of the presser foot. Some fabrics, however, require support while being stitched. • For tricot, and other similar synthetic knits, nts apply gentle tension by holding the fabric at extensi the front and back of presser foot as you sew. Do not pull fabric. • For elasticized fabric, stretch lace, and knits with an unusual amount of elasticity, hold the fabric firmily in front and back of the presser foot to stretch the seam as the stitches are being placed. Guía y ayuda del tejido La mayoría de los tejidos sólamente necesitan ser dirigidos por delante del prensatelas. Otros, sin embargo, precisan ayuda mientras se cosen. • Para coser tricot y otros tejidos similares de punto sintético, aplique una ligera tensión agarrándolo por delante y por detrás del prensatelas para mantenerlo tenso mientras cose. No tire del tejido. • Para tejidos elásticos, de encaje extensible y de punto, con una cantidad de elasticidad poco común, aplique una tensión más firme por delante y por detrás del prensatelas, para estirar la costura según se van aplicando las puntadas. Sewing in reverse To secure the end of a seam, push in the reverse button and backstitch 3-4 stitches. Raise needle and presser foot and remove fabric by drawing it to the back and left. Cut thread on thread cutter on presser bar. Costura reversible Para reforzar el final de una costura, presione el botón de costura reversible y de 3-4 puntadas hacia atrás. Eleve la aguja y el prensatelas y quite el tejido tirando de este hacia atrás y a la izquierda. Corte el hilo en el cortahilos de la barra prensatelas. 34 Flexi-stitch patterns Pattern Needle Position Stitch Width Straight stretch stitch 1 12 3 4 5 Stitch Lenght Foot Special purpose Needle Plate Application General Ideal for plain purpose seams that stretch Ric-rac stitch Slant overedge stitch (left) Feather stitch Overedge stretch stitch Mountain stitch Crown stitch 12 3 4 5 12 3 4 5 12 3 4 5 12 3 4 5 12 3 4 5 12 3 4 5 Special purpose General purpose Heavy-duty general purpose sewing Special purpose General purpose Sweater and swimsuit construction Special purpose General purpose Flexible seam in lingerie Special purpose General purpose Joining and overcasting seams Special purpose General purpose Hemming and ornamental edges Special purpose General purpose Edge decoration Chevron stitch Thorn stitch 12 3 4 5 12 3 4 5 Special purpose General purpose Classical decorative seams Special purpose General purpose Ideal for flat-butted seam 51

  • 1
  • 2
  • 3
  • 4
  • 5
  • 6
  • 7
  • 8
  • 9
  • 10
  • 11
  • 12
  • 13
  • 14
  • 15
  • 16
  • 17
  • 18
  • 19
  • 20
  • 21
  • 22
  • 23
  • 24
  • 25
  • 26
  • 27
  • 28
  • 29
  • 30
  • 31
  • 32
  • 33
  • 34
  • 35
  • 36
  • 37
  • 38
  • 39
  • 40
  • 41
  • 42
  • 43
  • 44

Thorn
stitch
Chevron
stitch
Crown
stitch
Mountain
stitch
Overedge
stretch
stitch
Feather
stitch
Slant
overedge
stitch (left)
Ric-rac
stitch
Straight
stretch
stitch 1
51
Flexi-stitch patterns
3
4
5
12
Needle
Position
Stitch
Width
Stitch
Lenght
Pattern
Needle
Plate
Foot
Application
3
4
5
12
3
4
5
12
3
4
5
12
3
4
5
12
3
4
5
12
3
4
5
12
3
4
5
12
3
4
5
12
General
purpose
General
purpose
General
purpose
Special
purpose
Special
purpose
Special
purpose
Special
purpose
General
purpose
Special
purpose
General
purpose
Special
purpose
General
purpose
Special
purpose
General
purpose
Special
purpose
General
purpose
Special
purpose
General
purpose
Ideal for plain
seams that stretch
Heavy-duty
general purpose
sewing
Sweater and
swimsuit
construction
Flexible seam
in lingerie
Joining and
overcasting
seams
Hemming and
ornamental
edges
Edge
decoration
Classical
decorative
seams
Ideal for
flat-butted seam
34
Starting a seam
Guiding and
suppo
nts
extensi
Place fabric under presser foot 1/2”(12mm)
from rear of fabric. Align the right edge with one
of the seam guidelines on the needle plate.
Lower the presser foot.
Backstitch
to
the
edge
of
the
fabric
for
reinforcement by pushing in the reverse button
located in the center of the stitch length dial.
Hold button in until stitching reaches edge of
fabric.
Release push button for forward stitching.
Most fabrics need only to be guided in front of
the presser foot. Some fabrics, however, require
support while being stitched.
• For tricot, and other similar synthetic knits,
apply gentle tension by holding the fabric at
the front and back of presser foot as you sew.
Do not pull fabric.
• For elasticized fabric, stretch lace, and knits
with an unusual amount of elasticity, hold the
fabric firmily in front and back of the presser
foot to stretch the seam as the stitches are
being placed.
Sewing in reverse
To secure the end of a seam, push in the reverse
button and backstitch 3-4 stitches. Raise needle
and presser foot and remove fabric by drawing it
to the back and left. Cut thread on thread cutter
on presser bar.
Comienzo de una costura
Guía y ayuda
del tejido
Coloque el tejido debajo del prensatelas a
12mm. del fondo del tejido. Alínee el borde
derecho con una de las líneas-guías de la
costura
de
la
plancha
de
aguja.
Baje
el
prensatelas.
Pulsando el botón de costura reversible situado
en el centro del dial de largo de puntadas, cosa
hacia atrás hasta el fondo del tejido para
reforzar la costura.
Mantenga el botón presionado hasta que las
puntadas lleguen al fondo del tejido. Suelte el
botón para coser hacia adelante.
La mayoría de los tejidos sólamente necesitan
ser dirigidos por delante del prensatelas. Otros,
sin
embargo,
precisan
ayuda
mientras
se
cosen.
• Para coser tricot y otros tejidos similares de
punto sintético, aplique una ligera tensión
agarrándolo por delante y por detrás del
prensatelas para mantenerlo tenso mientras
cose. No tire del tejido.
• Para tejidos elásticos, de encaje extensible y
de punto, con una cantidad de elasticidad
poco común, aplique una tensión más firme
por delante y por detrás del prensatelas, para
estirar la costura según se van aplicando las
puntadas.
Costura reversible
Para reforzar el final de una costura, presione el
botón de costura reversible y de 3-4 puntadas
hacia atrás.
Eleve la aguja y el prensatelas y quite el tejido
tirando de este hacia atrás y a la izquierda. Corte
el hilo en el cortahilos de la barra prensatelas.
Comienzo
de
una
costura
Guía y ayuda
del tejido
Costura reversible
Coloque el tejido debajo del prensatelas a
12mm. del fondo del tejido. Alínee el borde
derecho con una de las líneas-guías de la
costura
de
la
plancha
de
aguja.
Baje
el
prensatelas.
Pulsando el botón de costura reversible situado
en el centro del dial de largo de puntadas, cosa
hacia atrás hasta el fondo del tejido para
reforzar la costura.
Mantenga el botón presionado hasta que las
puntadas lleguen al fondo del tejido. Suelte el
botón para coser hacia adelante.
La mayoría de los tejidos sólamente necesitan
ser dirigidos por delante del prensatelas. Otros,
sin
embargo,
precisan
ayuda
mientras
se
cosen.
• Para coser tricot y otros tejidos similares de
punto sintético, aplique una ligera tensión
agarrándolo por delante y por detrás del
prensatelas para mantenerlo tenso mientras
cose. No tire del tejido.
• Para tejidos elásticos, de encaje extensible y
de punto, con una cantidad de elasticidad
poco común, aplique una tensión más firme
por delante y por detrás del prensatelas, para
estirar la costura según se van aplicando las
puntadas.
Para reforzar el final de una costura, presione el
botón de costura reversible y de 3-4 puntadas
hacia atrás.
Eleve la aguja y el prensatelas y quite el tejido
tirando de este hacia atrás y a la izquierda. Corte
el hilo en el cortahilos de la barra prensatelas.