Sony DPPFP67 Operating Instructions - Page 27
Making a Calendar
 |
UPC - 027242766822
View all Sony DPPFP67 manuals
Add to My Manuals
Save this manual to your list of manuals |
Page 27 highlights
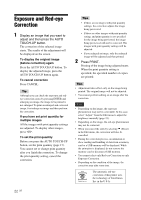
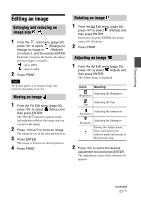
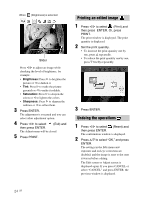
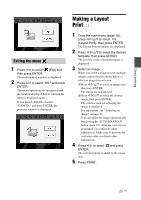
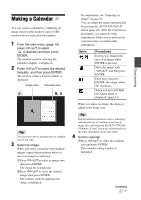
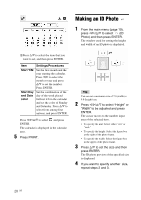
Making a Calendar You can create a calendar by combining an image stored on the memory card or USB memory device and a desired template. 1 From the main menu (page 19), press g/G/f/F to select (Calendar) and then press ENTER. The window used for selecting the calendar template, is displayed. 2 Press g/G/f/F to select the desired template, and then press ENTER. The preview of the selected template is displayed. Image area Calendar area Tip You can select and set an image area or calendar area in any order. 3 Select an image. When you select a template with multiple images, repeat the procedures below to select an image for each area. 1Press g/G/f/F to select an image area, then press ENTER. The image list is displayed. 2Press g/G/f/F to select the desired image, then press ENTER. The window used for adjusting the image is displayed. For adjustment, see "Adjusting an image" on page 23. You can adjust the image automatically by pressing the AUTO TOUCH-UP button (page 22). After the correction is performed, you cannot do other adjustments. Make sure to perform the correction after you finish other adjustments. Items / Procedures Increases or reduces the size of an image when ENTER is pressed. Move the image with g/G/f/F, and then press ENTER. Each time you press ENTER, the image rotates 90° clockwise. When you press ENTER, the Adjust menu is displayed. (page 23) When you adjust an image, the image is added to the image area. Tip Perform editorial operations such as enlarging, reducing the size of, rotating, or moving an image first, and then push the AUTO TOUCHUP button. If Auto Touch-up is performed first, the other adjustments do not take effect. 4 Set the calendar. 1Press g/G/f/F to select the calendar area and press ENTER. The calendar setting window is displayed. Continued 27 GB Direct printing
-
 1
1 -
2
-
3
-
4
-
5
-
6
-
7
-
8
-
9
-
10
-
11
-
12
-
13
-
14
-
15
-
16
-
17
-
18
-
19
-
20
-
21
-
 22
22 -
 23
23 -
 24
24 -
 25
25 -
 26
26 -
 27
27 -
 28
28 -
 29
29 -
 30
30 -
 31
31 -
 32
32 -
33
-
34
-
35
-
36
-
37
-
38
-
39
-
40
-
41
-
42
-
43
-
44
-
45
-
46
-
47
-
48
-
49
-
50
-
51
-
52
-
53
-
54
-
55
-
56
-
57
-
58
-
59
-
60
-
61
-
62
-
63
-
64
-
65
-
66
-
67
-
68
-
69
-
70
-
71
-
72
 |
 |