Sony DPPFP67 Operating Instructions - Page 45
Registering a browsing folder, To change the browsing folder
 |
UPC - 027242766822
View all Sony DPPFP67 manuals
Add to My Manuals
Save this manual to your list of manuals |
Page 45 highlights
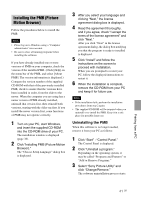
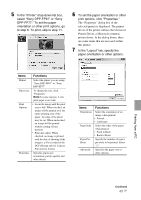
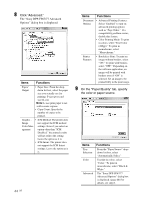
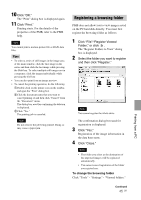
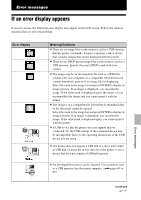
10 Click "OK." The "Print" dialog box is displayed again. 11 Click "Print." Printing starts. For the details of the properties of the PMB, refer to the PMB help. Note You cannot print a motion-picture file or RAW data files. Tips • To select a series of still images in the image area of the main window, click the first image in the series and then click the last image while pressing the Shift key. To select multiple still images not in a sequence, click the images individually while pressing the Ctrl key. • You can also print from an image preview. • To cancel the printing operation, do the following. 1Double-click on the printer icon on the taskbar, and open the "Print" dialog box. 2Click the document name that you want to cancel printing of and then click "Cancel" from the "Document" menu. The dialog box used for confirming the deletion is displayed. 3Click "Yes." The printing job is canceled. Note Do not remove the job being printed. Doing so may cause a paper jam. Registering a browsing folder PMB does not allow you to view images saved on the PC hard disk directly. You must first register the browsing folder as follows: 1 Click "File"-"Register Viewed Folder," or click . The "Register Folders to View" dialog box is displayed. 2 Select the folder you want to register and then click "Register." Note You cannot register the whole drive. The confirmation dialog box used for registration is displayed. 3 Click "Yes." Registration of the image information in the data base starts. 4 Click "Close." Notes • The folder you select as the destination of the imported images will be registered automatically. • You cannot cancel registration of the folder you register here. To change the browsing folder Click "Tools" - "Settings" - "Viewed folders." Printing from a PC Continued 45 GB
-
 1
1 -
2
-
3
-
4
-
5
-
6
-
7
-
8
-
9
-
10
-
11
-
12
-
13
-
14
-
15
-
16
-
17
-
18
-
19
-
20
-
21
-
22
-
23
-
24
-
25
-
26
-
27
-
28
-
29
-
30
-
31
-
32
-
33
-
34
-
35
-
36
-
37
-
38
-
39
-
 40
40 -
 41
41 -
 42
42 -
 43
43 -
 44
44 -
 45
45 -
 46
46 -
 47
47 -
 48
48 -
 49
49 -
 50
50 -
51
-
52
-
53
-
54
-
55
-
56
-
57
-
58
-
59
-
60
-
61
-
62
-
63
-
64
-
65
-
66
-
67
-
68
-
69
-
70
-
71
-
72
 |
 |