Sony DPPFP67 Operating Instructions - Page 56
Connecting with a digital camera or other external device, The PictBridge
 |
UPC - 027242766822
View all Sony DPPFP67 manuals
Add to My Manuals
Save this manual to your list of manuals |
Page 56 highlights
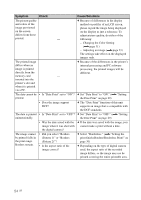
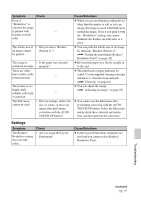
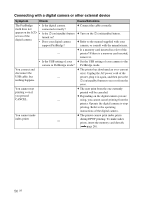
Connecting with a digital camera or other external device Symptom Check Cause/Solutions The PictBridge mark does not appear on the LCD screen of the digital camera. • Is the digital camera connected correctly? • Is the 1 (on/standby) button turned on? • Does your digital camera support PictBridge? c Connect the cable correctly. c Turn on the 1 (on/standby) button. c Refer to the manual supplied with your camera, or consult with the manufacturer. c Is a memory card inserted in a slot of the - printer? If there is a memory card inserted, remove it. • Is the USB setting of your c Set the USB setting of your camera to the camera in PictBridge mode? PictBridge mode. You connect and disconnect the USB cable, but nothing happens. c The printer has developed an over-current error. Unplug the AC power cord of the - printer, plug it in again, and then press the 1 (on/standby) button to recover from the error. You cannot stop printing even if you pressed CANCEL. c The next print from the one currently printed will be canceled. c Depending on the digital camera you are - using, you cannot cancel printing from the printer. Operate the digital camera to stop printing. Refer to the operating instructions of the digital camera. You cannot make index prints c The printer cannot print index prints during DPOF printing. To make index - prints, insert the memory card directly (.page 26). 56 GB
-
 1
1 -
2
-
3
-
4
-
5
-
6
-
7
-
8
-
9
-
10
-
11
-
12
-
13
-
14
-
15
-
16
-
17
-
18
-
19
-
20
-
21
-
22
-
23
-
24
-
25
-
26
-
27
-
28
-
29
-
30
-
31
-
32
-
33
-
34
-
35
-
36
-
37
-
38
-
39
-
40
-
41
-
42
-
43
-
44
-
45
-
46
-
47
-
48
-
49
-
50
-
 51
51 -
 52
52 -
 53
53 -
 54
54 -
 55
55 -
 56
56 -
 57
57 -
 58
58 -
 59
59 -
 60
60 -
 61
61 -
62
-
63
-
64
-
65
-
66
-
67
-
68
-
69
-
70
-
71
-
72
 |
 |