Sony DPPFP67 Operating Instructions - Page 55
Settings
 |
UPC - 027242766822
View all Sony DPPFP67 manuals
Add to My Manuals
Save this manual to your list of manuals |
Page 55 highlights
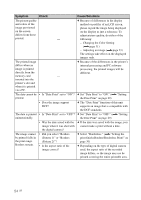
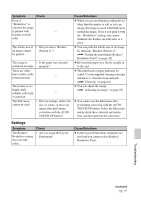
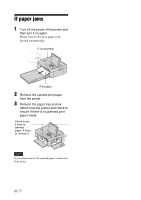
Symptom Check Even if "Borderless" is selected, the image is printed with - borders on both sides. The whole area of • Did you select "Borders an image cannot (Pattern 1)"? be printed. The image is • Is the paper tray inserted printed at an angle. properly? There are white lines or dots on the printed pictures. - The picture is too bright, dark, reddish, yellowish, - or greenish. The Edit menu cannot be used. • Did you enlarge, reduce the size of, rotate, or move an image after performing correction with the AUTO TOUCH-UP button? Cause/Solutions c When you use an editing/recording device other than the printer to edit or save an image, the image is saved with blank areas around the image. Even if you print it with the "Borderless" setting, you cannot eliminate the borders on both sides of a print. c You can print the whole area of an image by selecting "Borders (Pattern 1)." (."Setting the print finish (Borders/ Borderless Print)" on page 30) c Re-insert the paper tray firmly straight in to the end. c The print head or paper path may be soiled. Use the supplied cleaning cartridge and sheet to clean the head and path. (."Cleaning" on page 61) c You can adjust the image. (."Adjusting an image" on page 23) c You cannot use the Edit menu after performing correction with the AUTO TOUCH-UP button. Select the Edit menu and perform these editorial operations first, and then perform the correction. Settings Symptom The Borders/ Borderless setting does not take effect. Check • Are you using the Layout Print menu? Cause/Solutions c In the Layout Print menu, templates are used and you cannot select Borders/ Borderless Print. Troubleshooting Continued 55 GB
-
 1
1 -
2
-
3
-
4
-
5
-
6
-
7
-
8
-
9
-
10
-
11
-
12
-
13
-
14
-
15
-
16
-
17
-
18
-
19
-
20
-
21
-
22
-
23
-
24
-
25
-
26
-
27
-
28
-
29
-
30
-
31
-
32
-
33
-
34
-
35
-
36
-
37
-
38
-
39
-
40
-
41
-
42
-
43
-
44
-
45
-
46
-
47
-
48
-
49
-
 50
50 -
 51
51 -
 52
52 -
 53
53 -
 54
54 -
 55
55 -
 56
56 -
 57
57 -
 58
58 -
 59
59 -
 60
60 -
61
-
62
-
63
-
64
-
65
-
66
-
67
-
68
-
69
-
70
-
71
-
72
 |
 |
