Sony DPPFP67 Operating Instructions - Page 29
Changing the settings, Setting the Date Print
 |
UPC - 027242766822
View all Sony DPPFP67 manuals
Add to My Manuals
Save this manual to your list of manuals |
Page 29 highlights
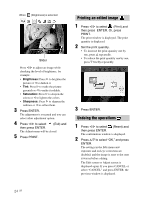
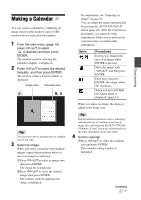
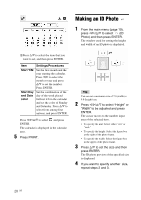
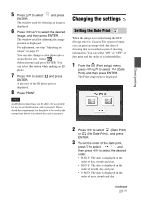
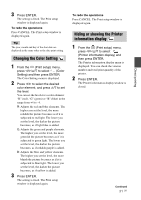
5 Press f/F to select and press ENTER. The window used for selecting an image is displayed. 6 Press g/G/f/F to select the desired image, and then press ENTER. The window used for adjusting the image position is displayed. For adjustment, see step "Adjusting an image" on page 23. You can also change a color photo into a monochrome one. Select (Monochrome) and press ENTER. You can select this option while making an ID photo. 7 Press g/G to select and press ENTER. A preview of the ID photo print is displayed. 8 Press PRINT. Note An ID photo printed may not be able to be acceptable for use in an identification card or passport. Please check the requirements for the photo to be used in the instructions before you submit the card or passport. Changing the settings Setting the Date Print When the image is recorded using the DCF (Design rule for Camera File system) format, you can print an image with the date of shooting that is recorded as part of shooting information. You can select "ON" or "OFF" of date print and the order of year/month/day. 1 From the (Print setup) menu, press g/G/f/F to select (Date Print) and then press ENTER. The Print setup menu is displayed. Direct printing 2 Press g/G to select (Date Print) or (No Date Print) , and press ENTER. 3 To set the order of the date print, press F to select , and then press g/G to select the desired order: • D-M-Y: The date is displayed in the order of day, month and year. • M-D-Y: The date is displayed in the order of month, day and year. • Y-M-D: The date is displayed in the order of year, month and day. Continued 29 GB
-
 1
1 -
2
-
3
-
4
-
5
-
6
-
7
-
8
-
9
-
10
-
11
-
12
-
13
-
14
-
15
-
16
-
17
-
18
-
19
-
20
-
21
-
22
-
23
-
 24
24 -
 25
25 -
 26
26 -
 27
27 -
 28
28 -
 29
29 -
 30
30 -
 31
31 -
 32
32 -
 33
33 -
 34
34 -
35
-
36
-
37
-
38
-
39
-
40
-
41
-
42
-
43
-
44
-
45
-
46
-
47
-
48
-
49
-
50
-
51
-
52
-
53
-
54
-
55
-
56
-
57
-
58
-
59
-
60
-
61
-
62
-
63
-
64
-
65
-
66
-
67
-
68
-
69
-
70
-
71
-
72
 |
 |