Sony XBR-55A9G User Manual - Page 41
Note, Connecting a camera or camcorder and viewing stored content, To connect a camera or camcorder
 |
View all Sony XBR-55A9G manuals
Add to My Manuals
Save this manual to your list of manuals |
Page 41 highlights
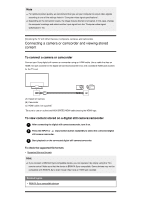
Note For optimum picture quality, we recommend that you set your computer to output video signals according to one of the settings listed in "Computer video signal specifications". Depending on the connection status, the image may be blurred or smeared. In this case, change the computer's settings and select another input signal from the "Computer video signal specifications" list. [55] Using the TV with Other Devices | Computers, cameras, and camcorders Connecting a camera or camcorder and viewing stored content To connect a camera or camcorder Connect your Sony digital still camera or camcorder using an HDMI cable. Use a cable that has an HDMI mini jack (socket) for the digital still camera/camcorder end, and a standard HDMI jack (socket) for the TV end. (A) (B) (C) (A) Digital still camera (B) Camcorder (C) HDMI cable (not supplied)* * Be sure to use an authorized HIGH SPEED HDMI cable bearing the HDMI logo. To view content stored on a digital still camera/camcorder 1 After connecting the digital still camera/camcorder, turn it on. 2 Press the INPUT or (Input select) button repeatedly to select the connected digital still camera/camcorder. 3 Start playback on the connected digital still camera/camcorder. To check the supported file formats Supported files and formats Hint If you connect a BRAVIA Sync-compatible device, you can operate it by simply using the TV's remote control. Make sure that the device is BRAVIA Sync-compatible. Some devices may not be compatible with BRAVIA Sync even though they have an HDMI jack (socket). Related topics BRAVIA Sync-compatible devices
-
 1
1 -
2
-
3
-
4
-
5
-
6
-
7
-
8
-
9
-
10
-
11
-
12
-
13
-
14
-
15
-
16
-
17
-
18
-
19
-
20
-
21
-
22
-
23
-
24
-
25
-
26
-
27
-
28
-
29
-
30
-
31
-
32
-
33
-
34
-
35
-
 36
36 -
 37
37 -
 38
38 -
 39
39 -
 40
40 -
 41
41 -
 42
42 -
 43
43 -
 44
44 -
 45
45 -
 46
46 -
47
-
48
-
49
-
50
-
51
-
52
-
53
-
54
-
55
-
56
-
57
-
58
-
59
-
60
-
61
-
62
-
63
-
64
-
65
-
66
-
67
-
68
-
69
-
70
-
71
-
72
-
73
-
74
-
75
-
76
-
77
-
78
-
79
-
80
-
81
-
82
-
83
-
84
-
85
-
86
-
87
-
88
-
89
 |
 |
