Sony XBR-55A9G User Manual - Page 45
Digital optical cable connection, Hint, Related topics, Adjusting an audio system
 |
View all Sony XBR-55A9G manuals
Add to My Manuals
Save this manual to your list of manuals |
Page 45 highlights
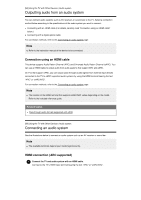
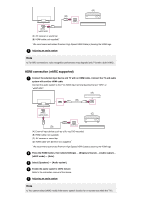
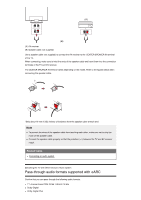
accessibility features is enabled. If audio is being output from an eARC supported device while you are watching HDMI input, the TV operates as follows. Audio from system sounds and audio responses is not output. The voice recognition performance of the built-in MIC may degrade (only TVs with a built-in MIC). Digital optical cable connection 1 Connect the TV and audio system with a digital optical cable. Connect to the audio system's digital optical input terminal. (A) (B) (A) AV receiver or Sound bar (B) Optical audio cable (not supplied) 2 Adjusting an audio system Hint For more information, please visit the Sony support website. Support Site Related topics No sound but good picture. No audio or low audio with a home theater system. [60] Using the TV with Other Devices | Audio system Adjusting an audio system After connecting an audio system to the TV, adjust the TV's audio output from the audio system. Adjusting an audio system connected with an HDMI cable or digital optical cable 1 After connecting the TV to your audio system, press the HOME button, then select [Settings] - [Display & Sound] - [Audio output] - [Speakers] - [Audio system]. 2 Turn on the connected audio system, then adjust the volume. If you connect a BRAVIA Sync-compatible device with an HDMI connection, you can operate it by simply using the TV's remote control. Note You need to configure the [Digital audio out] settings according to your audio system. Press the HOME button, then select [Settings] - [Display & Sound] - [Audio output] - [Digital audio out]. If the audio system is not compatible with Dolby Digital or DTS, set [Settings] - [Display &
-
 1
1 -
2
-
3
-
4
-
5
-
6
-
7
-
8
-
9
-
10
-
11
-
12
-
13
-
14
-
15
-
16
-
17
-
18
-
19
-
20
-
21
-
22
-
23
-
24
-
25
-
26
-
27
-
28
-
29
-
30
-
31
-
32
-
33
-
34
-
35
-
36
-
37
-
38
-
39
-
 40
40 -
 41
41 -
 42
42 -
 43
43 -
 44
44 -
 45
45 -
 46
46 -
 47
47 -
 48
48 -
 49
49 -
 50
50 -
51
-
52
-
53
-
54
-
55
-
56
-
57
-
58
-
59
-
60
-
61
-
62
-
63
-
64
-
65
-
66
-
67
-
68
-
69
-
70
-
71
-
72
-
73
-
74
-
75
-
76
-
77
-
78
-
79
-
80
-
81
-
82
-
83
-
84
-
85
-
86
-
87
-
88
-
89
 |
 |
