TP-Link TD-W8950N TD-W8950N V1 User Guide 1910010940 - Page 27
TD-W8950N, 4.1.2 ETH Interface, Advanced Setup, Layer2 Interface, ETH Interface, ETH port, Save/
 |
View all TP-Link TD-W8950N manuals
Add to My Manuals
Save this manual to your list of manuals |
Page 27 highlights
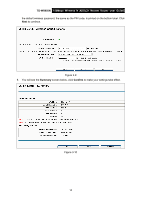
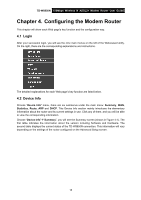
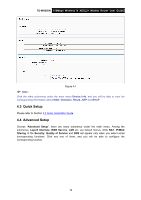
TD-W8950N 150Mbps Wireless N ADSL2+ Modem Router User Guide service, the Quality of Service menu will be added to the Web-based Utility, the detailed configuration will be described in 4.4.8 Quality of Service. 4.4.1.2 ETH Interface Choose "Advanced Setup""Layer2 InterfaceETH Interface", you can configure ETH WAN interfaces on the screen below. Figure 4-4 Note: To make sure the ETH port available, you should first choose "Advanced Setup""LAN Ports" to enable the Virtual LAN Ports feature. Add: Click the Add button, and you can add a new interface in the next screen. Figure 4-5 ETH port: Select an ETH port to configure as the WAN port. Click Save/Apply to save your settings and then you will see the screen similar to Figure 4-6. Figure 4-6 Remove: Select the check box in the table on the screen above and then click the Remove button, the corresponding interface will be deleted in the table. Note: One ETH is allowed to configure as the layer 2 WAN Interface. 19
-
 1
1 -
2
-
3
-
4
-
5
-
6
-
7
-
8
-
9
-
10
-
11
-
12
-
13
-
14
-
15
-
16
-
17
-
18
-
19
-
20
-
21
-
 22
22 -
 23
23 -
 24
24 -
 25
25 -
 26
26 -
 27
27 -
 28
28 -
 29
29 -
 30
30 -
 31
31 -
 32
32 -
33
-
34
-
35
-
36
-
37
-
38
-
39
-
40
-
41
-
42
-
43
-
44
-
45
-
46
-
47
-
48
-
49
-
50
-
51
-
52
-
53
-
54
-
55
-
56
-
57
-
58
-
59
-
60
-
61
-
62
-
63
-
64
-
65
-
66
-
67
-
68
-
69
-
70
-
71
-
72
-
73
-
74
-
75
-
76
-
77
-
78
-
79
-
80
-
81
-
82
-
83
-
84
-
85
-
86
-
87
-
88
-
89
-
90
-
91
-
92
-
93
-
94
-
95
-
96
-
97
-
98
-
99
-
100
-
101
-
102
-
103
-
104
-
105
-
106
-
107
-
108
-
109
-
110
-
111
-
112
-
113
-
114
-
115
-
116
 |
 |
