TP-Link TD-W8950N TD-W8950N V1 User Guide 1910010940 - Page 89
MAC Filter
 |
View all TP-Link TD-W8950N manuals
Add to My Manuals
Save this manual to your list of manuals |
Page 89 highlights
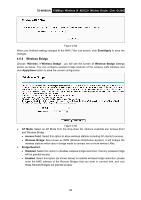
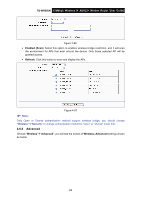
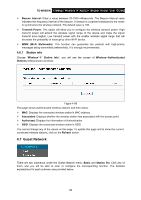
TD-W8950N 150Mbps Wireless N ADSL2+ Modem Router User Guide Note: The time you set is the period you need the wireless off. Before configure the wireless schedule, please set system time first which refer to 4.9.5 Internet Time, then you can enable or disable Wireless Schedule. Apply To: Select the day or days you need the wireless off. Start Time, End Time: You can select all day-24 hours or you may enter the Start Time and End Time in the corresponding field. Add: Click this button to add your selected time to the below table. Click the Clear Schedule button to clear your settings in the table. Click Save to complete the settings. 4.6.4 MAC Filter Choose "Wireless""MAC Filter", you will see the screen of Wireless--MAC Filter settings shown as below. Figure 4-93 Wireless access can be filtered by using the MAC addresses of the wireless devices transmitting within your network's RADIUS. To filter wireless users by MAC Address, either permitting or blocking access. If you do not wish to filter users by MAC Address, select Disabled. Disabled: Select this option to disable MAC Filter function. Allow: Select this option to enable MAC Filter function that allow wireless access by the devices listed on this screen. Deny: Select this option to enable MAC Filter function that block wireless access from the devices listed on this screen. Add: Click this button to add the MAC Address. Remove: Select the item of the MAC Address and click this button to remove it. When you click the Add button, the pop-up picture shown below, and then you can type the MAC Address in the MAC Address field. Note: The form of MAC Address must be "xx:xx:xx:xx:xx:xx", like "00:13:0A:55:FF:09". 81
-
 1
1 -
2
-
3
-
4
-
5
-
6
-
7
-
8
-
9
-
10
-
11
-
12
-
13
-
14
-
15
-
16
-
17
-
18
-
19
-
20
-
21
-
22
-
23
-
24
-
25
-
26
-
27
-
28
-
29
-
30
-
31
-
32
-
33
-
34
-
35
-
36
-
37
-
38
-
39
-
40
-
41
-
42
-
43
-
44
-
45
-
46
-
47
-
48
-
49
-
50
-
51
-
52
-
53
-
54
-
55
-
56
-
57
-
58
-
59
-
60
-
61
-
62
-
63
-
64
-
65
-
66
-
67
-
68
-
69
-
70
-
71
-
72
-
73
-
74
-
75
-
76
-
77
-
78
-
79
-
80
-
81
-
82
-
83
-
 84
84 -
 85
85 -
 86
86 -
 87
87 -
 88
88 -
 89
89 -
 90
90 -
 91
91 -
 92
92 -
 93
93 -
 94
94 -
95
-
96
-
97
-
98
-
99
-
100
-
101
-
102
-
103
-
104
-
105
-
106
-
107
-
108
-
109
-
110
-
111
-
112
-
113
-
114
-
115
-
116
 |
 |
